HP iPAQ 512 HP iPAQ 500 Voice Messenger Series - Product Guide - Page 12
Bottom Panel Components, Left and Right Side Components
 |
View all HP iPAQ 512 manuals
Add to My Manuals
Save this manual to your list of manuals |
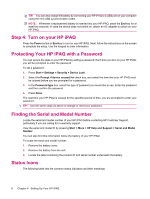
Page 12 highlights
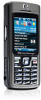
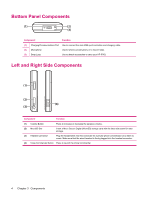
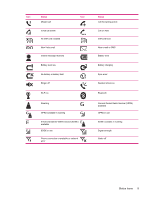
Bottom Panel Components Component Function (1) Charging/Communications Port Use to connect the mini-USB synchronization and charging cable. (2) Microphone Use for phone conversations or to record notes. (3) Strap Loop Use to attach accessories to carry your HP iPAQ. Left and Right Side Components Component Function (1) Volume Button Press to increase or decrease the earpiece volume. (2) MicroSD Slot Insert a Micro Secure Digital (MicroSD) storage card with the label side down for data storage. (3) Headset Connector Plug the headphones into this connector for a private phone conversation or to listen to music. Make sure that the wired headset is firmly plugged into the headset connector. (4) Voice Commander Button Press to launch the Voice Commander. 4 Chapter 3 Components
-
 1
1 -
2
-
3
-
4
-
5
-
6
-
 7
7 -
 8
8 -
 9
9 -
 10
10 -
 11
11 -
 12
12 -
 13
13 -
 14
14 -
 15
15 -
 16
16 -
 17
17 -
18
-
19
-
20
-
21
-
22
-
23
-
24
-
25
-
26
-
27
-
28
-
29
-
30
-
31
-
32
-
33
-
34
-
35
-
36
-
37
-
38
-
39
-
40
-
41
-
42
-
43
-
44
-
45
-
46
-
47
-
48
-
49
-
50
-
51
-
52
-
53
-
54
-
55
-
56
-
57
-
58
-
59
-
60
-
61
-
62
-
63
-
64
-
65
-
66
-
67
-
68
-
69
-
70
-
71
-
72
-
73
-
74
-
75
-
76
-
77
-
78
-
79
-
80
-
81
-
82
-
83
-
84
-
85
-
86
-
87
-
88
-
89
 |
 |
