HP rp5800 Maintenance & Service Guide HP rp5800 Retail System - Page 110
while threading the fan cable through the hole in the bottom
 |
View all HP rp5800 manuals
Add to My Manuals
Save this manual to your list of manuals |
Page 110 highlights
6. Remove the fan cable from the clip on the bottom of the optical drive cage (3). Figure 7-62 Removing the 50°C radial fan cable 7. Lower the drive cage to its normal position. 8. Press in on the two tabs that secure the fan to the optical drive cage (1) to release the fan, and then lift the fan from the cage (2) while threading the fan cable through the hole in the bottom of the optical drive cage. Figure 7-63 Removing the radial fan assembly 100 Chapter 7 Removal and Replacement Procedures
-
 1
1 -
2
-
3
-
4
-
5
-
6
-
7
-
8
-
9
-
10
-
11
-
12
-
13
-
14
-
15
-
16
-
17
-
18
-
19
-
20
-
21
-
22
-
23
-
24
-
25
-
26
-
27
-
28
-
29
-
30
-
31
-
32
-
33
-
34
-
35
-
36
-
37
-
38
-
39
-
40
-
41
-
42
-
43
-
44
-
45
-
46
-
47
-
48
-
49
-
50
-
51
-
52
-
53
-
54
-
55
-
56
-
57
-
58
-
59
-
60
-
61
-
62
-
63
-
64
-
65
-
66
-
67
-
68
-
69
-
70
-
71
-
72
-
73
-
74
-
75
-
76
-
77
-
78
-
79
-
80
-
81
-
82
-
83
-
84
-
85
-
86
-
87
-
88
-
89
-
90
-
91
-
92
-
93
-
94
-
95
-
96
-
97
-
98
-
99
-
100
-
101
-
102
-
103
-
104
-
 105
105 -
 106
106 -
 107
107 -
 108
108 -
 109
109 -
 110
110 -
 111
111 -
 112
112 -
 113
113 -
 114
114 -
 115
115 -
116
-
117
-
118
-
119
-
120
-
121
-
122
-
123
-
124
-
125
-
126
-
127
-
128
-
129
-
130
-
131
-
132
-
133
-
134
-
135
-
136
-
137
-
138
-
139
-
140
-
141
-
142
-
143
-
144
-
145
-
146
-
147
-
148
-
149
-
150
-
151
-
152
-
153
-
154
-
155
-
156
-
157
-
158
-
159
-
160
-
161
-
162
-
163
-
164
-
165
-
166
-
167
-
168
-
169
-
170
-
171
-
172
-
173
-
174
-
175
-
176
-
177
-
178
-
179
-
180
-
181
-
182
-
183
-
184
-
185
 |
 |

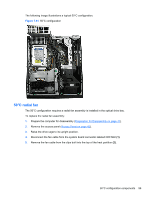
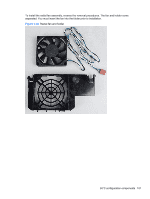
6.
Remove the fan cable from the clip on the bottom of the optical drive cage
(3)
.
Figure 7-62
Removing the 50°C radial fan cable
7.
Lower the drive cage to its normal position.
8.
Press in on the two tabs that secure the fan to the optical drive cage
(1)
to release the fan, and
then lift the fan from the cage
(2)
while threading the fan cable through the hole in the bottom of
the optical drive cage.
Figure 7-63
Removing the radial fan assembly
100
Chapter 7
Removal and Replacement Procedures