HP rp5800 Maintenance & Service Guide HP rp5800 Retail System - Page 91
Removing and Replacing the Primary 3.5-inch Internal Hard Drive, CAUTION,
 |
View all HP rp5800 manuals
Add to My Manuals
Save this manual to your list of manuals |
Page 91 highlights
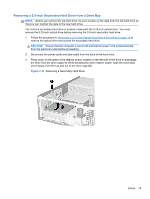
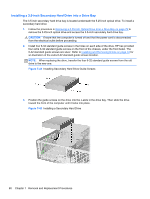
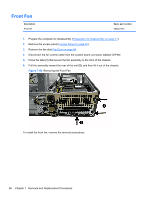
4. Connect the power cable and data cable to the back of the hard drive. Connect the other end of the data cable to the light blue SATA connector on the system board labeled SATA1. NOTE: Refer to System Board Drive Connections on page 75 for an illustration of the system board drive connectors. 5. Route the data cable through the cable guides. CAUTION: There are two cable guides that keep the data cable from being pinched by the drive cage when raising or lowering it. One is located on the bottom side of the drive cage. The other is located on the chassis frame under the drive cage. Ensure that the data cable is routed through these guides. 6. Replace the optical drive. 7. Reassemble the computer. Removing and Replacing the Primary 3.5-inch Internal Hard Drive NOTE: Before you remove the old hard drive, be sure to back up the data from the old hard drive so that you can transfer the data to the new hard drive. The preinstalled 3.5-inch primary hard drive is located under the power supply. To remove and replace the primary hard drive: 1. Prepare the computer for disassembly (Preparation for Disassembly on page 41). 2. Remove the access panel (Access Panel on page 42). 3. Rotate the drive cage for internal drives to its upright position. 4. Rotate the power supply to its upright position. The hard drive is located beneath the power supply. NOTE: If you are using a PS/2 mouse and/or PS/2 keyboard, make sure they are unplugged from the rear of the computer so that the connectors do not block the power supply from rotating all the way back. Figure 7-44 Raising the Power Supply Drives 81
-
 1
1 -
2
-
3
-
4
-
5
-
6
-
7
-
8
-
9
-
10
-
11
-
12
-
13
-
14
-
15
-
16
-
17
-
18
-
19
-
20
-
21
-
22
-
23
-
24
-
25
-
26
-
27
-
28
-
29
-
30
-
31
-
32
-
33
-
34
-
35
-
36
-
37
-
38
-
39
-
40
-
41
-
42
-
43
-
44
-
45
-
46
-
47
-
48
-
49
-
50
-
51
-
52
-
53
-
54
-
55
-
56
-
57
-
58
-
59
-
60
-
61
-
62
-
63
-
64
-
65
-
66
-
67
-
68
-
69
-
70
-
71
-
72
-
73
-
74
-
75
-
76
-
77
-
78
-
79
-
80
-
81
-
82
-
83
-
84
-
85
-
 86
86 -
 87
87 -
 88
88 -
 89
89 -
 90
90 -
 91
91 -
 92
92 -
 93
93 -
 94
94 -
 95
95 -
 96
96 -
97
-
98
-
99
-
100
-
101
-
102
-
103
-
104
-
105
-
106
-
107
-
108
-
109
-
110
-
111
-
112
-
113
-
114
-
115
-
116
-
117
-
118
-
119
-
120
-
121
-
122
-
123
-
124
-
125
-
126
-
127
-
128
-
129
-
130
-
131
-
132
-
133
-
134
-
135
-
136
-
137
-
138
-
139
-
140
-
141
-
142
-
143
-
144
-
145
-
146
-
147
-
148
-
149
-
150
-
151
-
152
-
153
-
154
-
155
-
156
-
157
-
158
-
159
-
160
-
161
-
162
-
163
-
164
-
165
-
166
-
167
-
168
-
169
-
170
-
171
-
172
-
173
-
174
-
175
-
176
-
177
-
178
-
179
-
180
-
181
-
182
-
183
-
184
-
185
 |
 |