LG LS996 Volcano Owners Manual - English - Page 62
Add a Contact, Check Contacts, Contacts, Phone contact, Google, Phone, MOBILE, WORK, HOME, MAIN
 |
View all LG LS996 Volcano manuals
Add to My Manuals
Save this manual to your list of manuals |
Page 62 highlights
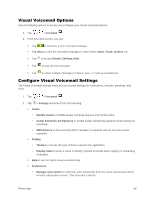
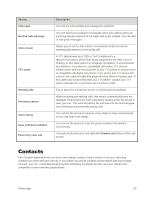
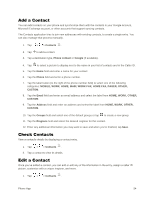
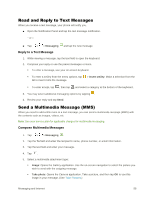
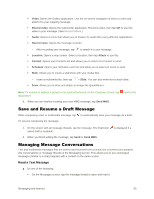
Add a Contact You can add contacts on your phone and synchronize them with the contacts in your Google Account, Microsoft Exchange account, or other accounts that support syncing contacts. The Contacts application tries to join new addresses with existing contacts, to create a single entry. You can also manage that process manually. 1. Tap > > Contacts . 2. Tap to add a contact. 3. Tap a destination type, Phone contact or Google (if available). 4. Tap to select a picture to display next to the name in your list of contacts and in the Caller ID. 5. Tap the Name field and enter a name for your contact. 6. Tap the Phone field and enter a phone number. 7. Tap the label button (to the right of the phone number field) to select one of the following categories: MOBILE, WORK, HOME, MAIN, WORK FAX, HOME FAX, PAGER, OTHER, CUSTOM. 8. Tap the Email field and enter an email address and select the label from HOME, WORK, OTHER, CUSTOM. 9. Tap the Address field and enter an address and select the label from HOME, WORK, OTHER, CUSTOM. 10. Tap the Groups field and select one of the default groups or tap to create a new group. 11. Tap the Ringtone field and select the desired ringtone for this contact. 12. Enter any additional information you may want to save and when you're finished, tap Save. Check Contacts View a contact‟s details by displaying a contact entry. 1. Tap > > Contacts . 2. Tap a contact to view its details. Edit a Contact Once you‟ve added a contact, you can add or edit any of the information in the entry, assign a caller ID picture, customize with a unique ringtone, and more. 1. Tap > > Contacts . Phone App 54
-
 1
1 -
2
-
3
-
4
-
5
-
6
-
7
-
8
-
9
-
10
-
11
-
12
-
13
-
14
-
15
-
16
-
17
-
18
-
19
-
20
-
21
-
22
-
23
-
24
-
25
-
26
-
27
-
28
-
29
-
30
-
31
-
32
-
33
-
34
-
35
-
36
-
37
-
38
-
39
-
40
-
41
-
42
-
43
-
44
-
45
-
46
-
47
-
48
-
49
-
50
-
51
-
52
-
53
-
54
-
55
-
56
-
 57
57 -
 58
58 -
 59
59 -
 60
60 -
 61
61 -
 62
62 -
 63
63 -
 64
64 -
 65
65 -
 66
66 -
 67
67 -
68
-
69
-
70
-
71
-
72
-
73
-
74
-
75
-
76
-
77
-
78
-
79
-
80
-
81
-
82
-
83
-
84
-
85
-
86
-
87
-
88
-
89
-
90
-
91
-
92
-
93
-
94
-
95
-
96
-
97
-
98
-
99
-
100
-
101
-
102
-
103
-
104
-
105
-
106
-
107
-
108
-
109
-
110
-
111
-
112
-
113
-
114
-
115
-
116
-
117
-
118
-
119
-
120
-
121
-
122
-
123
-
124
-
125
-
126
-
127
-
128
-
129
-
130
-
131
-
132
-
133
-
134
-
135
-
136
-
137
-
138
-
139
-
140
-
141
-
142
-
143
-
144
-
145
-
146
-
147
-
148
-
149
-
150
-
151
-
152
-
153
-
154
-
155
-
156
-
157
-
158
-
159
 |
 |
