LG LS996 Volcano Owners Manual - English - Page 75
Open Email, Set Up a Corporate Email
 |
View all LG LS996 Volcano manuals
Add to My Manuals
Save this manual to your list of manuals |
Page 75 highlights
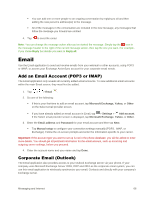
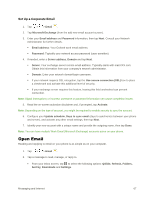
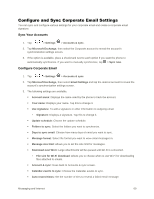
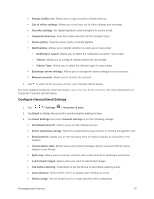
Set Up a Corporate Email 1. Tap > > Email . 2. Tap Microsoft Exchange (from the add new email account screen). 3. Enter your Email address and Password information, then tap Next. Consult your Network Administrator for further details. Email address: Your Outlook work email address. Password: Typically your network access password (case-sensitive). 4. If needed, enter a Server address, Domain and tap Next. Server: Your exchange server remote email address. Typically starts with mail.XXX.com. Obtain this information from your company's network administrator. Domain: Enter your network domain\login username. If your network requires SSL encryption, tap the Use secure connection (SSL) box to place a checkmark and activate this additional level of security. If your exchange server requires this feature, leaving this field unchecked can prevent connection. Note: Signal interruptions or incorrect username or password information can cause completion issues. 5. Read the on-screen activation disclaimer and, if prompted, tap Activate. Note: Depending on the type of account, you might be required to enable security to sync the account. 6. Configure your Update schedule, Days to sync email (days to synchronize between your phone and server), and activate any other email settings, then tap Next. 7. Identify your new account with a unique name and provide the outgoing name, then tap Done. Note: You can have multiple Work Email (Microsoft Exchange) accounts active on your phone. Open Email Reading and replying to email on your phone is as simple as on your computer. 1. Tap > > Email . 2. Tap a message to read, manage, or reply to. From your Inbox screen, tap to select the following options: QSlide, Refresh, Folders, Sort by, Downloads and Settings. Messaging and Internet 67
-
 1
1 -
2
-
3
-
4
-
5
-
6
-
7
-
8
-
9
-
10
-
11
-
12
-
13
-
14
-
15
-
16
-
17
-
18
-
19
-
20
-
21
-
22
-
23
-
24
-
25
-
26
-
27
-
28
-
29
-
30
-
31
-
32
-
33
-
34
-
35
-
36
-
37
-
38
-
39
-
40
-
41
-
42
-
43
-
44
-
45
-
46
-
47
-
48
-
49
-
50
-
51
-
52
-
53
-
54
-
55
-
56
-
57
-
58
-
59
-
60
-
61
-
62
-
63
-
64
-
65
-
66
-
67
-
68
-
69
-
 70
70 -
 71
71 -
 72
72 -
 73
73 -
 74
74 -
 75
75 -
 76
76 -
 77
77 -
 78
78 -
 79
79 -
 80
80 -
81
-
82
-
83
-
84
-
85
-
86
-
87
-
88
-
89
-
90
-
91
-
92
-
93
-
94
-
95
-
96
-
97
-
98
-
99
-
100
-
101
-
102
-
103
-
104
-
105
-
106
-
107
-
108
-
109
-
110
-
111
-
112
-
113
-
114
-
115
-
116
-
117
-
118
-
119
-
120
-
121
-
122
-
123
-
124
-
125
-
126
-
127
-
128
-
129
-
130
-
131
-
132
-
133
-
134
-
135
-
136
-
137
-
138
-
139
-
140
-
141
-
142
-
143
-
144
-
145
-
146
-
147
-
148
-
149
-
150
-
151
-
152
-
153
-
154
-
155
-
156
-
157
-
158
-
159
 |
 |
