Marantz DV8400 User Guide - Page 49
Video Adjust, Selecting a preset
 |
View all Marantz DV8400 manuals
Add to My Manuals
Save this manual to your list of manuals |
Page 49 highlights
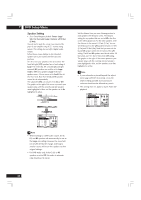
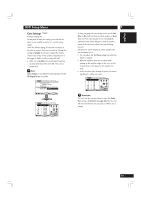
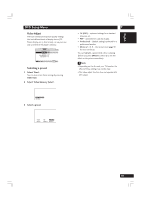
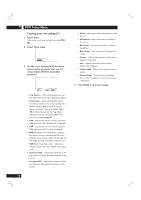
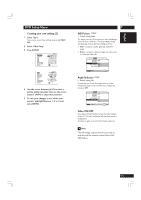
English DVD Setup Menu Video Adjust There are several preset picture quality settings that suit different kinds of display device (TV, Plasma display, etc.). Alternatively, set up your own and save them in the player's memory. Audio1 A2 V1 Video2 Language General Background - Black Video Adjust - Start Still Picture - Auto On Screen Display - On Angle Indicator - On Move SETUP Exit Selecting a preset 1 Select 'Start'. You can also access these settings by pressing VIDEO ADJ.. 2 Select 'Video Memory Select'. 7 • TV (CRT) - optimized settings for a standard television set. • PDP - optimized for a plasma display. • Professional - (default setting) optimized for a professional monitor. • Memory 1, 2, 3 - User presets (see page 51 for more on these) You can highlight a preset while a disc is playing (before you press ENTER to select it) to see the effect on the picture immediately. Note • Depending on the disc and your TV/monitor, the effect of these settings may not be clear. • This video adjust function does not operate with DVI output. Video Memory Select Video Setup 3 Select a preset. TV(CRT) Memory 1 PDP Professional Memory 2 Memory 3 49
-
 1
1 -
2
-
3
-
4
-
5
-
6
-
7
-
8
-
9
-
10
-
11
-
12
-
13
-
14
-
15
-
16
-
17
-
18
-
19
-
20
-
21
-
22
-
23
-
24
-
25
-
26
-
27
-
28
-
29
-
30
-
31
-
32
-
33
-
34
-
35
-
36
-
37
-
38
-
39
-
40
-
41
-
42
-
43
-
 44
44 -
 45
45 -
 46
46 -
 47
47 -
 48
48 -
 49
49 -
 50
50 -
 51
51 -
 52
52 -
 53
53 -
 54
54 -
55
-
56
-
57
-
58
-
59
-
60
-
61
-
62
-
63
-
64
-
65
-
66
-
67
-
68
-
69
-
70
-
71
-
72
-
73
-
74
-
75
-
76
-
77
-
78
-
79
-
80
-
81
-
82
-
83
-
84
-
85
-
86
-
87
-
88
-
89
-
90
-
91
-
92
-
93
-
94
-
95
-
96
-
97
-
98
-
99
-
100
-
101
-
102
-
103
-
104
-
105
-
106
-
107
-
108
-
109
-
110
-
111
-
112
-
113
-
114
-
115
-
116
-
117
-
118
-
119
-
120
-
121
-
122
-
123
-
124
-
125
-
126
-
127
-
128
-
129
-
130
-
131
-
132
-
133
-
134
-
135
-
136
-
137
-
138
-
139
-
140
-
141
-
142
-
143
-
144
-
145
-
146
-
147
-
148
-
149
-
150
-
151
-
152
-
153
-
154
-
155
-
156
-
157
-
158
-
159
-
160
-
161
-
162
-
163
-
164
-
165
-
166
-
167
-
168
-
169
-
170
-
171
-
172
-
173
-
174
-
175
-
176
-
177
-
178
-
179
-
180
-
181
-
182
-
183
-
184
-
185
-
186
-
187
-
188
-
189
-
190
-
191
-
192
-
193
-
194
-
195
-
196
-
197
-
198
-
199
-
200
-
201
-
202
-
203
-
204
-
205
-
206
 |
 |
