Marantz DV8400 User Guide - Page 51
Creating your own setting 2, Still Picture, Angle Indicator, Video ON/OFF
 |
View all Marantz DV8400 manuals
Add to My Manuals
Save this manual to your list of manuals |
Page 51 highlights
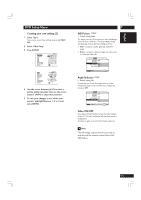
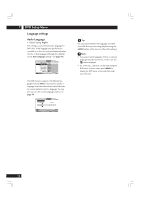
English DVD Setup Menu Creating your own setting (2) 1 Select 'Start'. You can also access these settings by pressing VIDEO ADJ.. 2 Select 'Video Setup' 3 Press DISPLAY. Prog. Motion PureCinema YNR CNR MNR BNR Sharpness High Sharpness Mid Memory Page 1/2 fast slow Auto1 Auto2 On Off off max off max off max off max soft fine soft fine Off 1 2 3 Detail White Level Black Level Black Setup Gamma Hue Chroma Level Chroma Delay Memory Page 2/2 off slow min max min max 0 IRE 7.5 IRE - + green red min max - + Off 1 2 3 4 Use the cursor buttons (5/∞) to select a picture quality parameter, then use the cursor buttons (2/3) to adjust that parameter. 5 To save your changes in one of the user presets, highlight Memory 1, 2 or 3 and press ENTER. 7 Still Picture • Default setting: Auto The player uses one of two processes when displaying a still frame from a DVD disc. The default Auto setting automatically chooses the best setting each time. • Field - produces a stable, generally shake-free image. • Frame - produces a sharper image, but more prone to shake than field stills. Audio1 A2 V1 Video2 Language General Background - Black Video Adjust Still Picture - Field On Screen Display Frame Angle Indicator Auto Move SETUP Exit Angle Indicator • Default setting: On If you prefer not to see the camera icon on-screen during multi-angle scenes on DVD discs, change this setting to Off. Audio1 A2 V1 Video2 Language General Background - Black Video Adjust Still Picture - Auto On Screen Display - On Angle Indicator - On Off Move SETUP Exit Video ON/OFF Press Video ON/OFF button to turn the Video Output (Video, S1/S2 and Component) off and then picture is disappeared. And press it again to turn the all of Video output on. Note The DVI image output cannot be turned on and off with the remote control Video ON/ OFF button. 51
-
 1
1 -
2
-
3
-
4
-
5
-
6
-
7
-
8
-
9
-
10
-
11
-
12
-
13
-
14
-
15
-
16
-
17
-
18
-
19
-
20
-
21
-
22
-
23
-
24
-
25
-
26
-
27
-
28
-
29
-
30
-
31
-
32
-
33
-
34
-
35
-
36
-
37
-
38
-
39
-
40
-
41
-
42
-
43
-
44
-
45
-
 46
46 -
 47
47 -
 48
48 -
 49
49 -
 50
50 -
 51
51 -
 52
52 -
 53
53 -
 54
54 -
 55
55 -
 56
56 -
57
-
58
-
59
-
60
-
61
-
62
-
63
-
64
-
65
-
66
-
67
-
68
-
69
-
70
-
71
-
72
-
73
-
74
-
75
-
76
-
77
-
78
-
79
-
80
-
81
-
82
-
83
-
84
-
85
-
86
-
87
-
88
-
89
-
90
-
91
-
92
-
93
-
94
-
95
-
96
-
97
-
98
-
99
-
100
-
101
-
102
-
103
-
104
-
105
-
106
-
107
-
108
-
109
-
110
-
111
-
112
-
113
-
114
-
115
-
116
-
117
-
118
-
119
-
120
-
121
-
122
-
123
-
124
-
125
-
126
-
127
-
128
-
129
-
130
-
131
-
132
-
133
-
134
-
135
-
136
-
137
-
138
-
139
-
140
-
141
-
142
-
143
-
144
-
145
-
146
-
147
-
148
-
149
-
150
-
151
-
152
-
153
-
154
-
155
-
156
-
157
-
158
-
159
-
160
-
161
-
162
-
163
-
164
-
165
-
166
-
167
-
168
-
169
-
170
-
171
-
172
-
173
-
174
-
175
-
176
-
177
-
178
-
179
-
180
-
181
-
182
-
183
-
184
-
185
-
186
-
187
-
188
-
189
-
190
-
191
-
192
-
193
-
194
-
195
-
196
-
197
-
198
-
199
-
200
-
201
-
202
-
203
-
204
-
205
-
206
 |
 |
