Oki MB471 Quick Start Guide - Page 100
Local PC, Select A Connecting PC, From WSD Scan, is selected and then press
 |
View all Oki MB471 manuals
Add to My Manuals
Save this manual to your list of manuals |
Page 100 highlights
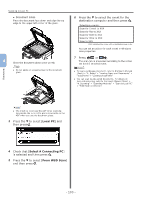
Scanning Scanning to Local PC ●● Document Glass Place the document face down and align its top edge to the upper-left corner of the glass. 4 Close the document glass cover gently. Note ●● Do not apply an excessive load to the document glass. 6 Press the to select the event for the destination computer and then press . OK Selectable events: Scan for E-mail to XXX Scan for Fax to XXX Scan for OCR to XXX Scan for Print to XXX Scan to XXX XXX indicates the name of the destination computer. You can set an action for each event in Windows scan properties. 7 Press MONO or . COLOR The scan job is processed according to the action set for the selected event. Reference ●● To load a landscape document, refer to the User's Manual (Basic) > "1. Setup" > "Loading Paper and Documents" > "Documents" > "Loading Documents". ●● You can scan double-sided documents. For details on dual-side scanning, refer to the User's Manual (Basic) > "4. Scanning" > "Scanning Methods" > "Scan to Local PC" > "WSD Scan connection". Memo ●● The machine prioritizes the ADF when scanning documents. Be sure not to place documents on the ADF when you use the document glass. 3 Press the to select [Local PC] and then press . OK 4 Check that [Select A Connecting PC] is selected and then press . OK 5 Press the to select [From WSD Scan] and then press . OK - 100 -
-
 1
1 -
2
-
3
-
4
-
5
-
6
-
7
-
8
-
9
-
10
-
11
-
12
-
13
-
14
-
15
-
16
-
17
-
18
-
19
-
20
-
21
-
22
-
23
-
24
-
25
-
26
-
27
-
28
-
29
-
30
-
31
-
32
-
33
-
34
-
35
-
36
-
37
-
38
-
39
-
40
-
41
-
42
-
43
-
44
-
45
-
46
-
47
-
48
-
49
-
50
-
51
-
52
-
53
-
54
-
55
-
56
-
57
-
58
-
59
-
60
-
61
-
62
-
63
-
64
-
65
-
66
-
67
-
68
-
69
-
70
-
71
-
72
-
73
-
74
-
75
-
76
-
77
-
78
-
79
-
80
-
81
-
82
-
83
-
84
-
85
-
86
-
87
-
88
-
89
-
90
-
91
-
92
-
93
-
94
-
 95
95 -
 96
96 -
 97
97 -
 98
98 -
 99
99 -
 100
100 -
 101
101 -
 102
102 -
 103
103 -
 104
104 -
 105
105 -
106
-
107
-
108
-
109
-
110
-
111
-
112
-
113
-
114
-
115
-
116
-
117
-
118
-
119
-
120
-
121
-
122
-
123
-
124
-
125
-
126
-
127
-
128
 |
 |
