Oki MB471 Quick Start Guide - Page 21
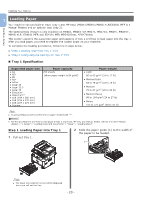
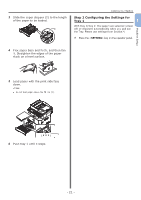
Step 2 Configuring the Settings for Tray 1, Tray 1
 |
View all Oki MB471 manuals
Add to My Manuals
Save this manual to your list of manuals |
Page 21 highlights
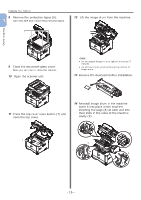
3 Slide the paper stopper (2) to the length of the paper to be loaded. 2 Installing Your Machine Step 2 Configuring the Settings for Tray 1 1 With Tray 1/Tray 2: The paper size selection screen will be displayed automatically when you pull out the Tray. Please use settings from Section 4. 1 Press the key on the operator panel. Machine Setup 4 Flex paper back and forth, and then fan it. Straighten the edges of the paper stack on a level surface. 5 Load paper with the print side face down. Note ●● Do not load paper above the fill line (3). 2 Press the to select [Paper Setup] and then press . OK 3 6 Push tray 1 until it stops. 3 Check that [Tray 1] is selected and then press . OK 4 Check that [Paper Size] is selected and then press . OK 5 Press the to select the size of the loaded paper and then press . OK Reference ●● If [Custom] is selected for [Paper Size], you need to register the custom size. For how to register the custom size, refer to the User's Manual (Basic) > "1. Setup" > "Loading Paper and Documents" > "Paper" > "Loading Paper" > "Registering Custom Sizes". 6 Press the to select [Media Type] and then press . OK 7 Press the to select the type of media loaded and then press . OK 8 Press the to select [Media Weight] and then press . OK 9 Press the to select the weight of the loaded paper and then press . OK 10 Press the until the top screen is displayed. - 21 -
-
 1
1 -
2
-
3
-
4
-
5
-
6
-
7
-
8
-
9
-
10
-
11
-
12
-
13
-
14
-
15
-
 16
16 -
 17
17 -
 18
18 -
 19
19 -
 20
20 -
 21
21 -
 22
22 -
 23
23 -
 24
24 -
 25
25 -
 26
26 -
27
-
28
-
29
-
30
-
31
-
32
-
33
-
34
-
35
-
36
-
37
-
38
-
39
-
40
-
41
-
42
-
43
-
44
-
45
-
46
-
47
-
48
-
49
-
50
-
51
-
52
-
53
-
54
-
55
-
56
-
57
-
58
-
59
-
60
-
61
-
62
-
63
-
64
-
65
-
66
-
67
-
68
-
69
-
70
-
71
-
72
-
73
-
74
-
75
-
76
-
77
-
78
-
79
-
80
-
81
-
82
-
83
-
84
-
85
-
86
-
87
-
88
-
89
-
90
-
91
-
92
-
93
-
94
-
95
-
96
-
97
-
98
-
99
-
100
-
101
-
102
-
103
-
104
-
105
-
106
-
107
-
108
-
109
-
110
-
111
-
112
-
113
-
114
-
115
-
116
-
117
-
118
-
119
-
120
-
121
-
122
-
123
-
124
-
125
-
126
-
127
-
128
 |
 |
