Oki MB471 Quick Start Guide - Page 41
Faxing from a Computer (For Windows), Installing a Fax Driver
 |
View all Oki MB471 manuals
Add to My Manuals
Save this manual to your list of manuals |
Page 41 highlights
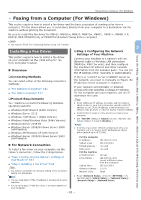
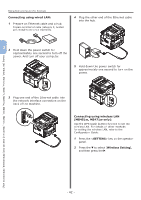
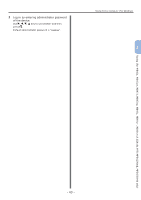
Faxing from a Computer (For Windows) ●●Faxing from a Computer (For Windows) This section explains how to install a fax driver and the basic procedure of sending a fax from a computer. The fax driver allows you to send faxes directly from your computer to a destination via the machine without printing the document. Be sure to install the fax driver for MB451, MB451w, MB471, MB471w, MB491, MB491+, MB491+LP, ES4191 MFP, MPS4200mb, or MPS4700mb before faxing from a computer. Note ●● You need to finish the initial setup before using this function. Installing a Fax Driver This section explains how to install a fax driver on your computer as the initial setup for Fax from Computer function. „„ Overview ‰‰Connecting Methods You can select either of the following connection methods: ●● "For Network Connection" P.41 ●● "For USB Connection" P.47 ‰‰Product Requirements Your machine supports the following Windows operating systems: ●● Windows 8/Windows 8 (64bit Version) ●● Windows Server 2012 ●● Windows 7/Windows 7 (64bit Version) ●● Windows Vista/Windows Vista (64bit Version) ●● Windows Server 2008 R2 ●● Windows Server 2008/Windows Server 2008 (x64 Version) ●● Windows XP/Windows XP (x64 Version) ●● Windows Server 2003/Windows Server 2003 (x64 Version) „„For Network Connection To install a fax driver on your computer via the network connection, follow the 2 steps below: ●● "Step 1 Configuring the Network Settings of Your Machine" P.41 ●● "Step 2 Installing a Fax Driver" P.45 Note ●● You need to complete the network setting of the computer before this procedure. Memo ●● You can skip step 1 if the IP address is already set on your machine. ●● You can skip step 2 if the fax driver is already installed on your computer. 3 ‰‰Step 1 Configuring the Network Settings of Your Machine Connect your machine to a network with an Ethernet cable or Wireless LAN connection (MB451w, MB471w only), and then configure the machine's IP address and other network information from the operator panel. You can set the IP address either manually or automatically. If there is no DHCP server or BOOTP server on the network, you need to manually configure the IP address on the computer or machine. If your network administrator or Internet service provider specifies a unique IP address for the computer and your machine, set the IP addresses manually. Note ●● When setting an IP address manually, ask the network administrator or your Internet service provider which IP address to use. If the IP address is set incorrectly, the network may go down or Internet access may be disabled. ●● Conform the IP version of the machine to that of your computer. ●● Set [TCP/IP] setting to [Enable] on your machine. (By factory default, it is set to [Enable].) Memo ●● If configuring a small network consisting of only your machine and a computer, set IP addresses as shown below (according to RFC1918). For the computer IP address : 192.168.0.1~254 Subnet mask : 255.255.255.0 Default gateway : not used DNS server : not used For the machine IP Address Set : Manual IPv4 Address : 192.168.0.1~254 (select a different value from the computer) Subnet Mask : 255.255.255.0 Gateway Address : 0.0.0.0 Network Scale : Small ●● To set [Network Scale], press the key and then select [Admin Setup] > [Network Menu] > [Network Setup] > [Network Scale]. Faxing (For MB451, MB451w, MB471, MB471w, MB491, MB491+, MB491+LP, ES4191 MFP, MPS4200mb, MPS4700mb only) - 41 -
-
 1
1 -
2
-
3
-
4
-
5
-
6
-
7
-
8
-
9
-
10
-
11
-
12
-
13
-
14
-
15
-
16
-
17
-
18
-
19
-
20
-
21
-
22
-
23
-
24
-
25
-
26
-
27
-
28
-
29
-
30
-
31
-
32
-
33
-
34
-
35
-
 36
36 -
 37
37 -
 38
38 -
 39
39 -
 40
40 -
 41
41 -
 42
42 -
 43
43 -
 44
44 -
 45
45 -
 46
46 -
47
-
48
-
49
-
50
-
51
-
52
-
53
-
54
-
55
-
56
-
57
-
58
-
59
-
60
-
61
-
62
-
63
-
64
-
65
-
66
-
67
-
68
-
69
-
70
-
71
-
72
-
73
-
74
-
75
-
76
-
77
-
78
-
79
-
80
-
81
-
82
-
83
-
84
-
85
-
86
-
87
-
88
-
89
-
90
-
91
-
92
-
93
-
94
-
95
-
96
-
97
-
98
-
99
-
100
-
101
-
102
-
103
-
104
-
105
-
106
-
107
-
108
-
109
-
110
-
111
-
112
-
113
-
114
-
115
-
116
-
117
-
118
-
119
-
120
-
121
-
122
-
123
-
124
-
125
-
126
-
127
-
128
 |
 |