Ricoh Aficio SP C320DN Software Guide - Page 173
Using a Printer Server, Preparing Printer Server
 |
View all Ricoh Aficio SP C320DN manuals
Add to My Manuals
Save this manual to your list of manuals |
Page 173 highlights
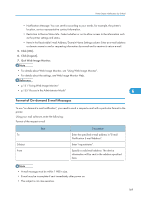
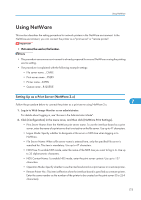
7. Using a Printer Server This chapter explains how to configure this printer to work as a network printer. Preparing Printer Server This section explains how to configure the printer as a Windows network printer. The printer is configured to enabling network clients to use it. When the network printer is connected via SmartDeviceMonitor for Client, you can set the printing notification function to notify clients of the results of their print jobs. • Under Windows XP Professional or Windows Server 2003/2003 R2/2008/2008 R2, to change printer properties in the [Printer] folder, you need Printer Management access authentication; under Windows Vista/7, Full Control access authentication. Log on to the file server as an Administrator group. 1. Open the [Printers and Faxes] window from the [Start] menu. The [Printers and Faxes] window appears. 2. Click the icon of the printer you want to use. On the [File] menu, click [Properties]. The printer properties appear. 3. On the [Sharing] tab, click [Share this printer]. 7 4. To share the printer with users using a different version of Windows, click [Additional Drivers...]. If you have installed an alternative driver by selecting [Share As:] during the printer driver installation, this step can be ignored. 5. On the [Advanced] tab, click the [Printing Defaults...] button. Specify the default values for the printer driver that will be distributed to client computers, and then click [OK]. 6. Click [OK], and then close the printer properties. Printing Notification via SmartDeviceMonitor for Client Follow the procedure below to configure the printer to use the printing notification function of SmartDeviceMonitor for Client. Setting the print server • Under Windows XP Professional or Windows Server 2003/2003 R2/2008/2008 R2, to change printer properties in the [Printer] folder, you need Printer Management access authentication; under 171
-
 1
1 -
2
-
3
-
4
-
5
-
6
-
7
-
8
-
9
-
10
-
11
-
12
-
13
-
14
-
15
-
16
-
17
-
18
-
19
-
20
-
21
-
22
-
23
-
24
-
25
-
26
-
27
-
28
-
29
-
30
-
31
-
32
-
33
-
34
-
35
-
36
-
37
-
38
-
39
-
40
-
41
-
42
-
43
-
44
-
45
-
46
-
47
-
48
-
49
-
50
-
51
-
52
-
53
-
54
-
55
-
56
-
57
-
58
-
59
-
60
-
61
-
62
-
63
-
64
-
65
-
66
-
67
-
68
-
69
-
70
-
71
-
72
-
73
-
74
-
75
-
76
-
77
-
78
-
79
-
80
-
81
-
82
-
83
-
84
-
85
-
86
-
87
-
88
-
89
-
90
-
91
-
92
-
93
-
94
-
95
-
96
-
97
-
98
-
99
-
100
-
101
-
102
-
103
-
104
-
105
-
106
-
107
-
108
-
109
-
110
-
111
-
112
-
113
-
114
-
115
-
116
-
117
-
118
-
119
-
120
-
121
-
122
-
123
-
124
-
125
-
126
-
127
-
128
-
129
-
130
-
131
-
132
-
133
-
134
-
135
-
136
-
137
-
138
-
139
-
140
-
141
-
142
-
143
-
144
-
145
-
146
-
147
-
148
-
149
-
150
-
151
-
152
-
153
-
154
-
155
-
156
-
157
-
158
-
159
-
160
-
161
-
162
-
163
-
164
-
165
-
166
-
167
-
 168
168 -
 169
169 -
 170
170 -
 171
171 -
 172
172 -
 173
173 -
 174
174 -
 175
175 -
 176
176 -
 177
177 -
 178
178 -
179
-
180
-
181
-
182
-
183
-
184
-
185
-
186
-
187
-
188
-
189
-
190
-
191
-
192
-
193
-
194
-
195
-
196
-
197
-
198
-
199
-
200
-
201
-
202
-
203
-
204
-
205
-
206
-
207
-
208
-
209
-
210
-
211
-
212
-
213
-
214
-
215
-
216
-
217
-
218
-
219
-
220
-
221
-
222
-
223
-
224
-
225
-
226
-
227
-
228
-
229
-
230
-
231
-
232
-
233
-
234
-
235
-
236
-
237
-
238
-
239
-
240
-
241
-
242
-
243
-
244
-
245
-
246
-
247
-
248
 |
 |