Samsung SCX-4623F User Guide - Page 108
Checking replaceable’s lifespan, System Setup, Maintenance, Supplies Life, Total, ADF Scan
 |
UPC - 635753615333
View all Samsung SCX-4623F manuals
Add to My Manuals
Save this manual to your list of manuals |
Page 108 highlights
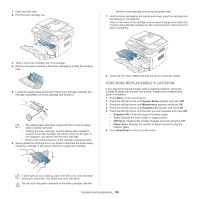
1. Open the front door. 2. Pull the toner cartridge out. handle on the cartridge to avoid touching this area. 7. Hold the toner cartridge by the handle and slowly insert the cartridge into the opening in the machine. Tabs on the sides of the cartridge and corresponding grooves within the machine will guide the cartridge into the correct position until it locks into place completely. 3. Take a new toner cartridge out of its package. 4. Remove the paper protecting the toner cartridge by pulling the packing tape. 5. Locate the sealing tape at the end of the toner cartridge. Carefully pull the tape completely out of the cartridge and discard it. • The sealing tape should be longer than 60 cm (23.6 inches) when correctly removed. • Holding the toner cartridge, pull the sealing tape straight to remove it from the cartridge. Be careful not to cut the tape. If this happens, you cannot use the toner cartridge. • Refer to the helpful pictures on the cartridge wrapping paper. 6. Slowly shake the cartridge five or six times to distribute the toner evenly inside the cartridge. It will assure maximum copies per cartridge. 8. Close the front door. Make sure that the cover is securely closed. CHECKING REPLACEABLE'S LIFESPAN If you experience frequent paper jams or printing problems, check the number of pages the machine has printed. Replace the corresponding parts, if necessary. 1. Press Menu on the control panel. 2. Press the left/right arrow until System Setup appears and press OK. 3. Press the left/right arrow until Maintenance appears and press OK. 4. Press the left/right arrow until Supplies Life appears and press OK. 5. Press the left/right arrow until the item you want appears and press OK. • Supplies Info: Prints the supply information page. • Total: Displays the total number of pages printed. • ADF Scan: Displays the number of pages scanned using the ADF. • Platen Scan: Displays the number of pages scanned using the scanner glass. 6. Press Stop/Clear to return to ready mode. If toner gets on your clothing, wipe it off with a dry cloth and wash clothing in cold water. Hot water sets toner into fabric. Do not touch the green underside of the toner cartridge. Use the Supplies and accessories_ 108
-
 1
1 -
2
-
3
-
4
-
5
-
6
-
7
-
8
-
9
-
10
-
11
-
12
-
13
-
14
-
15
-
16
-
17
-
18
-
19
-
20
-
21
-
22
-
23
-
24
-
25
-
26
-
27
-
28
-
29
-
30
-
31
-
32
-
33
-
34
-
35
-
36
-
37
-
38
-
39
-
40
-
41
-
42
-
43
-
44
-
45
-
46
-
47
-
48
-
49
-
50
-
51
-
52
-
53
-
54
-
55
-
56
-
57
-
58
-
59
-
60
-
61
-
62
-
63
-
64
-
65
-
66
-
67
-
68
-
69
-
70
-
71
-
72
-
73
-
74
-
75
-
76
-
77
-
78
-
79
-
80
-
81
-
82
-
83
-
84
-
85
-
86
-
87
-
88
-
89
-
90
-
91
-
92
-
93
-
94
-
95
-
96
-
97
-
98
-
99
-
100
-
101
-
102
-
 103
103 -
 104
104 -
 105
105 -
 106
106 -
 107
107 -
 108
108 -
 109
109 -
 110
110 -
 111
111 -
 112
112 -
 113
113 -
114
-
115
-
116
-
117
-
118
-
119
-
120
-
121
 |
 |
