Samsung SCX-4623F User Guide - Page 38
Macintosh, Install Software Only - driver for mac
 |
UPC - 635753615333
View all Samsung SCX-4623F manuals
Add to My Manuals
Save this manual to your list of manuals |
Page 38 highlights
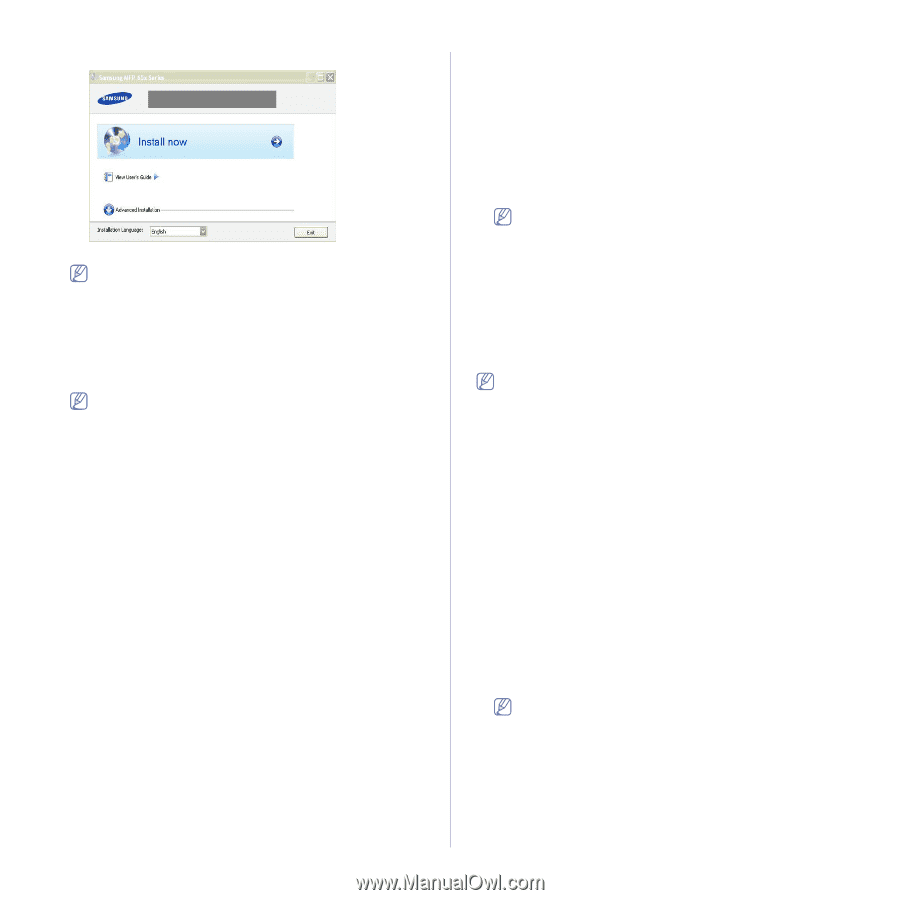
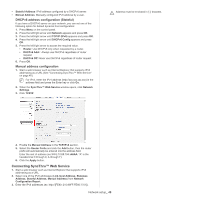
3. Select Install Now. If necessary, select a language from the drop-down list. The Advanced Installation has two options, Custom Installation and Install Software Only. The Custom Installation allows you to select the machine's connection and choose individual component to install. The Install Software Only allows you to install the supplied software, such as Smart Panel. Follow the instruction on the window. 4. Read License Agreement, and select I accept the terms of the License Agreement. Then, click Next. The program searches the machine. If your machine is not found in the network or locally, the error message appears. • Check if you want to install the software without connecting the printer to the network or locally. - Check this option to install this program without a machine connected. In this case, the print a test page window will be skipped, and completes the installation. • Search again When you press this button, the firewall notice window appears; - Turn off the firewall and Search again. For Windows operating system, click Start > Control Panel > Windows Firewall, and inactivate this option. - Turn off the firewall from the third party's program beside the operating system. Refer to the manual provided by individual programs. • Direct Input The Direct Input allows you to search a specific machine on the network. - Search by IP address: Enter the IP address or the host name. Then click Next. To verify your machine's IP address, print a network configuration report (See "Printing Network Configuration report" on page 35). - Search by network path: To find a shared machine (UNC Path), enter the shared name manually or find a shared printer by clicking the Browse button. Then click Next. • Help If your machine is not connected to the computer or network, This help button gives detailed information about the how to connect the machine. • Set IP Address If you want to set a specific IP address on a specific network machine, click the Set IP Address button. The Set IP Address window appears. Do as follows: a) Select a machine to be set with a specific IP address from the list. b) Configure an IP address, subnet mask, and gateway for the machine manually and click Apply to set the specific IP address for the network machine. c) Click Next. 5. The searched machine will be shown on the screen. Select one you wish to use. If the driver searched only one printer, the confirmation window appears. The program starts installation. 6. After the installation is finished, a window asking you to print a test page appears. If you want to print a test page, click Print a test page. Otherwise, just click Next and skip to step 8. 7. If the test page prints out correctly, click Yes. If not, click No to reprint it. 8. To register as a user of the machine in order to receive information from Samsung, click On-line Registration. 9. Click Finish. • After the driver setup, you may enable firewalls. • If your printer driver doesn't work properly after setup has been completed, repair or reinstall the printer driver (See "Installing wired network or USB connected machine's driver" on page 37). Macintosh 1. Make sure that the machine is connected to your network and powered on. Also, your machine's IP address should have been set. 2. Insert the supplied software CD into your CD-ROM drive. 3. Double-click the CD-ROM icon that appears on your Macintosh desktop. 4. Double-click the MAC_Installer folder. 5. Double-click the Installer OS X icon. 6. Enter the password and click OK. 7. The Samsung Installer window opens. Click Continue. 8. Read the license agreement and click Continue. 9. Click Agree to agree to the license agreement. 10. Select Easy Install and click Install. Easy Install is recommended for most users. All components necessary for machine operations will be installed. If you select Custom Install, you can choose individual components to install. 11. The message which warns that all applications will close on your computer appears. Click Continue. • If a window asking you to select an installation type appears, select Typical installation for a network printer and then click OK. • If you select Typical installation for a network printer, the SetIP program automatically runs. If the machine has already configured network information, close the SetIP program. Go to the next step. 12. After the installation is finished, click Quit. 13. Open the Applications folder > Utilities > Print Setup Utility. • For Mac OS X 10.5 ~ 10.6, open the Applications folder > System Preferences and click Print & Fax. Network setup_ 38
-
 1
1 -
2
-
3
-
4
-
5
-
6
-
7
-
8
-
9
-
10
-
11
-
12
-
13
-
14
-
15
-
16
-
17
-
18
-
19
-
20
-
21
-
22
-
23
-
24
-
25
-
26
-
27
-
28
-
29
-
30
-
31
-
32
-
 33
33 -
 34
34 -
 35
35 -
 36
36 -
 37
37 -
 38
38 -
 39
39 -
 40
40 -
 41
41 -
 42
42 -
 43
43 -
44
-
45
-
46
-
47
-
48
-
49
-
50
-
51
-
52
-
53
-
54
-
55
-
56
-
57
-
58
-
59
-
60
-
61
-
62
-
63
-
64
-
65
-
66
-
67
-
68
-
69
-
70
-
71
-
72
-
73
-
74
-
75
-
76
-
77
-
78
-
79
-
80
-
81
-
82
-
83
-
84
-
85
-
86
-
87
-
88
-
89
-
90
-
91
-
92
-
93
-
94
-
95
-
96
-
97
-
98
-
99
-
100
-
101
-
102
-
103
-
104
-
105
-
106
-
107
-
108
-
109
-
110
-
111
-
112
-
113
-
114
-
115
-
116
-
117
-
118
-
119
-
120
-
121
 |
 |