Samsung SCX-4623F User Guide - Page 39
IPv6 Configuration, Linux, Activating IPv6, Setting IPv6 addresses - printer driver download
 |
UPC - 635753615333
View all Samsung SCX-4623F manuals
Add to My Manuals
Save this manual to your list of manuals |
Page 39 highlights
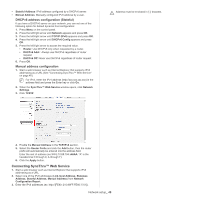
14. Click Add on the Printer List. • For Mac OS X 10.5 ~ 10.6, press the "+" icon; a display window will pop up. 15. For Mac OS X 10.3, select the IP Printing tab. • For Mac OS X 10.4, click IP Printer. • For Mac OS X 10.5 ~ 10.6, click IP. 16. Select Socket/HP Jet Direct in Printer Type. When printing a document containing many pages, printing performance may be enhanced by choosing Socket for Printer Type option. 17. Enter the machine's IP address in the Printer Address field. 18. Enter the queue name in the Queue Name field. If you cannot determine the queue name for your machine server, try using the default queue first. 19. For Mac OS X 10.3, if Auto Select does not work properly, select Samsung in Printer Model and your machine name in Model Name. • For Mac OS X 10.4, if Auto Select does not work properly, select Samsung in Print Using and your machine name in Model. • For Mac OS X 10.5 ~ 10.6, if Auto Select does not work properly, choose Select a driver to use... and your machine name in Print Using. Your machine's IP address appears on the Printer List, and is set as the default machine. 20. Click Add. If the printer driver does not work properly, uninstall the driver and reinstall it. Follow steps below to uninstall the driver for Macintosh. a) Make sure that the machine is connected to your computer and powered on. b) Insert the supplied software CD into your CD-ROM drive. c) Double-click CD-ROM icon that appears on your Macintosh desktop. d) Double-click the MAC_Installer folder. e) Double-click the Installer OS X icon. f) Enter the network key and click OK. g) The Samsung Installer window opens. Click Continue. h) Select Uninstall and click Uninstall. i) When the message which warns that all applications will close on your computer appears, click Continue. j) When the uninstall is done, click Quit. Linux Install Linux Driver and add network Printer 1. Make sure that the machine is connected to your network and powered on. Also, your machine's IP address should have been set. 2. Download the Unified Linux Driver package from the Samsung website. 3. Extract the UnifiedLinuxDriver.tar.gz file and open the new directory. 4. Double-click the Linux folder. 5. Double-click the install.sh icon. 6. The Samsung Installer window opens. Click Continue. 7. The Add printer wizard window opens. Click Next. 8. Select Network printer and click Search button. 9. The Printer's IP address and model name appears on list field. 10. Select your machine and click Next. 11. Input the printer description and Next 12. When the add printer is done, click Finish 13. When the install is done, click Finish Add network Printer 1. Double-click the Unified Driver Configurator. 2. Click Add Printer... 3. The Add printer wizard window opens. Click Next. 4. Select Network printer and click the Search button. 5. The printer's IP address and model name appears on list field. 6. Select your machine and click Next. 7. Input the printer description and Next 8. When the add printer is done, click Finish. IPV6 CONFIGURATION TCP/IPv6 is supported properly only in Windows Vista or higher. If the IPv6 network seems to not be working, set all the network setting to the factory defaults and try again (See "Restoring factory default settings" on page 37). To use the IPv6 network environment, follow the next procedure to use the IPv6 address: 1. Connect your machine to the network with a network cable. 2. Turn on the machine. 3. Print a Network Configuration Report from the machine's control panel that will check IPv6 addresses. a) Press Menu on the control panel. b) Press the left/right arrow until Network appears and press OK. c) Press the left/right arrow until Network Info. appears and press OK. d) Press the left/right arrow until Yes appears and press OK. 4. Select Start > Control Panel > Hardware and Sound > Printers > Add Printer. 5. Click Add a local printer on the Add Printer windows. 6. Follow the instruction on the window. If the machine does not work in the network environment, activate IPv6. Refer to the next section followed by. Activating IPv6 The machine is provided with IPv6 feature on. 1. Press Menu on the control panel. 2. Press the left/right arrow until Network appears and press OK. 3. Press the left/right arrow until TCP/IP (IPv6) appears and press OK. 4. Press the left/right arrow until IPv6 Activate appears and press OK. 5. Press the left/right arrow until On appears and press OK. 6. Turn the machine off and turn it on again. 7. Reinstall your printer driver. Setting IPv6 addresses Machine supports following IPv6 addresses for network printing and managements. • Link-local Address: Self-configured local IPv6 address (Address starts with FE80). • Stateless Address: Automatically configured IPv6 address by a network router. Network setup_ 39
-
 1
1 -
2
-
3
-
4
-
5
-
6
-
7
-
8
-
9
-
10
-
11
-
12
-
13
-
14
-
15
-
16
-
17
-
18
-
19
-
20
-
21
-
22
-
23
-
24
-
25
-
26
-
27
-
28
-
29
-
30
-
31
-
32
-
33
-
 34
34 -
 35
35 -
 36
36 -
 37
37 -
 38
38 -
 39
39 -
 40
40 -
 41
41 -
 42
42 -
 43
43 -
 44
44 -
45
-
46
-
47
-
48
-
49
-
50
-
51
-
52
-
53
-
54
-
55
-
56
-
57
-
58
-
59
-
60
-
61
-
62
-
63
-
64
-
65
-
66
-
67
-
68
-
69
-
70
-
71
-
72
-
73
-
74
-
75
-
76
-
77
-
78
-
79
-
80
-
81
-
82
-
83
-
84
-
85
-
86
-
87
-
88
-
89
-
90
-
91
-
92
-
93
-
94
-
95
-
96
-
97
-
98
-
99
-
100
-
101
-
102
-
103
-
104
-
105
-
106
-
107
-
108
-
109
-
110
-
111
-
112
-
113
-
114
-
115
-
116
-
117
-
118
-
119
-
120
-
121
 |
 |