D-Link DGS-3308FG Product Manual - Page 156
Setting a Default Gateway, Setting the Administrator Password, Setting Trap Destinations, Saving
 |
UPC - 790069239373
View all D-Link DGS-3308FG manuals
Add to My Manuals
Save this manual to your list of manuals |
Page 156 highlights
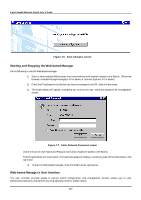
8-port Gigabit Ethernet Switch User's Guide 1. Starting at the main window of the User Interface, click Configuration and then press Switch IP Setup. 2. Enter the IP address, the subnet mask, and the management VD in the fields offered. 3. Click Apply to make the change effective. Use Save Changes on the Maintenance menu to enter the IP address into NV-RAM. Setting a Default Gateway The default gateway parameter defines the IP address of a router or other network device to which IP packets are to be sent if destined for a subnet outside of that in which the switch is operating. This parameter must be set if you are attempting to manage the Switch from a remote network or across the Internet. 1. Starting at the main window of the User Interface, click Configuration and then press Switch IP Setup. 2. Enter the router IP address and click Apply. Use Save Changes on the Maintenance menu to enter the IP address into NV-RAM. Setting the Administrator Password Management access to the Switch is restricted based on the administrator password. Administrators have read/write access for parameters governing the SNMP agent. You should therefore assign a password to the default administrator as soon as possible, and store it in a safe place. Setting Trap Destinations If you wish to record SNMP traps, or events, generated by the Switch, you must configure a destination for the IP Trap Managers. A trap destination is the IP address of the computer system on which the Web-based manager is being run. 1. Starting at the main menu of the User Interface, click Management and then press Trap Receivers. 2. Enter the IP address and community name. 3. Move to the Status field, and select Enabled. 4. Click Apply to make the changes effective. Use Save Changes on the Maintenance menu to enter the configuration into NV-RAM. Saving Configuration Changes Clicking the Apply button makes any configuration change active, but only for the current session. If the Switch is restarted (rebooted) without entering the configuration changes into the non-volatile RAM (flash RAM), the configuration changes will be lost. To enter configuration changes into the Switch's non-volatile RAM, select Save Changes from the Maintenance menu. Click on the Save Configuration button to enter the current configuration into NV-RAM. The configuration will then be loaded into the Switch's memory when it is restarted. 146
-
 1
1 -
2
-
3
-
4
-
5
-
6
-
7
-
8
-
9
-
10
-
11
-
12
-
13
-
14
-
15
-
16
-
17
-
18
-
19
-
20
-
21
-
22
-
23
-
24
-
25
-
26
-
27
-
28
-
29
-
30
-
31
-
32
-
33
-
34
-
35
-
36
-
37
-
38
-
39
-
40
-
41
-
42
-
43
-
44
-
45
-
46
-
47
-
48
-
49
-
50
-
51
-
52
-
53
-
54
-
55
-
56
-
57
-
58
-
59
-
60
-
61
-
62
-
63
-
64
-
65
-
66
-
67
-
68
-
69
-
70
-
71
-
72
-
73
-
74
-
75
-
76
-
77
-
78
-
79
-
80
-
81
-
82
-
83
-
84
-
85
-
86
-
87
-
88
-
89
-
90
-
91
-
92
-
93
-
94
-
95
-
96
-
97
-
98
-
99
-
100
-
101
-
102
-
103
-
104
-
105
-
106
-
107
-
108
-
109
-
110
-
111
-
112
-
113
-
114
-
115
-
116
-
117
-
118
-
119
-
120
-
121
-
122
-
123
-
124
-
125
-
126
-
127
-
128
-
129
-
130
-
131
-
132
-
133
-
134
-
135
-
136
-
137
-
138
-
139
-
140
-
141
-
142
-
143
-
144
-
145
-
146
-
147
-
148
-
149
-
150
-
 151
151 -
 152
152 -
 153
153 -
 154
154 -
 155
155 -
 156
156 -
 157
157 -
 158
158 -
 159
159 -
 160
160 -
 161
161 -
162
-
163
-
164
-
165
-
166
-
167
-
168
-
169
-
170
-
171
-
172
-
173
-
174
-
175
-
176
-
177
-
178
-
179
-
180
-
181
-
182
-
183
-
184
-
185
-
186
-
187
-
188
-
189
-
190
-
191
-
192
-
193
-
194
-
195
-
196
-
197
-
198
-
199
-
200
-
201
-
202
-
203
-
204
-
205
-
206
-
207
-
208
-
209
-
210
-
211
-
212
-
213
-
214
-
215
-
216
-
217
-
218
-
219
-
220
-
221
-
222
-
223
-
224
-
225
-
226
-
227
-
228
-
229
-
230
-
231
-
232
-
233
-
234
-
235
-
236
-
237
 |
 |
