D-Link DGS-3308FG Product Manual - Page 74
Viewing Current User Accounts
 |
UPC - 790069239373
View all D-Link DGS-3308FG manuals
Add to My Manuals
Save this manual to your list of manuals |
Page 74 highlights
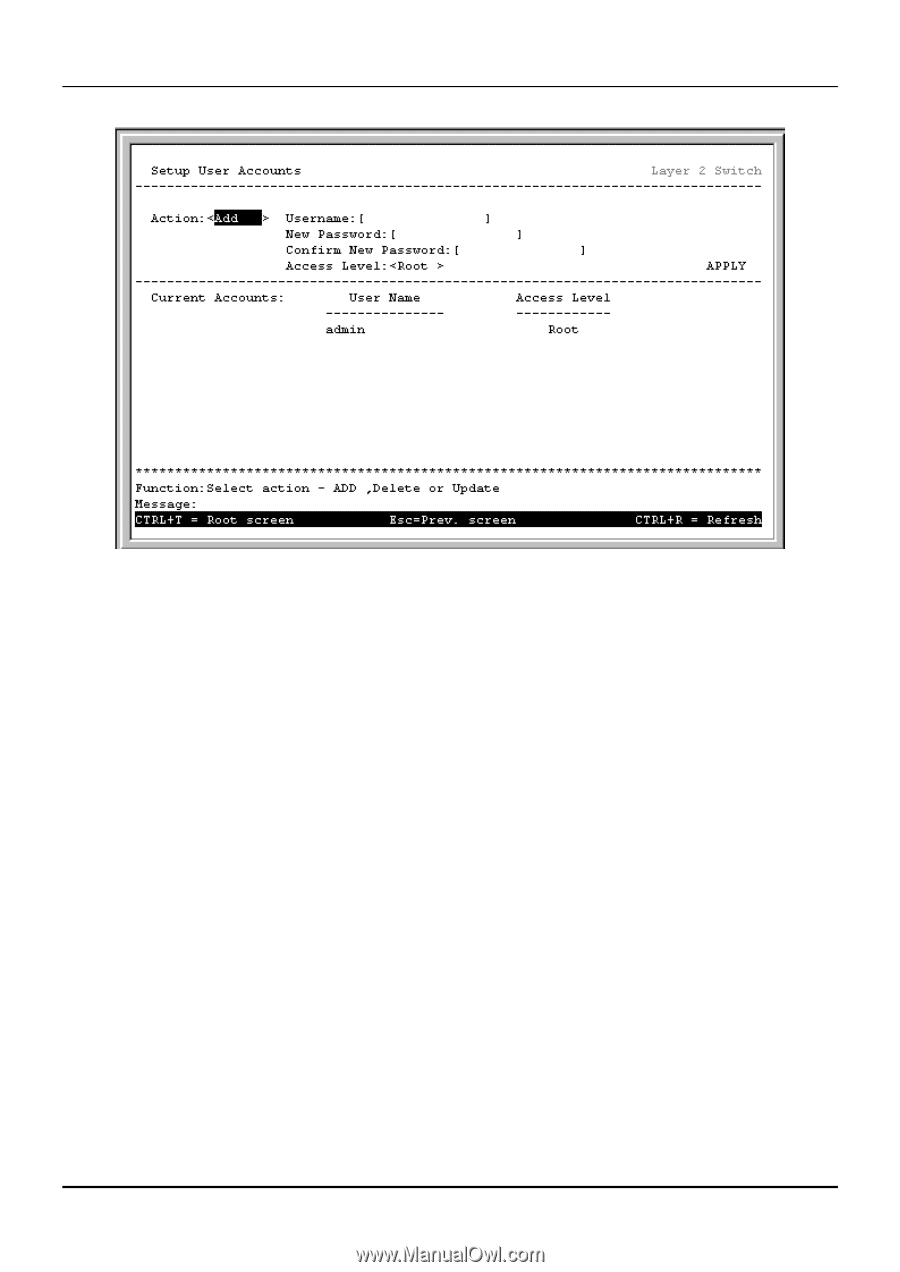
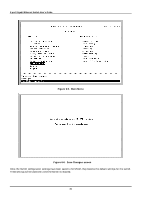
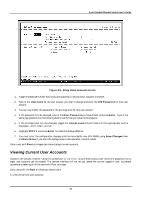
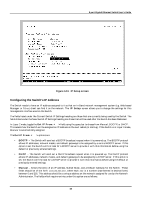
8-port Gigabit Ethernet Switch User's Guide Figure 6-9. Setup Users Accounts screen 1. Toggle the Action: field using the space bar to choose Add, Update, or Delete. 2. Type in the Username for the user account you wish to change and enter the Old Password for that user account. 3. You can now modify the password or the privilege level for this user account. 4. If the password is to be changed, type in the New Password you have chosen, and press Enter. Type in the same new password in the following field to verify that you have not mistyped it. 5. If the privilege level is to be changed, toggle the Access Level: field until the appropriate level is displayed - Root, User+ or User. 6. Highlight APPLY and press Enter to make the change effective. 7. You must enter the configuration changes into the non-volatile ram (NV-RAM) using Save Changes from the Main Menu if you want the configuration to be used after a switch reboot. Only a user with Root privileges can make changes to user accounts. Viewing Current User Accounts Access to the console, whether using the console port or via Telnet, is controlled using a user name and password. Up to eight user accounts can be created. The console interface will not let you delete the current logged-in user, to prevent accidentally deleting all of the users with Root privilege. Only users with the Root privilege can delete users. To view the current user accounts: 64
-
 1
1 -
2
-
3
-
4
-
5
-
6
-
7
-
8
-
9
-
10
-
11
-
12
-
13
-
14
-
15
-
16
-
17
-
18
-
19
-
20
-
21
-
22
-
23
-
24
-
25
-
26
-
27
-
28
-
29
-
30
-
31
-
32
-
33
-
34
-
35
-
36
-
37
-
38
-
39
-
40
-
41
-
42
-
43
-
44
-
45
-
46
-
47
-
48
-
49
-
50
-
51
-
52
-
53
-
54
-
55
-
56
-
57
-
58
-
59
-
60
-
61
-
62
-
63
-
64
-
65
-
66
-
67
-
68
-
 69
69 -
 70
70 -
 71
71 -
 72
72 -
 73
73 -
 74
74 -
 75
75 -
 76
76 -
 77
77 -
 78
78 -
 79
79 -
80
-
81
-
82
-
83
-
84
-
85
-
86
-
87
-
88
-
89
-
90
-
91
-
92
-
93
-
94
-
95
-
96
-
97
-
98
-
99
-
100
-
101
-
102
-
103
-
104
-
105
-
106
-
107
-
108
-
109
-
110
-
111
-
112
-
113
-
114
-
115
-
116
-
117
-
118
-
119
-
120
-
121
-
122
-
123
-
124
-
125
-
126
-
127
-
128
-
129
-
130
-
131
-
132
-
133
-
134
-
135
-
136
-
137
-
138
-
139
-
140
-
141
-
142
-
143
-
144
-
145
-
146
-
147
-
148
-
149
-
150
-
151
-
152
-
153
-
154
-
155
-
156
-
157
-
158
-
159
-
160
-
161
-
162
-
163
-
164
-
165
-
166
-
167
-
168
-
169
-
170
-
171
-
172
-
173
-
174
-
175
-
176
-
177
-
178
-
179
-
180
-
181
-
182
-
183
-
184
-
185
-
186
-
187
-
188
-
189
-
190
-
191
-
192
-
193
-
194
-
195
-
196
-
197
-
198
-
199
-
200
-
201
-
202
-
203
-
204
-
205
-
206
-
207
-
208
-
209
-
210
-
211
-
212
-
213
-
214
-
215
-
216
-
217
-
218
-
219
-
220
-
221
-
222
-
223
-
224
-
225
-
226
-
227
-
228
-
229
-
230
-
231
-
232
-
233
-
234
-
235
-
236
-
237
 |
 |