Epson Equity LT User Manual - Page 25
Setting the DIP Switches
 |
View all Epson Equity LT manuals
Add to My Manuals
Save this manual to your list of manuals |
Page 25 highlights
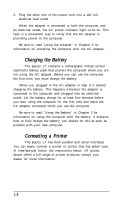
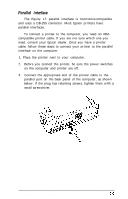
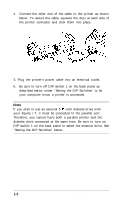
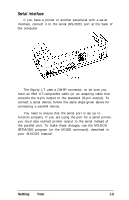
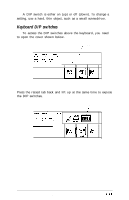
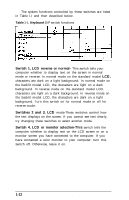
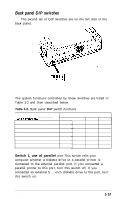
Note If you plan to connect a color monitor or an external diskette drive to your computer, do it at this point. For instructions on connecting the monitor, see Appendix A, "Options and Maintenance." For instructions on connecting an external drive, see the instructions that came with the drive you bought. If your computer already has two internal diskette drives and you connect an external drive, the internal diskette drive on the left side of the computer is disabled. Be sure to set the computer's DIP switches correctly if you connect either of these devices to your Equity LT. See 'Setting the DIP Switches" below. 6 Setting the DIP Switches The DIP switches on the Equity LT are set to provide your computer with information about itself. Each time you turn it on, the computer checks the DIP switch settings to determine the LCD mode in use, whether an external diskette drive is connected, the number of diskette drives in use, and the type of serial connection. The Equity LT has two sets of DIP switches: one just above the keyboard and one on the back panel of the computer. The set above the keyboard has four switches that control the LCD screen. The set on the back panel has four switches that control the diskette drive and parallel and serial interface configuration. Your dealer may have set these switches for you. Read this section, however, to be sure the settings match your system setup. Note Change the DIP switches only while your computer is off. Otherwise, the new settings may not take effect until you turn the computer off and then on again. 1-10 Setting Up Your System
-
 1
1 -
2
-
3
-
4
-
5
-
6
-
7
-
8
-
9
-
10
-
11
-
12
-
13
-
14
-
15
-
16
-
17
-
18
-
19
-
 20
20 -
 21
21 -
 22
22 -
 23
23 -
 24
24 -
 25
25 -
 26
26 -
 27
27 -
 28
28 -
 29
29 -
 30
30 -
31
-
32
-
33
-
34
-
35
-
36
-
37
-
38
-
39
-
40
-
41
-
42
-
43
-
44
-
45
-
46
-
47
-
48
-
49
-
50
-
51
-
52
-
53
-
54
-
55
-
56
-
57
-
58
-
59
-
60
-
61
-
62
-
63
-
64
-
65
-
66
-
67
-
68
-
69
-
70
-
71
-
72
-
73
-
74
-
75
-
76
-
77
-
78
-
79
-
80
-
81
-
82
-
83
-
84
-
85
-
86
-
87
-
88
-
89
-
90
-
91
-
92
-
93
-
94
-
95
-
96
-
97
-
98
-
99
-
100
-
101
-
102
-
103
-
104
-
105
-
106
-
107
-
108
-
109
-
110
-
111
-
112
-
113
-
114
-
115
-
116
-
117
-
118
-
119
-
120
-
121
-
122
-
123
-
124
-
125
-
126
-
127
-
128
-
129
-
130
-
131
-
132
-
133
-
134
-
135
-
136
-
137
-
138
-
139
-
140
-
141
-
142
-
143
-
144
-
145
-
146
-
147
-
148
-
149
-
150
-
151
 |
 |