Epson Equity LT User Manual - Page 43
Leaving the Setup program, without saving, saving
 |
View all Epson Equity LT manuals
Add to My Manuals
Save this manual to your list of manuals |
Page 43 highlights
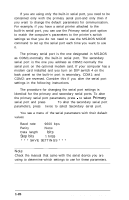
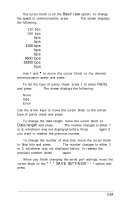
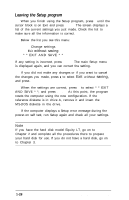
Leaving the Setup program When you finish using the Setup program, press t until the cursor block is on Exit and press Enter. The screen displays a list of the current settings you just made. Check the list to make sure all the information is correct. Below the list you see this menu: Change settings Exit without saving * * EXIT AND SAVE * * If any setting is incorrect, press Enter. The main Setup menu is displayed again, and you can correct the setting. If you did not make any changes or if you want to cancel the changes you made, press 1 to select Exit without saving, and press Enter. When the settings are correct, press 1 to select * * EXIT AND SAVE * *, and press Enter. At this point, the program resets the computer using the new configuration. If the reference diskette is in drive A, remove it and insert the MS-DOS diskette in the drive. If the computer displays a Setup error message during the power-on self test, run Setup again and check all your settings. Note If you have the hard disk model Equity LT, go on to Chapter 2 and complete all the procedures there to prepare your hard disk for use. If you do not have a hard disk, go on to Chapter 3. 1-28 Setting Up Your System
-
 1
1 -
2
-
3
-
4
-
5
-
6
-
7
-
8
-
9
-
10
-
11
-
12
-
13
-
14
-
15
-
16
-
17
-
18
-
19
-
20
-
21
-
22
-
23
-
24
-
25
-
26
-
27
-
28
-
29
-
30
-
31
-
32
-
33
-
34
-
35
-
36
-
37
-
 38
38 -
 39
39 -
 40
40 -
 41
41 -
 42
42 -
 43
43 -
 44
44 -
 45
45 -
 46
46 -
 47
47 -
 48
48 -
49
-
50
-
51
-
52
-
53
-
54
-
55
-
56
-
57
-
58
-
59
-
60
-
61
-
62
-
63
-
64
-
65
-
66
-
67
-
68
-
69
-
70
-
71
-
72
-
73
-
74
-
75
-
76
-
77
-
78
-
79
-
80
-
81
-
82
-
83
-
84
-
85
-
86
-
87
-
88
-
89
-
90
-
91
-
92
-
93
-
94
-
95
-
96
-
97
-
98
-
99
-
100
-
101
-
102
-
103
-
104
-
105
-
106
-
107
-
108
-
109
-
110
-
111
-
112
-
113
-
114
-
115
-
116
-
117
-
118
-
119
-
120
-
121
-
122
-
123
-
124
-
125
-
126
-
127
-
128
-
129
-
130
-
131
-
132
-
133
-
134
-
135
-
136
-
137
-
138
-
139
-
140
-
141
-
142
-
143
-
144
-
145
-
146
-
147
-
148
-
149
-
150
-
151
 |
 |