HP t310 PCoIP Management Console User Manual - Page 20
Host offering this service, PCoIP Endpoint, Display name, ASCII - specifications
 |
View all HP t310 manuals
Add to My Manuals
Save this manual to your list of manuals |
Page 20 highlights
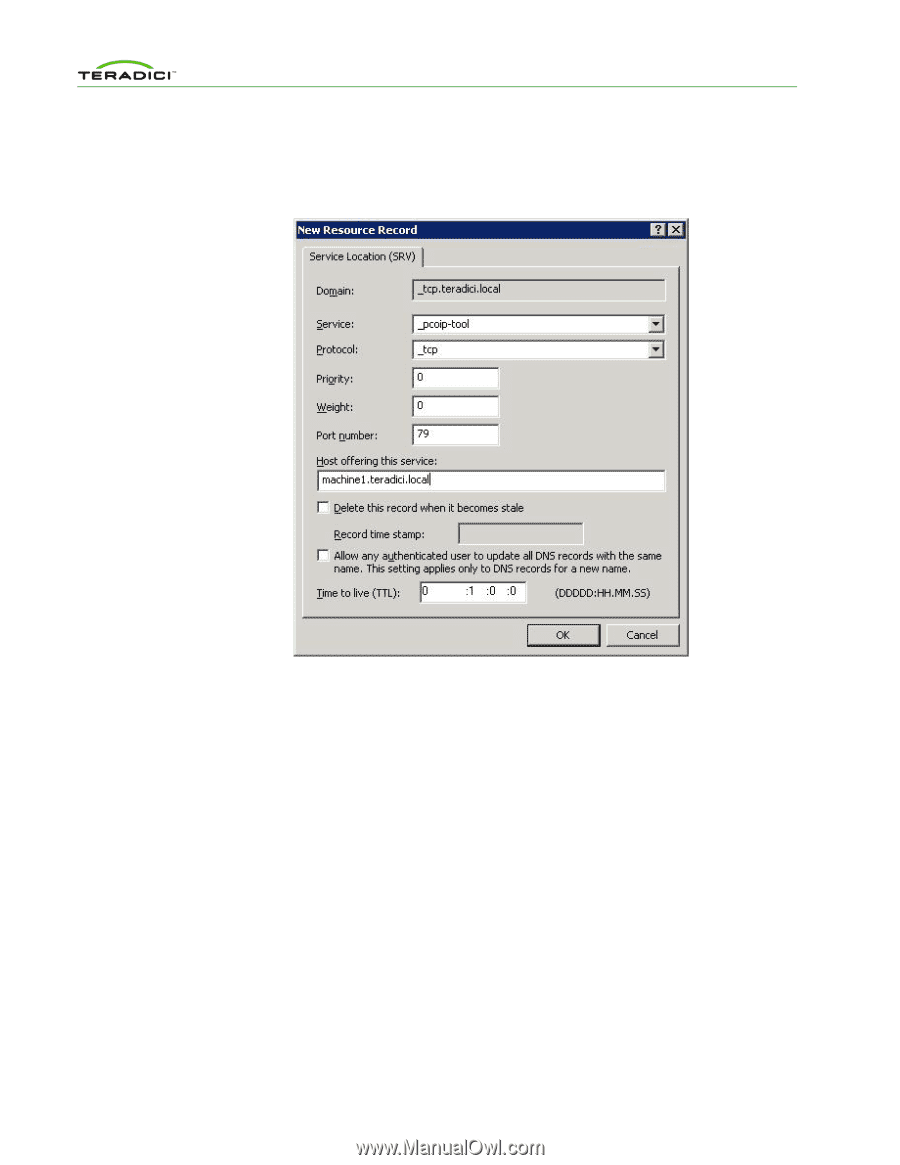
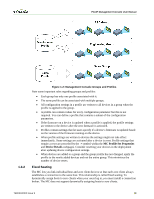
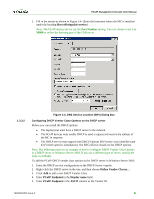
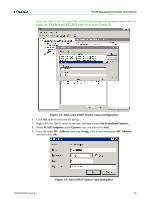
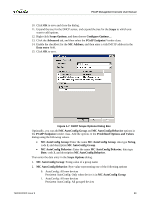
PCoIP Management Console User Manual 5. Fill in the entries as shown in Figure 1-4. (Enter the hostname where the MC is installed under the heading Host offering this service.) Note: The PCoIP devices do not use the Port Number setting. You can choose to set it to 50000 to reflect the listening port of the CMI server. 1.3.3.2 Figure 1-4: DNS Service Location (SRV) Dialog Box Configuring DHCP Vendor Class Options on the DHCP server Before you can install the DHCP options: • The deployment must have a DHCP server in the network. • The PCoIP devices must enable DHCP to send a request and receive the address of the MC in response. • The DHCP server must support both DHCP Options 60 (Vendor class identifier) and 43 (Vendor specific information). See RFC2132 for details on the DHCP options. Note: The following steps are an example of how to configure DHCP Vendor Class Options in a DHCP server in Windows Server 2003. If you use a different type of server, modify the steps accordingly. To add the PCoIP DHCP vender class options to the DHCP server in Windows Server 2003: 1. Enter the DHCP service configuration on the DHCP Server console. 2. Right-click the DHCP server in the tree, and then choose Define Vendor Classes... 3. Click Add to add a new DHCP Vendor Class. 4. Enter PCoIP Endpoint in the Display name field. 5. Enter PCoIP Endpoint in the ASCII column as the Vendor ID. TER0812002 Issue 9 21
-
 1
1 -
2
-
3
-
4
-
5
-
6
-
7
-
8
-
9
-
10
-
11
-
12
-
13
-
14
-
 15
15 -
 16
16 -
 17
17 -
 18
18 -
 19
19 -
 20
20 -
 21
21 -
 22
22 -
 23
23 -
 24
24 -
 25
25 -
26
-
27
-
28
-
29
-
30
-
31
-
32
-
33
-
34
-
35
-
36
-
37
-
38
-
39
-
40
-
41
-
42
-
43
-
44
-
45
-
46
-
47
-
48
-
49
-
50
-
51
-
52
-
53
-
54
-
55
-
56
-
57
-
58
-
59
-
60
-
61
-
62
-
63
-
64
-
65
-
66
-
67
-
68
-
69
-
70
-
71
-
72
-
73
-
74
-
75
-
76
-
77
-
78
-
79
-
80
-
81
-
82
-
83
-
84
-
85
-
86
-
87
 |
 |