HP t310 PCoIP Management Console User Manual - Page 31
Installing the Management Console into your Existing - review
 |
View all HP t310 manuals
Add to My Manuals
Save this manual to your list of manuals |
Page 31 highlights
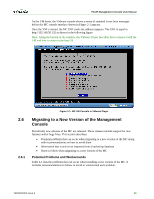
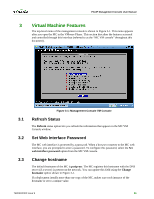
PCoIP Management Console User Manual • TER0904003_Issue_X-PCoIP_MC_Release_Notes.pdf: Teradici PCoIP Management Console Release Notes, where X is the current issue number 2.3 Installing the Management Console using VMware Player 1. Download the VMware Player application. The MC is distributed as a VMware virtual machine (VM) contained in a zip file. The VM is run using VMware Player. VMware Player is a free application that you can download from http://www.vmware.com/download/player/. Follow the directions provided by VMware to download and install this application on the MC host machine. 2. Extract the contents of the file PCoIP_MC_relA-B-C_vDEF.zip into a folder on the MC host machine. The release number (A-B-C) and build ID (DEF) are encoded in the filename. 3. To start the MC, open the folder from step 2. Double-click the file PCoIP_MC_relA-BC_vDEF.vmx to launch VMware Player and have it load the MC VM. You can also start the MC from within VMware Player. Select File->Open a Virtual Machine, and then navigate to the PCoIP_MC_relA-B-C_vDEF.vmx file. Click Open. Once VMware Player has launched the MC at least once, you can restart the MC from within VMware Player's startup screen by double-clicking on the PCoIP MC entry in the list of recently opened VMs. 2.4 Installing the Management Console into your Existing VMware ESX™ server 1. The recommended method to import the MC VM into a VMware ESX server is to use the VMware vCenter™ Converter Standalone Client. Download and install this free tool from http://www.vmware.com/products/converter/. 2. Click the Convert Machine button to launch the Conversion wizard. 3. Select source type VMware Workstation or other VMware virtual machine. 4. Use the Browse button to locate the PCoIP MC's .vmx file. Click Next. 5. Select the destination type VMware Infrastructure virtual machine. 6. Enter the address, user name, and password of either the VMware vCenter or the VMware ESX host. Click Next. 7. Edit the virtual machine name (optional), and then click Next. 8. Review the options, and then click Next. 9. Click Finish to begin the conversion. 10. Once complete, start the VM through VMware vSphere client or your preferred mechanism. 11. See section 2.2 to learn about the contents of the MC virtual machine. 2.5 Running the Management Console Before running the MC, make sure the MC host machine and PCoIP devices are connected to the same network. The MC supports both DHCP and static IP addressing. TER0812002 Issue 9 32
-
 1
1 -
2
-
3
-
4
-
5
-
6
-
7
-
8
-
9
-
10
-
11
-
12
-
13
-
14
-
15
-
16
-
17
-
18
-
19
-
20
-
21
-
22
-
23
-
24
-
25
-
 26
26 -
 27
27 -
 28
28 -
 29
29 -
 30
30 -
 31
31 -
 32
32 -
 33
33 -
 34
34 -
 35
35 -
 36
36 -
37
-
38
-
39
-
40
-
41
-
42
-
43
-
44
-
45
-
46
-
47
-
48
-
49
-
50
-
51
-
52
-
53
-
54
-
55
-
56
-
57
-
58
-
59
-
60
-
61
-
62
-
63
-
64
-
65
-
66
-
67
-
68
-
69
-
70
-
71
-
72
-
73
-
74
-
75
-
76
-
77
-
78
-
79
-
80
-
81
-
82
-
83
-
84
-
85
-
86
-
87
 |
 |
