IBM 436854u Service Guide - Page 107
Removing the front-panel assembly, Disconnect the front-panel assembly cable from the system board
 |
UPC - 883436026772
View all IBM 436854u manuals
Add to My Manuals
Save this manual to your list of manuals |
Page 107 highlights
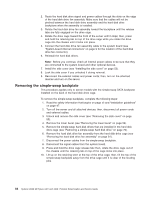
Removing the front-panel assembly To remove the front-panel assembly, complete the following steps: 1. Read the safety information that begins on page vii and "Installation guidelines" on page 47. 2. Turn off the server and all attached devices; then, disconnect all power cords and external cables. 3. Unlock and remove the side cover (see "Removing the side cover" on page 52). 4. Remove the lower bezel (see "Removing the lower bezel" on page 54). 5. Remove the upper bezel (see "Removing the upper bezel" on page 56). 6. Slide the drives in bay 1 and bay 2 forward slightly (see "Removing a CD or DVD drive" on page 62 for more information). It is not necessary to remove these drives. 7. If the server has hot-swap power supplies, remove the power supplies and the power-supply cage (see "Removing the hot-swap power supply cage" on page 94). 8. Disconnect the front-panel assembly cable from the system board, and note the routing of the cable (see "System-board internal connectors" on page 9 for the location of the front-panel connector). 9. Press up on the release tab of the front-panel assembly and pull the assembly toward the rear of the server; then, remove the front-panel assembly from the chassis. 10. If you are instructed to return the front-panel assembly, follow all packaging instructions, and use any packaging materials for shipping that are supplied to you. Chapter 4. Removing and replacing server components 89
-
 1
1 -
2
-
3
-
4
-
5
-
6
-
7
-
8
-
9
-
10
-
11
-
12
-
13
-
14
-
15
-
16
-
17
-
18
-
19
-
20
-
21
-
22
-
23
-
24
-
25
-
26
-
27
-
28
-
29
-
30
-
31
-
32
-
33
-
34
-
35
-
36
-
37
-
38
-
39
-
40
-
41
-
42
-
43
-
44
-
45
-
46
-
47
-
48
-
49
-
50
-
51
-
52
-
53
-
54
-
55
-
56
-
57
-
58
-
59
-
60
-
61
-
62
-
63
-
64
-
65
-
66
-
67
-
68
-
69
-
70
-
71
-
72
-
73
-
74
-
75
-
76
-
77
-
78
-
79
-
80
-
81
-
82
-
83
-
84
-
85
-
86
-
87
-
88
-
89
-
90
-
91
-
92
-
93
-
94
-
95
-
96
-
97
-
98
-
99
-
100
-
101
-
 102
102 -
 103
103 -
 104
104 -
 105
105 -
 106
106 -
 107
107 -
 108
108 -
 109
109 -
 110
110 -
 111
111 -
 112
112 -
113
-
114
-
115
-
116
-
117
-
118
-
119
-
120
-
121
-
122
-
123
-
124
-
125
-
126
-
127
-
128
-
129
-
130
-
131
-
132
-
133
-
134
-
135
-
136
-
137
-
138
-
139
-
140
-
141
-
142
-
143
-
144
-
145
-
146
-
147
-
148
-
149
-
150
-
151
-
152
-
153
-
154
-
155
-
156
-
157
-
158
-
159
-
160
-
161
-
162
-
163
-
164
-
165
-
166
-
167
-
168
-
169
-
170
-
171
-
172
-
173
-
174
-
175
-
176
-
177
-
178
-
179
-
180
-
181
-
182
-
183
-
184
-
185
-
186
-
187
-
188
-
189
-
190
-
191
-
192
-
193
-
194
-
195
-
196
-
197
-
198
-
199
-
200
-
201
-
202
-
203
-
204
-
205
-
206
-
207
-
208
-
209
-
210
-
211
-
212
-
213
-
214
-
215
-
216
-
217
-
218
-
219
-
220
-
221
-
222
-
223
-
224
-
225
-
226
-
227
-
228
-
229
-
230
-
231
-
232
-
233
-
234
-
235
-
236
-
237
-
238
-
239
-
240
-
241
-
242
-
243
-
244
-
245
-
246
-
247
-
248
-
249
-
250
-
251
-
252
-
253
-
254
-
255
-
256
-
257
-
258
-
259
-
260
-
261
-
262
-
263
-
264
-
265
-
266
 |
 |
