IBM 436854u Service Guide - Page 75
Installing the upper bezel, Install the lower bezel see Installing the lower bezel
 |
UPC - 883436026772
View all IBM 436854u manuals
Add to My Manuals
Save this manual to your list of manuals |
Page 75 highlights
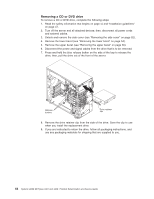
Installing the upper bezel To install the upper bezel, complete the following steps: 1. Insert the two tabs on the right-side of the upper bezel into the corresponding holes on the right side of the chassis. 2. Rotate the upper bezel to the left side of the chassis until the bezel clips are aligned with the corresponding indentations on the left side of the chassis and it snaps into place. 3. Install the lower bezel (see "Installing the lower bezel" on page 55). 4. Install the side cover (see "Installing the side cover" on page 53). 5. Lock the side cover. 6. Reconnect the external cables and power cords; then, turn on the attached devices and turn on the server. Chapter 4. Removing and replacing server components 57
-
 1
1 -
2
-
3
-
4
-
5
-
6
-
7
-
8
-
9
-
10
-
11
-
12
-
13
-
14
-
15
-
16
-
17
-
18
-
19
-
20
-
21
-
22
-
23
-
24
-
25
-
26
-
27
-
28
-
29
-
30
-
31
-
32
-
33
-
34
-
35
-
36
-
37
-
38
-
39
-
40
-
41
-
42
-
43
-
44
-
45
-
46
-
47
-
48
-
49
-
50
-
51
-
52
-
53
-
54
-
55
-
56
-
57
-
58
-
59
-
60
-
61
-
62
-
63
-
64
-
65
-
66
-
67
-
68
-
69
-
 70
70 -
 71
71 -
 72
72 -
 73
73 -
 74
74 -
 75
75 -
 76
76 -
 77
77 -
 78
78 -
 79
79 -
 80
80 -
81
-
82
-
83
-
84
-
85
-
86
-
87
-
88
-
89
-
90
-
91
-
92
-
93
-
94
-
95
-
96
-
97
-
98
-
99
-
100
-
101
-
102
-
103
-
104
-
105
-
106
-
107
-
108
-
109
-
110
-
111
-
112
-
113
-
114
-
115
-
116
-
117
-
118
-
119
-
120
-
121
-
122
-
123
-
124
-
125
-
126
-
127
-
128
-
129
-
130
-
131
-
132
-
133
-
134
-
135
-
136
-
137
-
138
-
139
-
140
-
141
-
142
-
143
-
144
-
145
-
146
-
147
-
148
-
149
-
150
-
151
-
152
-
153
-
154
-
155
-
156
-
157
-
158
-
159
-
160
-
161
-
162
-
163
-
164
-
165
-
166
-
167
-
168
-
169
-
170
-
171
-
172
-
173
-
174
-
175
-
176
-
177
-
178
-
179
-
180
-
181
-
182
-
183
-
184
-
185
-
186
-
187
-
188
-
189
-
190
-
191
-
192
-
193
-
194
-
195
-
196
-
197
-
198
-
199
-
200
-
201
-
202
-
203
-
204
-
205
-
206
-
207
-
208
-
209
-
210
-
211
-
212
-
213
-
214
-
215
-
216
-
217
-
218
-
219
-
220
-
221
-
222
-
223
-
224
-
225
-
226
-
227
-
228
-
229
-
230
-
231
-
232
-
233
-
234
-
235
-
236
-
237
-
238
-
239
-
240
-
241
-
242
-
243
-
244
-
245
-
246
-
247
-
248
-
249
-
250
-
251
-
252
-
253
-
254
-
255
-
256
-
257
-
258
-
259
-
260
-
261
-
262
-
263
-
264
-
265
-
266
 |
 |

Installing the upper bezel
To install the upper bezel, complete the following steps:
1.
Insert the two tabs on the right-side of the upper bezel into the corresponding
holes on the right side of the chassis.
2.
Rotate the upper bezel to the left side of the chassis until the bezel clips are
aligned with the corresponding indentations on the left side of the chassis and it
snaps into place.
3.
Install the lower bezel (see “Installing the lower bezel” on page 55).
4.
Install the side cover (see “Installing the side cover” on page 53).
5.
Lock the side cover.
6.
Reconnect the external cables and power cords; then, turn on the attached
devices and turn on the server.
Chapter 4. Removing and replacing server components
57