IBM 436854u Service Guide - Page 120
Removing an IBM Remote Supervisor Adapter II SlimLine
 |
UPC - 883436026772
View all IBM 436854u manuals
Add to My Manuals
Save this manual to your list of manuals |
Page 120 highlights
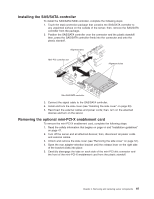
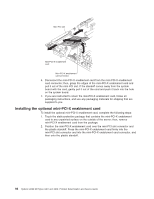
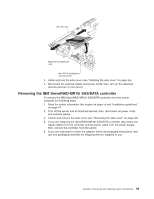
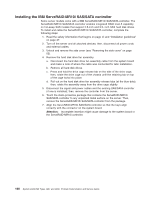
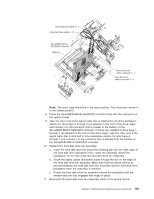
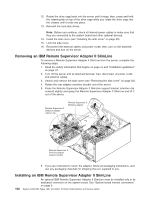
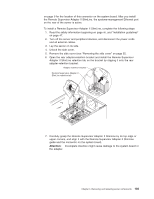
12. Rotate the drive cage back into the server until it stops; then, press and hold the retaining tab on top of the drive cage while you rotate the drive cage into the chassis until it locks into place. 13. Reinstall the hard disk drives. Note: Before you continue, check all internal power cables to make sure that they are connected to the system board and other optional devices. 14. Install the side cover (see "Installing the side cover" on page 53). 15. Lock the side cover. 16. Reconnect the external cables and power cords; then, turn on the attached devices and turn on the server. Removing an IBM Remote Supervisor Adapter II SlimLine To remove a Remote Supervisor Adapter II SlimLine from the server, complete the following steps: 1. Read the safety information that begins on page vii and "Installation guidelines" on page 47. 2. Turn off the server and all attached devices; then, disconnect all power cords and external cables. 3. Unlock and remove the side cover (see "Removing the side cover" on page 52). 4. Rotate the rear adapter-retention bracket out of the server. 5. Press the Remote Supervisor Adapter II SlimLine support bracket retention clip outward slightly and grasp the Remote Supervisor Adapter II SlimLine and lift it out of the server. Remote Supervisor II SlimLine adapter retainer clip Remote Supervisor II SlimLine adapter Remote Supervisor II SlimLine adapter support bracket 6. If you are instructed to return the adapter, follow all packaging instructions, and use any packaging materials for shipping that are supplied to you. Installing an IBM Remote Supervisor Adapter II SlimLine An optional IBM Remote Supervisor Adapter II SlimLine must be installed only in its dedicated connector on the system board. See "System-board internal connectors" on page 9 102 System x3200 M2 Types 4367 and 4368: Problem Determination and Service Guide
-
 1
1 -
2
-
3
-
4
-
5
-
6
-
7
-
8
-
9
-
10
-
11
-
12
-
13
-
14
-
15
-
16
-
17
-
18
-
19
-
20
-
21
-
22
-
23
-
24
-
25
-
26
-
27
-
28
-
29
-
30
-
31
-
32
-
33
-
34
-
35
-
36
-
37
-
38
-
39
-
40
-
41
-
42
-
43
-
44
-
45
-
46
-
47
-
48
-
49
-
50
-
51
-
52
-
53
-
54
-
55
-
56
-
57
-
58
-
59
-
60
-
61
-
62
-
63
-
64
-
65
-
66
-
67
-
68
-
69
-
70
-
71
-
72
-
73
-
74
-
75
-
76
-
77
-
78
-
79
-
80
-
81
-
82
-
83
-
84
-
85
-
86
-
87
-
88
-
89
-
90
-
91
-
92
-
93
-
94
-
95
-
96
-
97
-
98
-
99
-
100
-
101
-
102
-
103
-
104
-
105
-
106
-
107
-
108
-
109
-
110
-
111
-
112
-
113
-
114
-
 115
115 -
 116
116 -
 117
117 -
 118
118 -
 119
119 -
 120
120 -
 121
121 -
 122
122 -
 123
123 -
 124
124 -
 125
125 -
126
-
127
-
128
-
129
-
130
-
131
-
132
-
133
-
134
-
135
-
136
-
137
-
138
-
139
-
140
-
141
-
142
-
143
-
144
-
145
-
146
-
147
-
148
-
149
-
150
-
151
-
152
-
153
-
154
-
155
-
156
-
157
-
158
-
159
-
160
-
161
-
162
-
163
-
164
-
165
-
166
-
167
-
168
-
169
-
170
-
171
-
172
-
173
-
174
-
175
-
176
-
177
-
178
-
179
-
180
-
181
-
182
-
183
-
184
-
185
-
186
-
187
-
188
-
189
-
190
-
191
-
192
-
193
-
194
-
195
-
196
-
197
-
198
-
199
-
200
-
201
-
202
-
203
-
204
-
205
-
206
-
207
-
208
-
209
-
210
-
211
-
212
-
213
-
214
-
215
-
216
-
217
-
218
-
219
-
220
-
221
-
222
-
223
-
224
-
225
-
226
-
227
-
228
-
229
-
230
-
231
-
232
-
233
-
234
-
235
-
236
-
237
-
238
-
239
-
240
-
241
-
242
-
243
-
244
-
245
-
246
-
247
-
248
-
249
-
250
-
251
-
252
-
253
-
254
-
255
-
256
-
257
-
258
-
259
-
260
-
261
-
262
-
263
-
264
-
265
-
266
 |
 |
