IBM 436854u Service Guide - Page 110
Installing the rear adapter retention bracket, If necessary
 |
UPC - 883436026772
View all IBM 436854u manuals
Add to My Manuals
Save this manual to your list of manuals |
Page 110 highlights
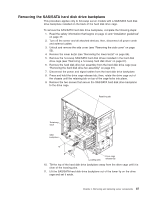
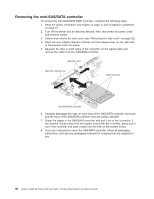
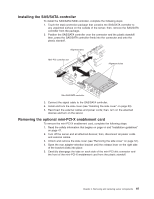
Hinge pin Rear adapter retention bracket 6. If necessary, remove the Remote Supervisor Adapter II SlimLine retention tab and store it for future use. Installing the rear adapter retention bracket To install the rear adapter-retention bracket, complete the following steps: 1. If you removed the Remote Supervisor Adapter II SlimLine retention tab earlier, reinstall it on the rear adapter-retention bracket and any other adapters that you might have removed. 2. Position the rear adapter retention bracket so that the hole in one of the hinge points is aligned with the hinge pin on the chassis; then, place the hinge pin through the hole on the chassis. 3. Rotate the rear adapter-retention bracket into place so that the hole in the opposite hinge point snaps into place over the hinge pin on the chassis. 4. Install the side cover (see "Installing the side cover" on page 53). 5. Lock the side cover if you unlocked it during removal. 6. Reconnect the external cables and power cords; then, turn on the attached devices and turn on the server. Removing the front adapter-retention bracket To remove the front adapter-retention bracket, complete the following steps: 1. Read the safety information that begins on page vii and "Installation guidelines" on page 47. 2. Turn off the server and all attached devices; then, disconnect all power cords and external cables. 3. Unlock and remove the side cover (see "Removing the side cover" on page 52). 4. Open the front and rear adapter-retention brackets. 5. Remove all adapters (if necessary) and place them on a static-protective surface. Note: You might find it helpful to note where each adapter is installed before you remove the adapters. 6. Grasp one side of the bracket at a hinge point and pull outward (while you rotate the bracket slightly toward the rear of the server) until the hinge pin on the bracket is free of the hole; then, grasp the bracket on the other side at the hinge point, pull outward until the bracket is free of the hinge pin, and remove the rear adapter-retention bracket from the server. 92 System x3200 M2 Types 4367 and 4368: Problem Determination and Service Guide
-
 1
1 -
2
-
3
-
4
-
5
-
6
-
7
-
8
-
9
-
10
-
11
-
12
-
13
-
14
-
15
-
16
-
17
-
18
-
19
-
20
-
21
-
22
-
23
-
24
-
25
-
26
-
27
-
28
-
29
-
30
-
31
-
32
-
33
-
34
-
35
-
36
-
37
-
38
-
39
-
40
-
41
-
42
-
43
-
44
-
45
-
46
-
47
-
48
-
49
-
50
-
51
-
52
-
53
-
54
-
55
-
56
-
57
-
58
-
59
-
60
-
61
-
62
-
63
-
64
-
65
-
66
-
67
-
68
-
69
-
70
-
71
-
72
-
73
-
74
-
75
-
76
-
77
-
78
-
79
-
80
-
81
-
82
-
83
-
84
-
85
-
86
-
87
-
88
-
89
-
90
-
91
-
92
-
93
-
94
-
95
-
96
-
97
-
98
-
99
-
100
-
101
-
102
-
103
-
104
-
 105
105 -
 106
106 -
 107
107 -
 108
108 -
 109
109 -
 110
110 -
 111
111 -
 112
112 -
 113
113 -
 114
114 -
 115
115 -
116
-
117
-
118
-
119
-
120
-
121
-
122
-
123
-
124
-
125
-
126
-
127
-
128
-
129
-
130
-
131
-
132
-
133
-
134
-
135
-
136
-
137
-
138
-
139
-
140
-
141
-
142
-
143
-
144
-
145
-
146
-
147
-
148
-
149
-
150
-
151
-
152
-
153
-
154
-
155
-
156
-
157
-
158
-
159
-
160
-
161
-
162
-
163
-
164
-
165
-
166
-
167
-
168
-
169
-
170
-
171
-
172
-
173
-
174
-
175
-
176
-
177
-
178
-
179
-
180
-
181
-
182
-
183
-
184
-
185
-
186
-
187
-
188
-
189
-
190
-
191
-
192
-
193
-
194
-
195
-
196
-
197
-
198
-
199
-
200
-
201
-
202
-
203
-
204
-
205
-
206
-
207
-
208
-
209
-
210
-
211
-
212
-
213
-
214
-
215
-
216
-
217
-
218
-
219
-
220
-
221
-
222
-
223
-
224
-
225
-
226
-
227
-
228
-
229
-
230
-
231
-
232
-
233
-
234
-
235
-
236
-
237
-
238
-
239
-
240
-
241
-
242
-
243
-
244
-
245
-
246
-
247
-
248
-
249
-
250
-
251
-
252
-
253
-
254
-
255
-
256
-
257
-
258
-
259
-
260
-
261
-
262
-
263
-
264
-
265
-
266
 |
 |
