IBM 436854u Service Guide - Page 84
Installing a tape drive, Touch the static-protective package that contains the drive to any unpainted
 |
UPC - 883436026772
View all IBM 436854u manuals
Add to My Manuals
Save this manual to your list of manuals |
Page 84 highlights
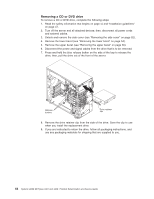
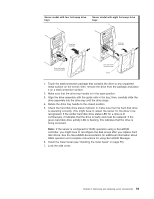
EMC shield Tape drive Drive retainer clip 9. If you are instructed to return the drive, follow all packaging instructions, and use any packaging materials for shipping that are supplied to you. Installing a tape drive To install a tape drive, complete the following steps: 1. If you are replacing a removed drive with a new drive, make sure that: v You have all the cables and other equipment that is specified in the documentation that comes with the new drive. v You check the instructions that come with the new drive to determine whether you must set any switches or jumpers on the drive. v You have removed the drive retainer clip on the side of the old drive and have it available for installation on the new drive. 2. Read the safety information that begins on page vii and "Installation guidelines" on page 47. 3. Turn off the server and peripheral devices, and disconnect the power cords and all external cables. 4. Unlock and remove the side cover (see "Installing the side cover" on page 53). 5. Remove the upper bezel (see "Installing the upper bezel" on page 57). 6. Remove the lower bezel (see "Installing the lower bezel" on page 55). 7. Touch the static-protective package that contains the drive to any unpainted metal surface on the server; then, remove the drive from the package and place it on a static-protective surface. 8. Set any jumpers or switches on the drive according to the documentation that comes with the drive. 9. Remove the drive retainer clip from the side of the drive cage of bays 1 or 2. Slide the drive retainer clip to the right to remove it from the drive cage; then, snap the drive retainer clip into the screw holes on the side of the drive. 66 System x3200 M2 Types 4367 and 4368: Problem Determination and Service Guide
-
 1
1 -
2
-
3
-
4
-
5
-
6
-
7
-
8
-
9
-
10
-
11
-
12
-
13
-
14
-
15
-
16
-
17
-
18
-
19
-
20
-
21
-
22
-
23
-
24
-
25
-
26
-
27
-
28
-
29
-
30
-
31
-
32
-
33
-
34
-
35
-
36
-
37
-
38
-
39
-
40
-
41
-
42
-
43
-
44
-
45
-
46
-
47
-
48
-
49
-
50
-
51
-
52
-
53
-
54
-
55
-
56
-
57
-
58
-
59
-
60
-
61
-
62
-
63
-
64
-
65
-
66
-
67
-
68
-
69
-
70
-
71
-
72
-
73
-
74
-
75
-
76
-
77
-
78
-
 79
79 -
 80
80 -
 81
81 -
 82
82 -
 83
83 -
 84
84 -
 85
85 -
 86
86 -
 87
87 -
 88
88 -
 89
89 -
90
-
91
-
92
-
93
-
94
-
95
-
96
-
97
-
98
-
99
-
100
-
101
-
102
-
103
-
104
-
105
-
106
-
107
-
108
-
109
-
110
-
111
-
112
-
113
-
114
-
115
-
116
-
117
-
118
-
119
-
120
-
121
-
122
-
123
-
124
-
125
-
126
-
127
-
128
-
129
-
130
-
131
-
132
-
133
-
134
-
135
-
136
-
137
-
138
-
139
-
140
-
141
-
142
-
143
-
144
-
145
-
146
-
147
-
148
-
149
-
150
-
151
-
152
-
153
-
154
-
155
-
156
-
157
-
158
-
159
-
160
-
161
-
162
-
163
-
164
-
165
-
166
-
167
-
168
-
169
-
170
-
171
-
172
-
173
-
174
-
175
-
176
-
177
-
178
-
179
-
180
-
181
-
182
-
183
-
184
-
185
-
186
-
187
-
188
-
189
-
190
-
191
-
192
-
193
-
194
-
195
-
196
-
197
-
198
-
199
-
200
-
201
-
202
-
203
-
204
-
205
-
206
-
207
-
208
-
209
-
210
-
211
-
212
-
213
-
214
-
215
-
216
-
217
-
218
-
219
-
220
-
221
-
222
-
223
-
224
-
225
-
226
-
227
-
228
-
229
-
230
-
231
-
232
-
233
-
234
-
235
-
236
-
237
-
238
-
239
-
240
-
241
-
242
-
243
-
244
-
245
-
246
-
247
-
248
-
249
-
250
-
251
-
252
-
253
-
254
-
255
-
256
-
257
-
258
-
259
-
260
-
261
-
262
-
263
-
264
-
265
-
266
 |
 |
