IBM 436854u Service Guide - Page 109
Removing the rear adapter retention bracket
 |
UPC - 883436026772
View all IBM 436854u manuals
Add to My Manuals
Save this manual to your list of manuals |
Page 109 highlights
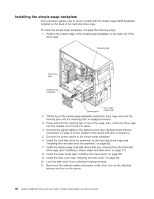
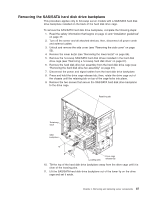
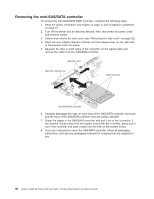
8. Squeeze the spring clips on the sides of the front USB connector assembly and pull the assembly out of the back of the housing. 9. Carefully pull the front USB cable out of the opening in the chassis. 10. If you are instructed to return the front USB connector assembly, follow all packaging instructions, and use any packaging materials for shipping that are supplied to you. Removing the rear adapter retention bracket To remove the rear adapter-retention bracket, complete the following steps: 1. Turn off the server and all attached devices; then, disconnect all power cords and external cables. 2. Unlock and remove the side cover (see "Removing the side cover" on page 52). 3. Remove all adapters (if necessary) and place the adapters on static-protective surface. Note: You might find it helpful to note where each adapter is installed before you remove the adapters. 4. Release the rear adapter-retention bracket by lifting up on the rear adapter-retention bracket, and rotate the bracket partially toward the closed position. 5. Grasp the bracket on one side at the hinge point and pull outward (while you rotate the bracket slightly toward the front of the server) until the bracket is free of the hinge pin; then, grasp the bracket on the other side at the hinge point, pull outward until the bracket is free of the hinge pin, and remove the rear adapter-retention bracket from the server. Chapter 4. Removing and replacing server components 91
-
 1
1 -
2
-
3
-
4
-
5
-
6
-
7
-
8
-
9
-
10
-
11
-
12
-
13
-
14
-
15
-
16
-
17
-
18
-
19
-
20
-
21
-
22
-
23
-
24
-
25
-
26
-
27
-
28
-
29
-
30
-
31
-
32
-
33
-
34
-
35
-
36
-
37
-
38
-
39
-
40
-
41
-
42
-
43
-
44
-
45
-
46
-
47
-
48
-
49
-
50
-
51
-
52
-
53
-
54
-
55
-
56
-
57
-
58
-
59
-
60
-
61
-
62
-
63
-
64
-
65
-
66
-
67
-
68
-
69
-
70
-
71
-
72
-
73
-
74
-
75
-
76
-
77
-
78
-
79
-
80
-
81
-
82
-
83
-
84
-
85
-
86
-
87
-
88
-
89
-
90
-
91
-
92
-
93
-
94
-
95
-
96
-
97
-
98
-
99
-
100
-
101
-
102
-
103
-
 104
104 -
 105
105 -
 106
106 -
 107
107 -
 108
108 -
 109
109 -
 110
110 -
 111
111 -
 112
112 -
 113
113 -
 114
114 -
115
-
116
-
117
-
118
-
119
-
120
-
121
-
122
-
123
-
124
-
125
-
126
-
127
-
128
-
129
-
130
-
131
-
132
-
133
-
134
-
135
-
136
-
137
-
138
-
139
-
140
-
141
-
142
-
143
-
144
-
145
-
146
-
147
-
148
-
149
-
150
-
151
-
152
-
153
-
154
-
155
-
156
-
157
-
158
-
159
-
160
-
161
-
162
-
163
-
164
-
165
-
166
-
167
-
168
-
169
-
170
-
171
-
172
-
173
-
174
-
175
-
176
-
177
-
178
-
179
-
180
-
181
-
182
-
183
-
184
-
185
-
186
-
187
-
188
-
189
-
190
-
191
-
192
-
193
-
194
-
195
-
196
-
197
-
198
-
199
-
200
-
201
-
202
-
203
-
204
-
205
-
206
-
207
-
208
-
209
-
210
-
211
-
212
-
213
-
214
-
215
-
216
-
217
-
218
-
219
-
220
-
221
-
222
-
223
-
224
-
225
-
226
-
227
-
228
-
229
-
230
-
231
-
232
-
233
-
234
-
235
-
236
-
237
-
238
-
239
-
240
-
241
-
242
-
243
-
244
-
245
-
246
-
247
-
248
-
249
-
250
-
251
-
252
-
253
-
254
-
255
-
256
-
257
-
258
-
259
-
260
-
261
-
262
-
263
-
264
-
265
-
266
 |
 |
