Kyocera FS-1135MFP KM-NET ADMIN Operation Guide for Ver 2.0 - Page 69
Viewing a Device's Account List, Adding an Account to a Printing Device, Adding a New Account
 |
View all Kyocera FS-1135MFP manuals
Add to My Manuals
Save this manual to your list of manuals |
Page 69 highlights
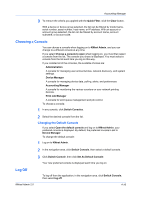
Accounting Manager 3 Click each tab to change the time period. You can also view a device's counters from the Edit Device Account Settings dialog box by clicking Device Counters Overview in the toolbar. Viewing a Device's Account List You can view a printing device's account list and add or delete accounts. 1 Select a device in the navigation area. 2 Click Accounts. The account list appears. 3 Click each tab to view its information. You can also view a device's accounts from the Edit Device Accounting Settings dialog box by clicking Accounts in the toolbar. In this view, you can add or delete accounts. Note: The All and Other accounts are displayed in the list, but they are not included in the Number of Accounts displayed in Form View. Adding an Account to a Printing Device You can add an existing account to a printing device from the Edit Device Accounting Settings dialog box. 1 In the Edit Device Accounting Settings dialog box, click the Accounts icon in the toolbar. The account list appears. 2 Click Add Accounts. The Add Accounts dialog box opens. 3 Select a new account to associate with the printing device. 4 Click Add. The Edit Device Accounting Settings dialog box refreshes with the new account added. Adding a New Account You can create a new account on a printing system. 1 In the Edit Device Accounting Settings dialog box, click the Accounts icon in the toolbar. The account list appears. 2 Click Add New Account. The Add New Account dialog box opens. 3 Type a name for the account in Account Name. 4 If desired, type an optional name in Account Sub Name. The optional name is used in certain languages to indicate the phonetic pronunciation of the account name. Where this is not necessary, it may be used as a nickname or alias. It will appear in search results. KMnet Admin 2.0 4-12
-
 1
1 -
2
-
3
-
4
-
5
-
6
-
7
-
8
-
9
-
10
-
11
-
12
-
13
-
14
-
15
-
16
-
17
-
18
-
19
-
20
-
21
-
22
-
23
-
24
-
25
-
26
-
27
-
28
-
29
-
30
-
31
-
32
-
33
-
34
-
35
-
36
-
37
-
38
-
39
-
40
-
41
-
42
-
43
-
44
-
45
-
46
-
47
-
48
-
49
-
50
-
51
-
52
-
53
-
54
-
55
-
56
-
57
-
58
-
59
-
60
-
61
-
62
-
63
-
 64
64 -
 65
65 -
 66
66 -
 67
67 -
 68
68 -
 69
69 -
 70
70 -
 71
71 -
 72
72 -
 73
73 -
 74
74 -
75
-
76
-
77
-
78
-
79
-
80
-
81
-
82
-
83
-
84
-
85
-
86
-
87
-
88
-
89
-
90
-
91
-
92
-
93
-
94
-
95
-
96
-
97
-
98
-
99
-
100
-
101
-
102
-
103
-
104
-
105
-
106
-
107
 |
 |