Kyocera KM-8530 KM-8530 Operation Guide - Page 221
Scan the platen glass images., Press, Repeat steps, for all originals., Touch, to exit the Store mode.
 |
View all Kyocera KM-8530 manuals
Add to My Manuals
Save this manual to your list of manuals |
Page 221 highlights
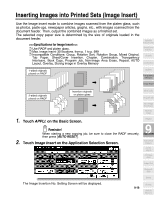
Inserting Images into Printed Sets (Image Insert) (continued) 9. Scan the platen glass images. Open the document feeder. Position an original FACE DOWN on the platen glass, then close the document feeder. Reminder! PLACE AND SCAN THE ORIGINALS ACCORDING TO PAGINATION. 10. Press [START]. 11. Repeat steps 9 and 10 for all originals. HINTS • Memory overflow may occur during scanning. See p. 5-11 to p. 5-12. • Should memory overflow occur frequently, it is recommended that you contact your service representative to extend the memory capacity in your machine. 12. Touch STORE to exit the Store mode. 13. Press [START]. The copier will start printing when ready for output. Application Selection Screen Sheet/Cover Insertion Chapter Combination Booklet Transparency Interleave Image Insert Book Copy Program Job CAUTION When the finisher / trimmer unit / paper exit tray capacity is exceeded due to the print quantity selected, remove the copied sets as they exit; otherwise, mishandled paper will occur. Non-Image Area Erase Reverse Image Repeat DETAILS: Entering Page Numbers For example, if insertion locations are [2/2/6], scanned platen images will be inserted as follows: The first scanned platen image will be inserted after page 2. The second scanned platen image will be inserted directly after the first scanned Image insertion. The third scanned platen image will be inserted after page 6. NOTES: • When a page number is larger than the total original count, a sheet is inserted as the last page. • Insertions occur in sequence, even if page numbers are entered out of sequence. • Entering the same page number twice will insert two sheets at that location. 9 Applications Frame/Fold Erasure AUTO Layout All-Image Area Image Shift Reduce & Shift Stamp 9-21 Overlay Overlay Memory
-
 1
1 -
2
-
3
-
4
-
5
-
6
-
7
-
8
-
9
-
10
-
11
-
12
-
13
-
14
-
15
-
16
-
17
-
18
-
19
-
20
-
21
-
22
-
23
-
24
-
25
-
26
-
27
-
28
-
29
-
30
-
31
-
32
-
33
-
34
-
35
-
36
-
37
-
38
-
39
-
40
-
41
-
42
-
43
-
44
-
45
-
46
-
47
-
48
-
49
-
50
-
51
-
52
-
53
-
54
-
55
-
56
-
57
-
58
-
59
-
60
-
61
-
62
-
63
-
64
-
65
-
66
-
67
-
68
-
69
-
70
-
71
-
72
-
73
-
74
-
75
-
76
-
77
-
78
-
79
-
80
-
81
-
82
-
83
-
84
-
85
-
86
-
87
-
88
-
89
-
90
-
91
-
92
-
93
-
94
-
95
-
96
-
97
-
98
-
99
-
100
-
101
-
102
-
103
-
104
-
105
-
106
-
107
-
108
-
109
-
110
-
111
-
112
-
113
-
114
-
115
-
116
-
117
-
118
-
119
-
120
-
121
-
122
-
123
-
124
-
125
-
126
-
127
-
128
-
129
-
130
-
131
-
132
-
133
-
134
-
135
-
136
-
137
-
138
-
139
-
140
-
141
-
142
-
143
-
144
-
145
-
146
-
147
-
148
-
149
-
150
-
151
-
152
-
153
-
154
-
155
-
156
-
157
-
158
-
159
-
160
-
161
-
162
-
163
-
164
-
165
-
166
-
167
-
168
-
169
-
170
-
171
-
172
-
173
-
174
-
175
-
176
-
177
-
178
-
179
-
180
-
181
-
182
-
183
-
184
-
185
-
186
-
187
-
188
-
189
-
190
-
191
-
192
-
193
-
194
-
195
-
196
-
197
-
198
-
199
-
200
-
201
-
202
-
203
-
204
-
205
-
206
-
207
-
208
-
209
-
210
-
211
-
212
-
213
-
214
-
215
-
 216
216 -
 217
217 -
 218
218 -
 219
219 -
 220
220 -
 221
221 -
 222
222 -
 223
223 -
 224
224 -
 225
225 -
 226
226 -
227
-
228
-
229
-
230
-
231
-
232
-
233
-
234
-
235
-
236
-
237
-
238
-
239
-
240
-
241
-
242
-
243
-
244
-
245
-
246
-
247
-
248
-
249
-
250
-
251
-
252
-
253
-
254
-
255
-
256
-
257
-
258
-
259
-
260
-
261
-
262
-
263
-
264
-
265
-
266
-
267
-
268
-
269
-
270
-
271
-
272
-
273
-
274
-
275
-
276
-
277
-
278
-
279
-
280
-
281
-
282
-
283
-
284
-
285
-
286
-
287
-
288
-
289
-
290
-
291
-
292
-
293
-
294
-
295
-
296
-
297
-
298
-
299
-
300
-
301
-
302
-
303
-
304
-
305
-
306
-
307
-
308
-
309
-
310
-
311
-
312
-
313
-
314
-
315
-
316
-
317
-
318
-
319
-
320
-
321
-
322
-
323
-
324
-
325
-
326
-
327
-
328
-
329
-
330
-
331
-
332
-
333
-
334
-
335
-
336
-
337
-
338
-
339
-
340
-
341
-
342
-
343
-
344
-
345
-
346
-
347
-
348
-
349
-
350
-
351
-
352
-
353
-
354
-
355
-
356
-
357
-
358
-
359
-
360
-
361
-
362
-
363
-
364
-
365
-
366
-
367
-
368
-
369
-
370
-
371
-
372
-
373
-
374
-
375
-
376
-
377
-
378
-
379
-
380
-
381
-
382
-
383
-
384
-
385
-
386
-
387
-
388
-
389
-
390
-
391
-
392
-
393
-
394
-
395
-
396
-
397
-
398
-
399
-
400
-
401
-
402
-
403
-
404
-
405
-
406
-
407
-
408
 |
 |
