Kyocera KM-8530 KM-8530 Operation Guide - Page 267
to return to the Basic Screen., to return to the Application Selection Screen.
 |
View all Kyocera KM-8530 manuals
Add to My Manuals
Save this manual to your list of manuals |
Page 267 highlights
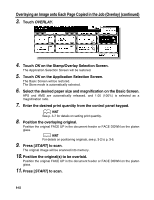
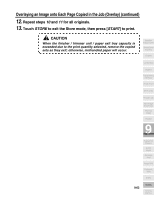
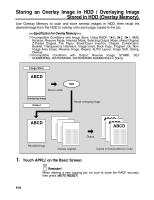
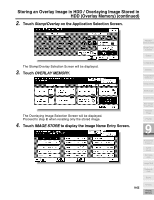
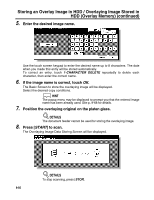
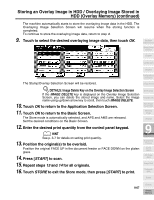
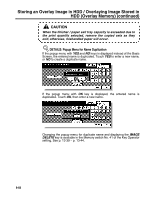
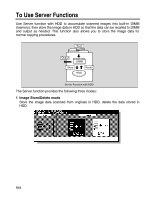
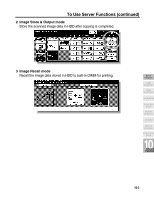
Storing an Overlay Image in HDD / Overlaying Image Stored in HDD (Overlay Memory) (continued) The machine automatically starts to store the overlaying image data in the HDD. The Overlaying Image Selection Screen will resume when the storing function is completed. To continue to store the overlaying image data, return to step 4. 9. Touch to select the desired overlaying image data, then touch OK. Application Selection Screen Sheet/Cover Insertion Chapter Combination Booklet The Stamp/Overlay Selection Screen will be restored. Transparency Interleave Image Insert DETAILS: Image Delete Key on the Overlay Image Selection Screen If the IMAGE DELETE key is displayed on the Overlay Image Selection Screen, you can delete the stored image and name. Select the image name using up/down arrow key to scroll, then touch IMAGE DELETE. 10. Touch OK to return to the Application Selection Screen. 11. Touch OK to return to the Basic Screen. The Store mode is automatically selected, and APS and AMS are released. Set the desired conditions on the Basic Screen. 12. Enter the desired print quantity from the control panel keypad. HINT See p. 3-7 for details on setting print quantity. 13. Position the original(s) to be overlaid. Position the original FACE UP in the document feeder or FACE DOWN on the platen glass. 14. Press [START] to scan. 15. Repeat steps 13 and 14 for all originals. 16. Touch STORE to exit the Store mode, then press [START] to print. Book Copy Program Job Non-Image Area Erase Reverse Image Repeat 9 Applications Frame/Fold Erasure AUTO Layout All-Image Area Image Shift Reduce & Shift Stamp 9-67 Overlay Overlay Memory
-
 1
1 -
2
-
3
-
4
-
5
-
6
-
7
-
8
-
9
-
10
-
11
-
12
-
13
-
14
-
15
-
16
-
17
-
18
-
19
-
20
-
21
-
22
-
23
-
24
-
25
-
26
-
27
-
28
-
29
-
30
-
31
-
32
-
33
-
34
-
35
-
36
-
37
-
38
-
39
-
40
-
41
-
42
-
43
-
44
-
45
-
46
-
47
-
48
-
49
-
50
-
51
-
52
-
53
-
54
-
55
-
56
-
57
-
58
-
59
-
60
-
61
-
62
-
63
-
64
-
65
-
66
-
67
-
68
-
69
-
70
-
71
-
72
-
73
-
74
-
75
-
76
-
77
-
78
-
79
-
80
-
81
-
82
-
83
-
84
-
85
-
86
-
87
-
88
-
89
-
90
-
91
-
92
-
93
-
94
-
95
-
96
-
97
-
98
-
99
-
100
-
101
-
102
-
103
-
104
-
105
-
106
-
107
-
108
-
109
-
110
-
111
-
112
-
113
-
114
-
115
-
116
-
117
-
118
-
119
-
120
-
121
-
122
-
123
-
124
-
125
-
126
-
127
-
128
-
129
-
130
-
131
-
132
-
133
-
134
-
135
-
136
-
137
-
138
-
139
-
140
-
141
-
142
-
143
-
144
-
145
-
146
-
147
-
148
-
149
-
150
-
151
-
152
-
153
-
154
-
155
-
156
-
157
-
158
-
159
-
160
-
161
-
162
-
163
-
164
-
165
-
166
-
167
-
168
-
169
-
170
-
171
-
172
-
173
-
174
-
175
-
176
-
177
-
178
-
179
-
180
-
181
-
182
-
183
-
184
-
185
-
186
-
187
-
188
-
189
-
190
-
191
-
192
-
193
-
194
-
195
-
196
-
197
-
198
-
199
-
200
-
201
-
202
-
203
-
204
-
205
-
206
-
207
-
208
-
209
-
210
-
211
-
212
-
213
-
214
-
215
-
216
-
217
-
218
-
219
-
220
-
221
-
222
-
223
-
224
-
225
-
226
-
227
-
228
-
229
-
230
-
231
-
232
-
233
-
234
-
235
-
236
-
237
-
238
-
239
-
240
-
241
-
242
-
243
-
244
-
245
-
246
-
247
-
248
-
249
-
250
-
251
-
252
-
253
-
254
-
255
-
256
-
257
-
258
-
259
-
260
-
261
-
 262
262 -
 263
263 -
 264
264 -
 265
265 -
 266
266 -
 267
267 -
 268
268 -
 269
269 -
 270
270 -
 271
271 -
 272
272 -
273
-
274
-
275
-
276
-
277
-
278
-
279
-
280
-
281
-
282
-
283
-
284
-
285
-
286
-
287
-
288
-
289
-
290
-
291
-
292
-
293
-
294
-
295
-
296
-
297
-
298
-
299
-
300
-
301
-
302
-
303
-
304
-
305
-
306
-
307
-
308
-
309
-
310
-
311
-
312
-
313
-
314
-
315
-
316
-
317
-
318
-
319
-
320
-
321
-
322
-
323
-
324
-
325
-
326
-
327
-
328
-
329
-
330
-
331
-
332
-
333
-
334
-
335
-
336
-
337
-
338
-
339
-
340
-
341
-
342
-
343
-
344
-
345
-
346
-
347
-
348
-
349
-
350
-
351
-
352
-
353
-
354
-
355
-
356
-
357
-
358
-
359
-
360
-
361
-
362
-
363
-
364
-
365
-
366
-
367
-
368
-
369
-
370
-
371
-
372
-
373
-
374
-
375
-
376
-
377
-
378
-
379
-
380
-
381
-
382
-
383
-
384
-
385
-
386
-
387
-
388
-
389
-
390
-
391
-
392
-
393
-
394
-
395
-
396
-
397
-
398
-
399
-
400
-
401
-
402
-
403
-
404
-
405
-
406
-
407
-
408
 |
 |
