Kyocera TASKalfa 181 Scan System (F) B Operation Guide (Functions Edition) - Page 19
Full Scan, Continuous Sending, Bypass Sender Selection, Accessing the Scan Default Screen
 |
View all Kyocera TASKalfa 181 manuals
Add to My Manuals
Save this manual to your list of manuals |
Page 19 highlights
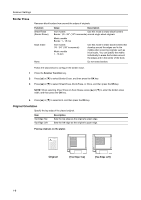
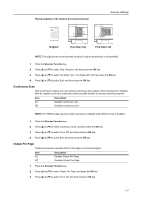
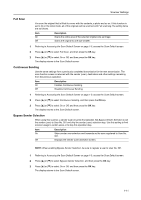
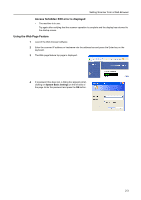
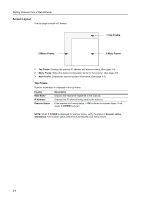
Scanner Settings Full Scan You scan the original that is filled its corner with the contents, a photo and so on. If this function is set to On in the initial mode, all of the originals will be scanned with Full scanning.The setting items are as follows. Item On Off Description Scans the entire area of the selected original size as image. Scans the original to one size smaller. 1 Referring to Accessing the Scan Default Screen on page 1-9, access the Scan Default screen. 2 Press [S] or [T] to select Full Scan, and then press the OK key. 3 Press [S] or [T] to select On or Off, and then press the OK key. The display returns to the Scan Default screen. Continuous Sending Use the same settings from a previously completed transmission for the next transmission. The scan function screen is returned with the sender (user), destination and other settings remaining from the previous operation. Item On Off Description Enables Continuous Sending. Disables Continuous Sending. 1 Referring to Accessing the Scan Default Screen on page 1-9, access the Scan Default screen. 2 Press [S] or [T] to select Continuous Sending, and then press the OK key. 3 Press [S] or [T] to select On or Off, and then press the OK key. The display returns to the Scan Default screen. Bypass Sender Selection When using this scanner, a sender (user) must be first selected. Set Bypass Sender Selection to set the sender (user) to User No. 001 and skip the sender (user) selection step. Use this setting to limit scanner usage to certain users or to skip this operation step. Item On Off Description Skips sender user selection and transmits as the user registered to User No. 001. Displays the sender (user) selection screen. NOTE: When enabling Bypass Sender Selection, be sure to register a user to User No. 001. 1 Referring to Accessing the Scan Default Screen on page 1-9, access the Scan Default screen. 2 Press [S] or [T] to select Bypass Sender Selection, and then press the OK key. 3 Press [S] or [T] to select On or Off, and then press the OK key. The display returns to the Scan Default screen. 1-11
-
 1
1 -
2
-
3
-
4
-
5
-
6
-
7
-
8
-
9
-
10
-
11
-
12
-
13
-
 14
14 -
 15
15 -
 16
16 -
 17
17 -
 18
18 -
 19
19 -
 20
20 -
 21
21 -
 22
22 -
 23
23 -
 24
24 -
25
-
26
-
27
-
28
-
29
-
30
-
31
-
32
-
33
-
34
-
35
-
36
-
37
-
38
-
39
-
40
-
41
-
42
-
43
-
44
-
45
-
46
-
47
-
48
-
49
-
50
-
51
-
52
-
53
-
54
-
55
-
56
-
57
-
58
-
59
-
60
-
61
-
62
-
63
-
64
-
65
-
66
-
67
-
68
-
69
-
70
-
71
-
72
-
73
-
74
-
75
-
76
-
77
-
78
-
79
-
80
-
81
-
82
-
83
-
84
-
85
-
86
-
87
-
88
-
89
-
90
-
91
-
92
-
93
-
94
-
95
-
96
-
97
-
98
-
99
-
100
-
101
-
102
-
103
-
104
-
105
-
106
-
107
-
108
 |
 |