Kyocera TASKalfa 181 Scan System (F) B Operation Guide (Functions Edition) - Page 52
Configuring a New Save Folder, Setup, Folder, Setting, Select Folder, Password Setting, Password
 |
View all Kyocera TASKalfa 181 manuals
Add to My Manuals
Save this manual to your list of manuals |
Page 52 highlights
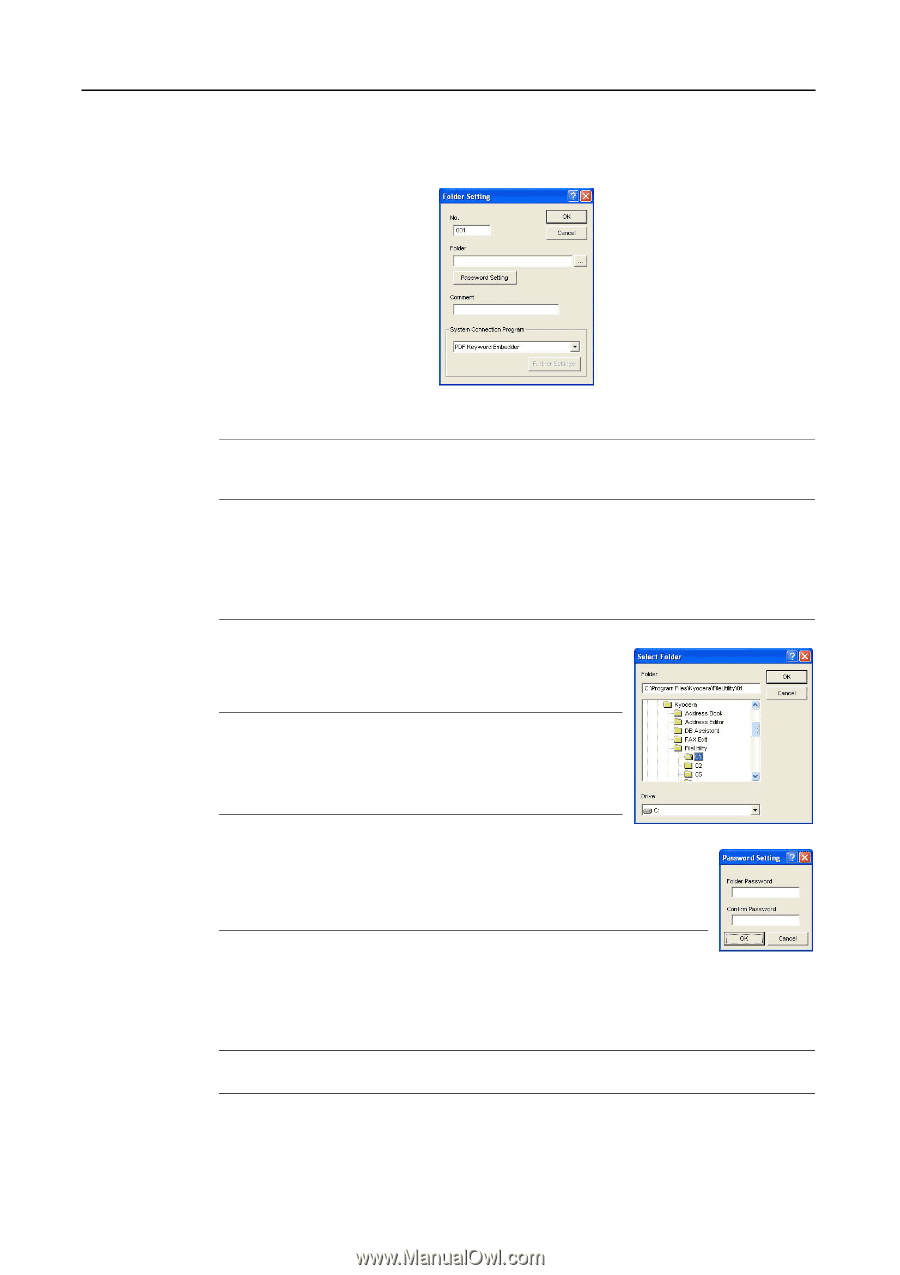
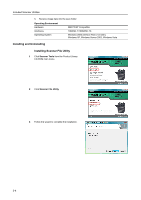
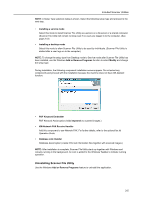
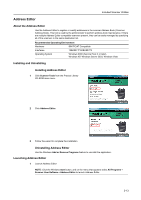
Included Scanner Utilities Configuring a New Save Folder To specify a new save folder, click the New button on the Setup dialog box. The New Folder Setting dialog box is shown. 1 Input a number (from 1 - 100) for the No. column. NOTE: The number input here is assigned to the save folder and used as the save number. Use this number to specify the save folder from the scanner operation panel which was configured from the web browser (save number). 2 To enter a new folder for saving images, click the ... button (reference) on the right side of the Folder field. The Select Folder dialog box is displayed. NOTE: The folder name can also be directly entered into the Folder field. When directly inputting the name, specify also the path to the target folder. A list of folders in the drive is shown in the Select Folder dialog box. Choose the folder to set as the save folder and click the OK button. NOTE: To choose a folder on a network drive, map a network drive before opening this screen. (Only available if the Scanner File Utility is installed in Desktop Mode) Floppy disks, MO disks or other removable drives may not be selected. 3 For added security, a password can be set for the specified folder. To specify a password, click the Password Setting button. Enter a numeric password less than 8 characters long in the Folder Password field of the displayed Password Setting dialog box. NOTE: If a password is not needed, it is not necessary to configure this setting. 4 After entering a password in the Folder Password field, to verify the entry, re-enter the same password in the Confirm Password field. Click the OK button when done entering. The display returns to the Folder Settings dialog box. NOTE: If a folder password has been set, the password must be entered when operating from the scanner operation panel. 5 To add a comment to the save folder, enter it into the Comment field. 3-8
-
 1
1 -
2
-
3
-
4
-
5
-
6
-
7
-
8
-
9
-
10
-
11
-
12
-
13
-
14
-
15
-
16
-
17
-
18
-
19
-
20
-
21
-
22
-
23
-
24
-
25
-
26
-
27
-
28
-
29
-
30
-
31
-
32
-
33
-
34
-
35
-
36
-
37
-
38
-
39
-
40
-
41
-
42
-
43
-
44
-
45
-
46
-
 47
47 -
 48
48 -
 49
49 -
 50
50 -
 51
51 -
 52
52 -
 53
53 -
 54
54 -
 55
55 -
 56
56 -
 57
57 -
58
-
59
-
60
-
61
-
62
-
63
-
64
-
65
-
66
-
67
-
68
-
69
-
70
-
71
-
72
-
73
-
74
-
75
-
76
-
77
-
78
-
79
-
80
-
81
-
82
-
83
-
84
-
85
-
86
-
87
-
88
-
89
-
90
-
91
-
92
-
93
-
94
-
95
-
96
-
97
-
98
-
99
-
100
-
101
-
102
-
103
-
104
-
105
-
106
-
107
-
108
 |
 |