Kyocera TASKalfa 181 Scan System (F) B Operation Guide (Functions Edition) - Page 89
Change Scanner IP Address, Job Accounting Setting, Address Setting
 |
View all Kyocera TASKalfa 181 manuals
Add to My Manuals
Save this manual to your list of manuals |
Page 89 highlights
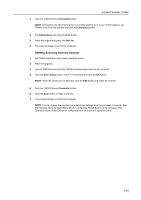
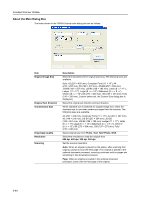
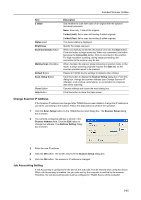
Included Scanner Utilities Item 2 sided Status Field Brightness Scan/Connect(s) Button Waiting Scan Checkbox Default Button Scan. Setup Button Close Button Help Button Description Sets whether to scan both sides of an original with the optional document processor. None: Scan only 1 side of the original. 2 sided (Left): Set to scan left binding 2-sided originals. 2 sided (Top): Set to scan top-binding 2-sided originals. The device status is displayed. Specify the image exposure. When successfully connected, this button turns into the Scan button. Click this button to begin scanning. When not connected, this button becomes the Connect(s) button. Click to reconnect to the scanner. For high resolution scanning, during image processing, the connection to the scanner may be lost. When checked, the scanner stops remaining in scanner mode. In this mode, to begin scanning originals requires the Start key on the scanner operation panel to be pressed. Resets all TWAIN Source settings to defaults when clicked. Click this button to display the Scanner Setup dialog box. From this dialog box, change the scanner address (see Change Scanner IP Address), units (inches, centimeters), or set whether to compress data when scanning. Cancels settings and closes the main dialog box. Click this button to show the Help screen. Change Scanner IP Address If the Scanner IP address has changed after TWAIN Source was installed, change the IP address to use when connecting to the scanner. Follow the steps below to perform the operation. 1 Click the Scan. Setup button on the TWAIN Source main dialog box. The Scanner Setup dialog box is shown. 2 The currently configured address is shown in the Scanner Address field. Click the Edit button to change this address. The Address Setting dialog box is shown. 3 Enter the new IP address. 4 Click the OK button. The screen returns to the Scanner Setup dialog box. 5 Click the OK button. The scanner's IP address is changed. Job Accounting Setting If Job Accounting is configured for the device, the Job code must be entered when using the device. When Job Accounting is enabled, the job code sent by the computer is verified by the scanner. Therefore, the Job Accounting code must be configured in TWAIN Source at the computer. 3-45
-
 1
1 -
2
-
3
-
4
-
5
-
6
-
7
-
8
-
9
-
10
-
11
-
12
-
13
-
14
-
15
-
16
-
17
-
18
-
19
-
20
-
21
-
22
-
23
-
24
-
25
-
26
-
27
-
28
-
29
-
30
-
31
-
32
-
33
-
34
-
35
-
36
-
37
-
38
-
39
-
40
-
41
-
42
-
43
-
44
-
45
-
46
-
47
-
48
-
49
-
50
-
51
-
52
-
53
-
54
-
55
-
56
-
57
-
58
-
59
-
60
-
61
-
62
-
63
-
64
-
65
-
66
-
67
-
68
-
69
-
70
-
71
-
72
-
73
-
74
-
75
-
76
-
77
-
78
-
79
-
80
-
81
-
82
-
83
-
 84
84 -
 85
85 -
 86
86 -
 87
87 -
 88
88 -
 89
89 -
 90
90 -
 91
91 -
 92
92 -
 93
93 -
 94
94 -
95
-
96
-
97
-
98
-
99
-
100
-
101
-
102
-
103
-
104
-
105
-
106
-
107
-
108
 |
 |