Kyocera TASKalfa 181 Scan System (F) B Operation Guide (Functions Edition) - Page 83
Importing CSV files, Warning, column
 |
View all Kyocera TASKalfa 181 manuals
Add to My Manuals
Save this manual to your list of manuals |
Page 83 highlights
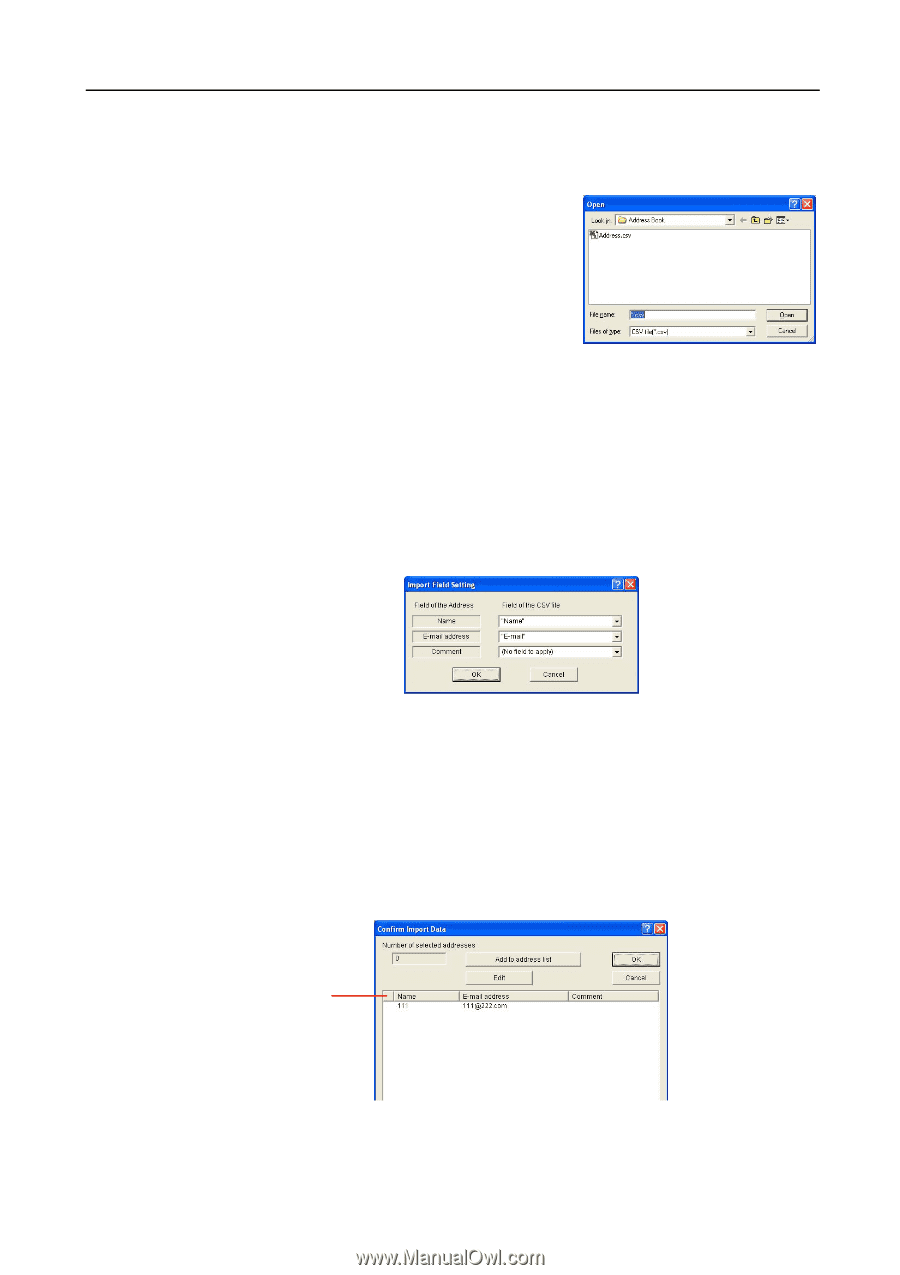
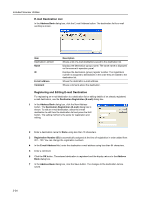
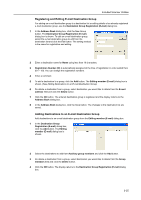
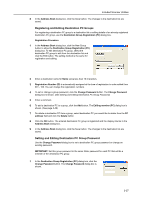
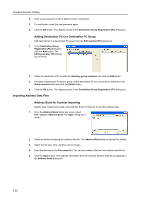
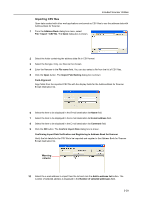
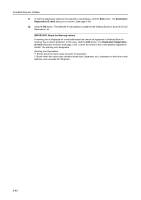
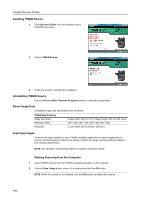
Included Scanner Utilities Importing CSV files Open data created with other mail applications and saved as CSV files to use the address data with Address Book for Scanner. 1 From the Address Book dialog box menu, select FileJImportJCSV file. The Open dialog box is shown. 2 Select the folder containing the address data file in CSV format. 3 Select the file type. Only .csv files can be chosen. 4 Enter the filename in the File name field. You can also select a file from the list of CSV files. 5 Click the Open button. The Import Field Setting dialog box is shown. Field Alignment Align fields from the imported CSV file with the display fields for the Address Book for Scanner E-mail destination list. 6 Select the item to be displayed in the E-mail destination list Name field. 7 Select the item to be displayed in the E-mail destination list E-mail address field. 8 Select the item to be displayed in the E-mail destination list Comment field. 9 Click the OK button. The Confirm Import Data dialog box is shown. Confirming Import Data Verification and Registering to Address Book for Scanner Verify the list details for the CSV file to be imported and register to the Address Book for Scanner E-mail destination list. Warning column 10 Select the e-mail address to import from the list and click the Add to address list button. The number of selected address is displayed in the Number of selected addresses field. 3-39
-
 1
1 -
2
-
3
-
4
-
5
-
6
-
7
-
8
-
9
-
10
-
11
-
12
-
13
-
14
-
15
-
16
-
17
-
18
-
19
-
20
-
21
-
22
-
23
-
24
-
25
-
26
-
27
-
28
-
29
-
30
-
31
-
32
-
33
-
34
-
35
-
36
-
37
-
38
-
39
-
40
-
41
-
42
-
43
-
44
-
45
-
46
-
47
-
48
-
49
-
50
-
51
-
52
-
53
-
54
-
55
-
56
-
57
-
58
-
59
-
60
-
61
-
62
-
63
-
64
-
65
-
66
-
67
-
68
-
69
-
70
-
71
-
72
-
73
-
74
-
75
-
76
-
77
-
 78
78 -
 79
79 -
 80
80 -
 81
81 -
 82
82 -
 83
83 -
 84
84 -
 85
85 -
 86
86 -
 87
87 -
 88
88 -
89
-
90
-
91
-
92
-
93
-
94
-
95
-
96
-
97
-
98
-
99
-
100
-
101
-
102
-
103
-
104
-
105
-
106
-
107
-
108
 |
 |