Kyocera TASKalfa 181 Scan System (F) B Operation Guide (Functions Edition) - Page 40
Sender List, ISO-8859-1 West Europe
 |
View all Kyocera TASKalfa 181 manuals
Add to My Manuals
Save this manual to your list of manuals |
Page 40 highlights
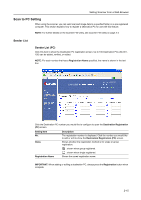
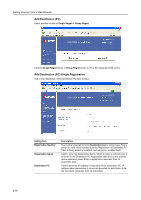
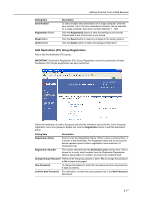
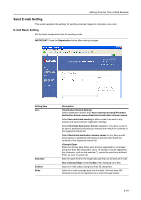
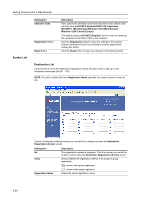
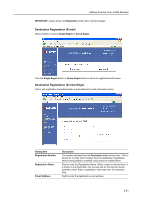
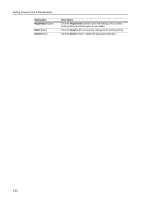
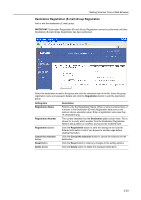
Setting Scanner from a Web Browser Sender List Setting Item Character Code Registration Button Reset Button Description Here, specify the character code set to describe e-mail. Select code set from among US-ASCII (English)/SHIFT-JIS (Japanese)/ ISO-8859-1 (West Europe)/Windows-1252 (West Europe)/ Windows-1250 (Central Europe). The default setting is US-ASCII (English). Set the code set matching the computer environment of the e-mail recipient. Click the Registration button to save the settings to the scanner. Entered information is lost if you browse to another page before clicking this button. Click the Reset button to reset any changes to the setting options. Destination List Click this item to show the destination registration screen and add, verify or edit up to 100 destination addresses (No.001 - 100). NOTE: For each number that has a Registration Name specified, the name is shown in the text box. 2-20 Click the Destination address number you would like to configure to open the Destination Registration (E-mail) screen. Setting Item No. Class Registration Name Description The registration number is displayed. Click the number you would like to add or edit to show the Destination Registration (E-mail) screen. Shows whether the registration method is for single or group registration. : shown when group registered. : shown when single registered. Shows the saved registration name.
-
 1
1 -
2
-
3
-
4
-
5
-
6
-
7
-
8
-
9
-
10
-
11
-
12
-
13
-
14
-
15
-
16
-
17
-
18
-
19
-
20
-
21
-
22
-
23
-
24
-
25
-
26
-
27
-
28
-
29
-
30
-
31
-
32
-
33
-
34
-
 35
35 -
 36
36 -
 37
37 -
 38
38 -
 39
39 -
 40
40 -
 41
41 -
 42
42 -
 43
43 -
 44
44 -
 45
45 -
46
-
47
-
48
-
49
-
50
-
51
-
52
-
53
-
54
-
55
-
56
-
57
-
58
-
59
-
60
-
61
-
62
-
63
-
64
-
65
-
66
-
67
-
68
-
69
-
70
-
71
-
72
-
73
-
74
-
75
-
76
-
77
-
78
-
79
-
80
-
81
-
82
-
83
-
84
-
85
-
86
-
87
-
88
-
89
-
90
-
91
-
92
-
93
-
94
-
95
-
96
-
97
-
98
-
99
-
100
-
101
-
102
-
103
-
104
-
105
-
106
-
107
-
108
 |
 |
