Kyocera TASKalfa 181 Scan System (F) B Operation Guide (Functions Edition) - Page 49
Uninstalling Scanner File Utility, KM-Network FAX Receive Handler
 |
View all Kyocera TASKalfa 181 manuals
Add to My Manuals
Save this manual to your list of manuals |
Page 49 highlights
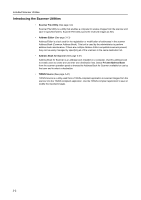
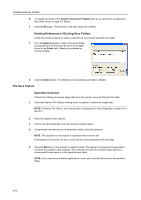
Included Scanner Utilities NOTE: A Setup Type selection dialog is shown. Select the following setup type and proceed to the next step. • Installing a service mode Select this mode to install Scanner File Utility as a service on a file server or a shared computer. (Scanner File Utility will remain running even if no users are logged in to the computer. (See page 3-12) • Installing a desktop mode Select this mode to allow Scanner File Utility to be used by individuals. (Scanner File Utility is started after a user logs on to the computer.) NOTE: To change the setup type from Desktop mode to Service mode after Scanner File Utility has been installed, use the Windows Add or Remove Programs function to select Modify and change the setup type. During installation, the following component installation screens appear. Do not select any components and proceed with the installation because the machine does not have DB Assitant function. • PDF Keyword Embedder PDF Keyword Assist option (Adds keywords to scanned images.) • KM-Network FAX Receive Handler Add this component to use Network FAX. For further details, refer to the optional fax kit Operation Guide. • Database Link Handler Database Assist option (create CSV text information files together with scanned images.) NOTE: After installation is complete, Scanner File Utility starts up together with Windows and remains running in the background. An icon is added to the Windows Taskbar to indicate running operation. Uninstalling Scanner File Utility Use the Windows Add or Remove Programs feature to uninstall the application. 3-5
-
 1
1 -
2
-
3
-
4
-
5
-
6
-
7
-
8
-
9
-
10
-
11
-
12
-
13
-
14
-
15
-
16
-
17
-
18
-
19
-
20
-
21
-
22
-
23
-
24
-
25
-
26
-
27
-
28
-
29
-
30
-
31
-
32
-
33
-
34
-
35
-
36
-
37
-
38
-
39
-
40
-
41
-
42
-
43
-
 44
44 -
 45
45 -
 46
46 -
 47
47 -
 48
48 -
 49
49 -
 50
50 -
 51
51 -
 52
52 -
 53
53 -
 54
54 -
55
-
56
-
57
-
58
-
59
-
60
-
61
-
62
-
63
-
64
-
65
-
66
-
67
-
68
-
69
-
70
-
71
-
72
-
73
-
74
-
75
-
76
-
77
-
78
-
79
-
80
-
81
-
82
-
83
-
84
-
85
-
86
-
87
-
88
-
89
-
90
-
91
-
92
-
93
-
94
-
95
-
96
-
97
-
98
-
99
-
100
-
101
-
102
-
103
-
104
-
105
-
106
-
107
-
108
 |
 |