Kyocera TASKalfa 181 Scan System (F) B Operation Guide (Functions Edition) - Page 33
Login Account Name, Sender User Setting
 |
View all Kyocera TASKalfa 181 manuals
Add to My Manuals
Save this manual to your list of manuals |
Page 33 highlights
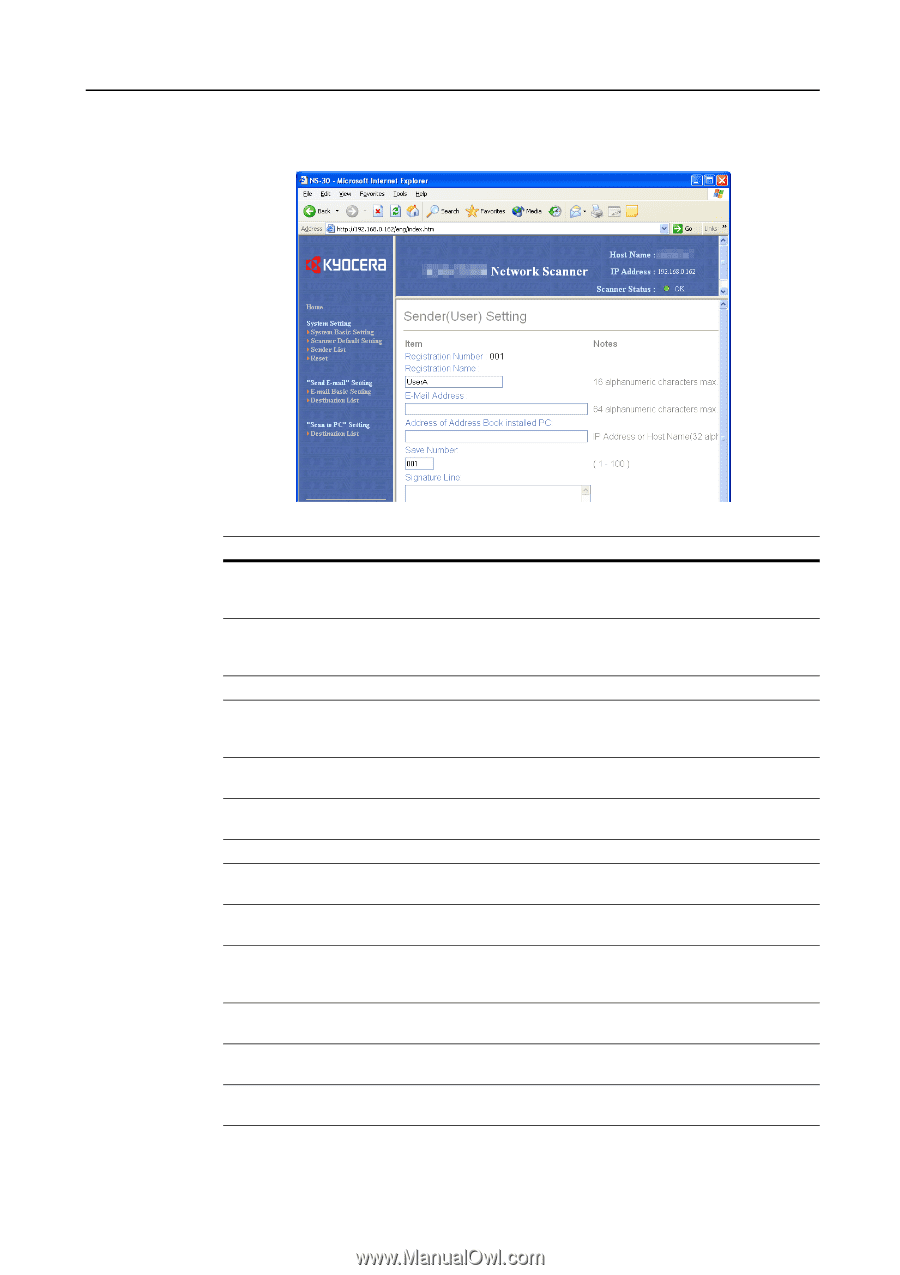
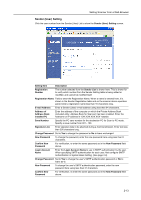
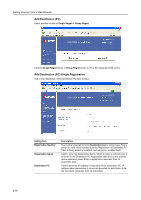
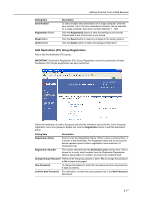
Setting Scanner from a Web Browser Sender (User) Setting Click the user number from the Sender (User) List to show the Sender (User) Setting screen. Setting Item Description Registration Number The number selected from the Sender List is shown here. This is shown for to verify which number from the Sender Setting table is being added or modified, and cannot be modified itself. Registration Name Field to enter the Registration Name. When a name is entered here, it is shown in the Sender Registration table and on the scanner device operation panel. Enter a registration name less than 16 characters long. E-mail Address Enter a Sender (User) e-mail address using less than 64 characters. Address of Address Book installed PC Enter the address of the computer on which the Private Address Book (included utility: Address Book for Scanner) has been installed. Enter the hostname or IP address in 'XXX.XXX.XXX.XXX' notation. Save Number Specify the PC save number for the destination PC for Scan to PC mode. Specify a save number from 001 - 100. Signature Line Enter signature data to be attached during e-mail transmission. Enter text less than 256 characters long. Change Password Set to Yes to change the password or No to leave unchanged. New Password To change the password, enter the new password here using less than 8 characters. Confirm New Password For verification, re-enter the same password as in the New Password field above. Login Account Name Enter the Login Account Name to use in SMTP authentication by the user. When specifying SMTP authentication for each user, first configure SMTP Authentication in System Basic Setting. (See page 2-8) Change Password Set to Yes to change the user's SMTP authentication password or No to leave as-is. New Password To change the user's SMTP authentication password, enter the new password here using less than 31 characters. Confirm New Password For verification, re-enter the same password as in the New Password field above. 2-13
-
 1
1 -
2
-
3
-
4
-
5
-
6
-
7
-
8
-
9
-
10
-
11
-
12
-
13
-
14
-
15
-
16
-
17
-
18
-
19
-
20
-
21
-
22
-
23
-
24
-
25
-
26
-
27
-
 28
28 -
 29
29 -
 30
30 -
 31
31 -
 32
32 -
 33
33 -
 34
34 -
 35
35 -
 36
36 -
 37
37 -
 38
38 -
39
-
40
-
41
-
42
-
43
-
44
-
45
-
46
-
47
-
48
-
49
-
50
-
51
-
52
-
53
-
54
-
55
-
56
-
57
-
58
-
59
-
60
-
61
-
62
-
63
-
64
-
65
-
66
-
67
-
68
-
69
-
70
-
71
-
72
-
73
-
74
-
75
-
76
-
77
-
78
-
79
-
80
-
81
-
82
-
83
-
84
-
85
-
86
-
87
-
88
-
89
-
90
-
91
-
92
-
93
-
94
-
95
-
96
-
97
-
98
-
99
-
100
-
101
-
102
-
103
-
104
-
105
-
106
-
107
-
108
 |
 |