Lexmark C524 User's Guide - Page 114
Buttons, Saved
 |
View all Lexmark C524 manuals
Add to My Manuals
Save this manual to your list of manuals |
Page 114 highlights
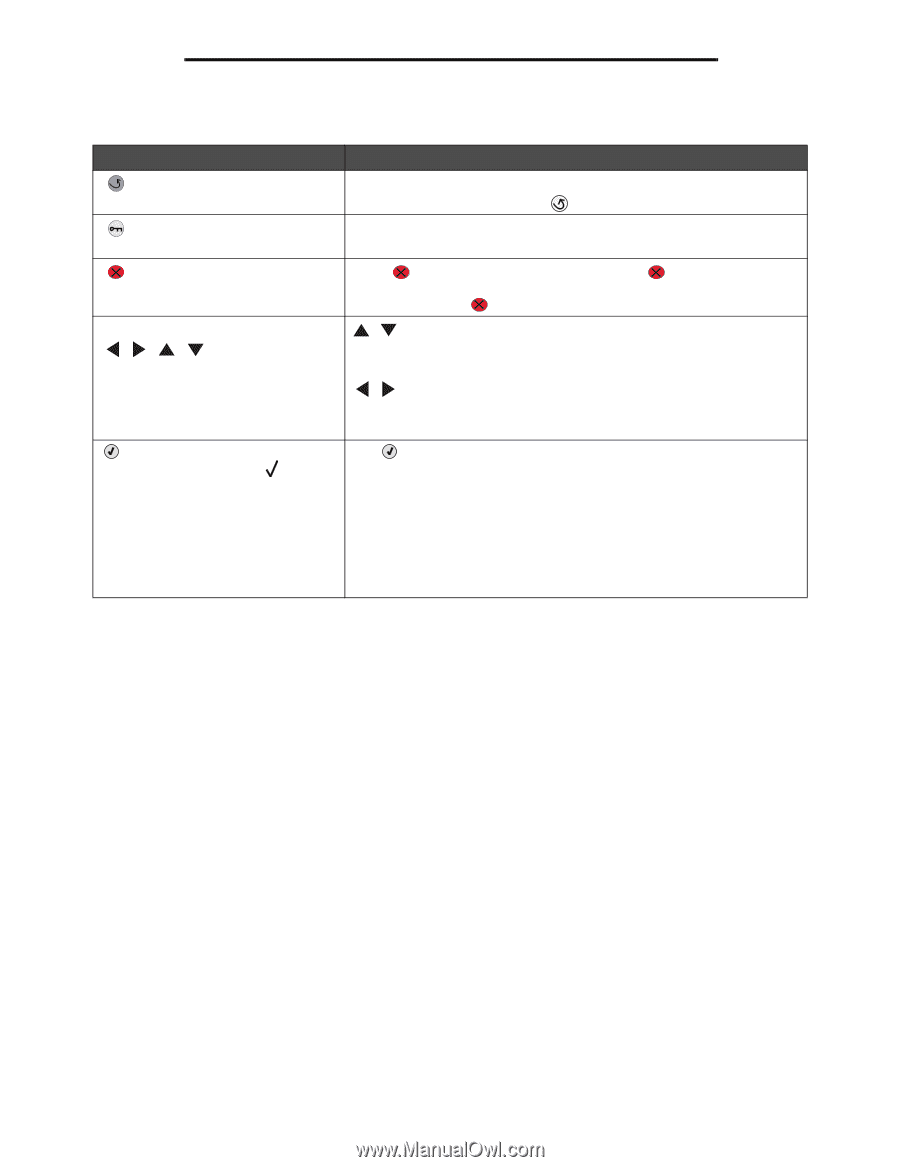
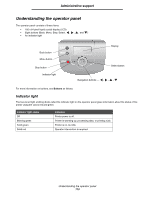
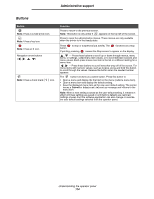
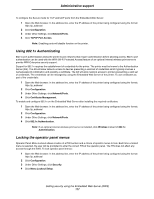
Administrative support Buttons Button Note: It has a curved arrow icon. Note: It has a key icon. Note: It has an X icon. Navigation arrow buttons (, , , ) Note: It has a check mark ( ) icon. Function Press to return to the previous screen. Note: This button is only active if appears on the top left of the screen. Press to open the administration menus. These menus are only available when the printer is in the Ready state. Press button. to stop or suspend all job activity. The functions as a stop If printing, pressing causes the Stop screen to appear on the display. , - Press these buttons to scroll up or down through menus, menu items, or settings, called menu item values, or to scroll between screens and menu values. Each press moves one item in the list or a different setting for a menu item. , - Press these buttons to scroll items that wrap off of the screen. For menu items with numeric values, such as Copies, press and hold this button to scroll through the values. Release the button when the needed number appears. The button functions as a select button. Press this button to: • Open a menu and display the first item in the menu (called a menu item). • Open a menu item and display the default setting. • Save the displayed menu item as the new user default setting. The printer issues a Saved or Submitted Selection message and returns to the menu item. Note: When a new setting is saved as the user default setting, it remains in effect until new settings are saved or until factory defaults are restored. Settings chosen from the software application can also change or override the user default settings selected from the operator panel. Understanding the operator panel 114
-
 1
1 -
2
-
3
-
4
-
5
-
6
-
7
-
8
-
9
-
10
-
11
-
12
-
13
-
14
-
15
-
16
-
17
-
18
-
19
-
20
-
21
-
22
-
23
-
24
-
25
-
26
-
27
-
28
-
29
-
30
-
31
-
32
-
33
-
34
-
35
-
36
-
37
-
38
-
39
-
40
-
41
-
42
-
43
-
44
-
45
-
46
-
47
-
48
-
49
-
50
-
51
-
52
-
53
-
54
-
55
-
56
-
57
-
58
-
59
-
60
-
61
-
62
-
63
-
64
-
65
-
66
-
67
-
68
-
69
-
70
-
71
-
72
-
73
-
74
-
75
-
76
-
77
-
78
-
79
-
80
-
81
-
82
-
83
-
84
-
85
-
86
-
87
-
88
-
89
-
90
-
91
-
92
-
93
-
94
-
95
-
96
-
97
-
98
-
99
-
100
-
101
-
102
-
103
-
104
-
105
-
106
-
107
-
108
-
 109
109 -
 110
110 -
 111
111 -
 112
112 -
 113
113 -
 114
114 -
 115
115 -
 116
116 -
 117
117 -
 118
118 -
 119
119 -
120
-
121
-
122
-
123
-
124
-
125
-
126
-
127
-
128
-
129
-
130
-
131
-
132
-
133
-
134
-
135
-
136
-
137
-
138
-
139
-
140
-
141
-
142
-
143
-
144
-
145
-
146
 |
 |