Lexmark C524 User's Guide - Page 132
Removing an optional INA card, Accessing the system board, Replacing the system board metal plate
 |
View all Lexmark C524 manuals
Add to My Manuals
Save this manual to your list of manuals |
Page 132 highlights
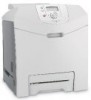
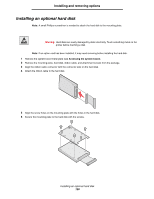
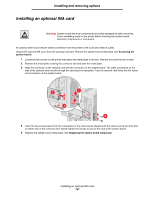
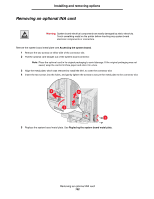
Installing and removing options Removing an optional INA card Warning: System board electrical components are easily damaged by static electricity. Touch something metal on the printer before touching any system board electronic components or connectors. Remove the system board metal plate (see Accessing the system board). 1 Remove the two screws on either side of the connector slot. 2 Pull the optional card straight out of the system board connector. Note: Place the optional card in its original packaging to avoid damage. If the original packaging was not saved, wrap the card in lint-free paper and store it in a box. 3 Align the metal plate, which was removed to install the INA, to cover the connector slot. 4 Insert the two screws into the holes, and gently tighten the screws to secure the metal plate to the connector slot. 4 3 5 Replace the system board metal plate. See Replacing the system board metal plate. Removing an optional INA card 132
-
 1
1 -
2
-
3
-
4
-
5
-
6
-
7
-
8
-
9
-
10
-
11
-
12
-
13
-
14
-
15
-
16
-
17
-
18
-
19
-
20
-
21
-
22
-
23
-
24
-
25
-
26
-
27
-
28
-
29
-
30
-
31
-
32
-
33
-
34
-
35
-
36
-
37
-
38
-
39
-
40
-
41
-
42
-
43
-
44
-
45
-
46
-
47
-
48
-
49
-
50
-
51
-
52
-
53
-
54
-
55
-
56
-
57
-
58
-
59
-
60
-
61
-
62
-
63
-
64
-
65
-
66
-
67
-
68
-
69
-
70
-
71
-
72
-
73
-
74
-
75
-
76
-
77
-
78
-
79
-
80
-
81
-
82
-
83
-
84
-
85
-
86
-
87
-
88
-
89
-
90
-
91
-
92
-
93
-
94
-
95
-
96
-
97
-
98
-
99
-
100
-
101
-
102
-
103
-
104
-
105
-
106
-
107
-
108
-
109
-
110
-
111
-
112
-
113
-
114
-
115
-
116
-
117
-
118
-
119
-
120
-
121
-
122
-
123
-
124
-
125
-
126
-
 127
127 -
 128
128 -
 129
129 -
 130
130 -
 131
131 -
 132
132 -
 133
133 -
 134
134 -
 135
135 -
 136
136 -
 137
137 -
138
-
139
-
140
-
141
-
142
-
143
-
144
-
145
-
146
 |
 |