Lexmark C524 User's Guide - Page 66
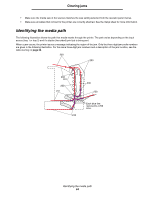
Operator panel, message, Area description, Go to Between Tray 1 and Tray 2 - photoconductors
 |
View all Lexmark C524 manuals
Add to My Manuals
Save this manual to your list of manuals |
Page 66 highlights
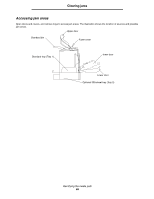
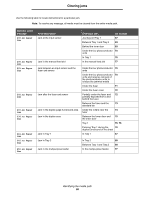
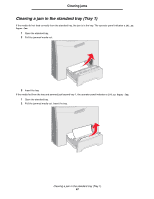
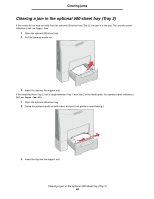
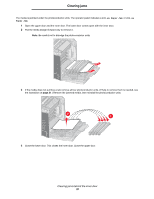
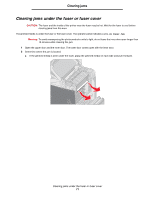
Clearing jams Use the following table to locate instructions for a particular jam. Note: To resolve any message, all media must be cleared from the entire media path. Operator panel message 200.xx Paper Jam 200.xx Paper Jam 201.xx Paper Jam 202.xx Paper Jam 203.xx Paper Jam 230.xx Paper Jam 241.xx Paper Jam 242.xx Paper Jam 250.xx Paper Jam Area description Jam at the input sensor Jam in the manual feed slot Clearing a jam... Go to page Just beyond Tray 1 67 Between Tray 1 and Tray 2 69 Behind the inner door 69 Under the four photoconductor 70 units In Tray 1 76 In the manual feed slot 77 Jam between an input sensor and the fuser exit sensor Jam after the fuser exit sensor Jam in the duplex page-turnaround area Jam in the duplex area Jam in Tray 1 Under the four photoconductor 70 units Under the four photoconductor 70 units and requires removal of the photoconductor units to release the jammed media Under the fuser 71 Under the fuser cover 72 Partially under the fuser and 72 partially exposed from a slot behind the fuser Between the fuser and the 73 standard bin Under the rollers near the 74 fuser Between the lower door and 75 the inner door Tray 1 76, 76 Entering Tray 1 during the 76 duplex turnaround of the sheet In Tray 1 67 Jam in Tray 2 Jam in the multipurpose feeder In Tray 2 68 Between Tray 1 and Tray 2 68 In the multipurpose feeder 77 Identifying the media path 66
-
 1
1 -
2
-
3
-
4
-
5
-
6
-
7
-
8
-
9
-
10
-
11
-
12
-
13
-
14
-
15
-
16
-
17
-
18
-
19
-
20
-
21
-
22
-
23
-
24
-
25
-
26
-
27
-
28
-
29
-
30
-
31
-
32
-
33
-
34
-
35
-
36
-
37
-
38
-
39
-
40
-
41
-
42
-
43
-
44
-
45
-
46
-
47
-
48
-
49
-
50
-
51
-
52
-
53
-
54
-
55
-
56
-
57
-
58
-
59
-
60
-
 61
61 -
 62
62 -
 63
63 -
 64
64 -
 65
65 -
 66
66 -
 67
67 -
 68
68 -
 69
69 -
 70
70 -
 71
71 -
72
-
73
-
74
-
75
-
76
-
77
-
78
-
79
-
80
-
81
-
82
-
83
-
84
-
85
-
86
-
87
-
88
-
89
-
90
-
91
-
92
-
93
-
94
-
95
-
96
-
97
-
98
-
99
-
100
-
101
-
102
-
103
-
104
-
105
-
106
-
107
-
108
-
109
-
110
-
111
-
112
-
113
-
114
-
115
-
116
-
117
-
118
-
119
-
120
-
121
-
122
-
123
-
124
-
125
-
126
-
127
-
128
-
129
-
130
-
131
-
132
-
133
-
134
-
135
-
136
-
137
-
138
-
139
-
140
-
141
-
142
-
143
-
144
-
145
-
146
 |
 |