Lexmark C524 User's Guide - Page 93
Solving print quality problems, ABCDE
 |
View all Lexmark C524 manuals
Add to My Manuals
Save this manual to your list of manuals |
Page 93 highlights
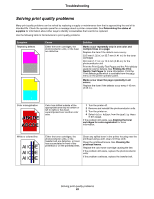
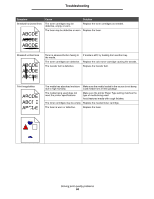
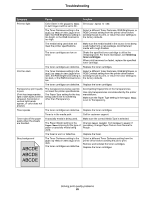
Troubleshooting Solving print quality problems Many print quality problems can be solved by replacing a supply or maintenance item that is approaching the end of its intended life. Check the operator panel for a message about a printer consumable. See Determining the status of supplies for information about other ways to identify consumables that need to be replaced. Use the following table to find solutions to print quality problems. Symptom Repeating defects Cause Either the toner cartridges, the photoconductor units, or the fuser are defective. Solution Marks occur repeatedly only in one color and multiple times on a page: Replace the item if the defects occur every: 33.5 mm (1.32 in.) or 35.7 mm (1.41 in.) for the toner cartridges 28.3 mm (1.11 in.) or 72.4 mm (2.85 in.) for the photoconductor unit Print the Print Quality Test Pages and the Print defects guide to look for defects. See Printing the Print Quality Test Pages for more information. Print the Print defects guide which is available from the Help menu on the printer operator panel. Marks occur down the page repeatedly in all colors: Replace the fuser if the defects occur every 116 mm (4.56 in.). Color misregistration AABBCCDDEE ABCDE Color has shifted outside of the appropriate area (top to bottom or left to right) or has been superimposed over another color area. 1 Turn the printer off. 2 Remove and reinstall the photoconductor units. 3 Turn the printer on. 4 Select Color Adjust from the Quality Menu in Settings. If the problem still exists, see Aligning the toner cartridges for color registration for more information. White or colored line ABCDE ABCDE ABCDE Either the toner cartridges, the photoconductor units, or the transfer belt are defective, or toner has accumulated in front of the printhead or on the printhead lens. Clean any spilled toner in the printer housing near the printhead using a soft, clean, lint-free cloth. Clean the printhead lenses. See Cleaning the printhead lenses. Replace the color toner cartridge causing the line. If the problem still exists, replace the photoconductor units. If the problem continues, replace the transfer belt. Solving print quality problems 93
-
 1
1 -
2
-
3
-
4
-
5
-
6
-
7
-
8
-
9
-
10
-
11
-
12
-
13
-
14
-
15
-
16
-
17
-
18
-
19
-
20
-
21
-
22
-
23
-
24
-
25
-
26
-
27
-
28
-
29
-
30
-
31
-
32
-
33
-
34
-
35
-
36
-
37
-
38
-
39
-
40
-
41
-
42
-
43
-
44
-
45
-
46
-
47
-
48
-
49
-
50
-
51
-
52
-
53
-
54
-
55
-
56
-
57
-
58
-
59
-
60
-
61
-
62
-
63
-
64
-
65
-
66
-
67
-
68
-
69
-
70
-
71
-
72
-
73
-
74
-
75
-
76
-
77
-
78
-
79
-
80
-
81
-
82
-
83
-
84
-
85
-
86
-
87
-
 88
88 -
 89
89 -
 90
90 -
 91
91 -
 92
92 -
 93
93 -
 94
94 -
 95
95 -
 96
96 -
 97
97 -
 98
98 -
99
-
100
-
101
-
102
-
103
-
104
-
105
-
106
-
107
-
108
-
109
-
110
-
111
-
112
-
113
-
114
-
115
-
116
-
117
-
118
-
119
-
120
-
121
-
122
-
123
-
124
-
125
-
126
-
127
-
128
-
129
-
130
-
131
-
132
-
133
-
134
-
135
-
136
-
137
-
138
-
139
-
140
-
141
-
142
-
143
-
144
-
145
-
146
 |
 |