Lexmark C524 User's Guide - Page 29
Printing the Print Quality Test s, Printing only black text and graphics - toner
 |
View all Lexmark C524 manuals
Add to My Manuals
Save this manual to your list of manuals |
Page 29 highlights
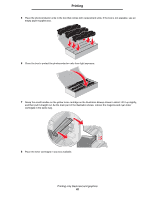
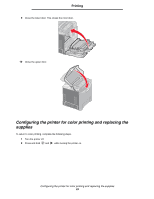
Printing 6 When the needed item is selected, press . The message Printing PCL Fonts. or Printing PS Fonts. appears while the pages print based on the one selected. The printer returns to the Ready message after the font sample pages print. If any other message appears when this page prints, see the Menus and Messages Guide located on the publications CD for more information. Printing the Print Quality Test Pages To help isolate print quality problems, print the Print Quality Test Pages. 1 Turn the printer off. 2 Press and hold and while turning the printer on. 3 Release the buttons when the clock appears. CONFIG MENU appears on the first line of the display. 4 Press until Prt Quality Pgs appears, and then press . The pages are formatted. The Printing Quality Test Pages message appears, then the pages print. The message remains on the operator panel until all the pages print. The Print Quality Test Pages contain several pages. The first page which is printed in English text only contains a mixture of text and graphics. The information includes values of the Quality Menu settings in Settings, and printer and toner cartridge configuration information. The remaining pages only contain graphics. After the Print Quality Test Pages print, exit the CONFIG MENU. 5 Press until Exit Config Menu appears, and then press . 6 The message Resetting the Printer and the clock appear, and the printer returns to Ready. Printing only black text and graphics If planning to print for an extended period with black toner only, complete Configuring the printer for black-only printing which follows and Removing the color supplies. This saves the matching toner cartridges (cyan, magenta, and yellow) and photoconductor units from excessive wear. Note: Store the photoconductor units in a clean, cool, dark, and dry place where they will not be touched or scratched. Store the toner cartridges with the photoconductor units. Keep the photoconductor units and toner cartridges readily available. Configuring the printer for black-only printing Complete the following instructions to print with black only prior to removing all the color supplies from the printer. 1 Turn the printer off. 2 Press and hold and while turning the printer on. 3 Release the buttons when the clock appears. CONFIG MENU appears on the first line of the display. 4 Press until Black Only Mode appears, and then press . 5 Press until On appears, and then press . The Submitting Selection message appears. Printing the Print Quality Test Pages 29
-
 1
1 -
2
-
3
-
4
-
5
-
6
-
7
-
8
-
9
-
10
-
11
-
12
-
13
-
14
-
15
-
16
-
17
-
18
-
19
-
20
-
21
-
22
-
23
-
 24
24 -
 25
25 -
 26
26 -
 27
27 -
 28
28 -
 29
29 -
 30
30 -
 31
31 -
 32
32 -
 33
33 -
 34
34 -
35
-
36
-
37
-
38
-
39
-
40
-
41
-
42
-
43
-
44
-
45
-
46
-
47
-
48
-
49
-
50
-
51
-
52
-
53
-
54
-
55
-
56
-
57
-
58
-
59
-
60
-
61
-
62
-
63
-
64
-
65
-
66
-
67
-
68
-
69
-
70
-
71
-
72
-
73
-
74
-
75
-
76
-
77
-
78
-
79
-
80
-
81
-
82
-
83
-
84
-
85
-
86
-
87
-
88
-
89
-
90
-
91
-
92
-
93
-
94
-
95
-
96
-
97
-
98
-
99
-
100
-
101
-
102
-
103
-
104
-
105
-
106
-
107
-
108
-
109
-
110
-
111
-
112
-
113
-
114
-
115
-
116
-
117
-
118
-
119
-
120
-
121
-
122
-
123
-
124
-
125
-
126
-
127
-
128
-
129
-
130
-
131
-
132
-
133
-
134
-
135
-
136
-
137
-
138
-
139
-
140
-
141
-
142
-
143
-
144
-
145
-
146
 |
 |