Lexmark C524 User's Guide - Page 89
Fuser Missing, If the fuser is installed improperly or it is missing
 |
View all Lexmark C524 manuals
Add to My Manuals
Save this manual to your list of manuals |
Page 89 highlights
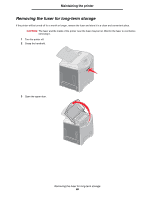
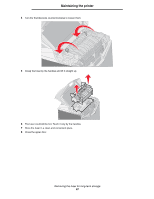
Maintaining the printer 3 Grasp the fuser by the handles and align it with its opening. Align the tab on the right with the groove. Align the u-shaped part on the left of the fuser with the u-shaped groove. 4 Gently lower the fuser into place. Push it down until it is firmly seated. 5 Turn the thumbscrews clockwise to tighten them. Warning: Make sure the thumbscrews are tightened fully before closing the upper door. 6 Close the upper door. 7 Turn the printer on. If the fuser is installed improperly or it is missing, 87 Fuser Missing appears on the operator panel. If this message appears, remove the fuser, and reinstall it correctly. Replacing the fuser after long-term storage 89
-
 1
1 -
2
-
3
-
4
-
5
-
6
-
7
-
8
-
9
-
10
-
11
-
12
-
13
-
14
-
15
-
16
-
17
-
18
-
19
-
20
-
21
-
22
-
23
-
24
-
25
-
26
-
27
-
28
-
29
-
30
-
31
-
32
-
33
-
34
-
35
-
36
-
37
-
38
-
39
-
40
-
41
-
42
-
43
-
44
-
45
-
46
-
47
-
48
-
49
-
50
-
51
-
52
-
53
-
54
-
55
-
56
-
57
-
58
-
59
-
60
-
61
-
62
-
63
-
64
-
65
-
66
-
67
-
68
-
69
-
70
-
71
-
72
-
73
-
74
-
75
-
76
-
77
-
78
-
79
-
80
-
81
-
82
-
83
-
 84
84 -
 85
85 -
 86
86 -
 87
87 -
 88
88 -
 89
89 -
 90
90 -
 91
91 -
 92
92 -
 93
93 -
 94
94 -
95
-
96
-
97
-
98
-
99
-
100
-
101
-
102
-
103
-
104
-
105
-
106
-
107
-
108
-
109
-
110
-
111
-
112
-
113
-
114
-
115
-
116
-
117
-
118
-
119
-
120
-
121
-
122
-
123
-
124
-
125
-
126
-
127
-
128
-
129
-
130
-
131
-
132
-
133
-
134
-
135
-
136
-
137
-
138
-
139
-
140
-
141
-
142
-
143
-
144
-
145
-
146
 |
 |

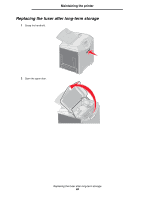
Replacing the fuser after long-term storage
89
Maintaining the printer
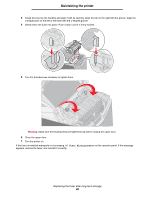
3
Grasp the fuser by the handles and align it with its opening. Align the tab on the right with the groove. Align the
u-shaped part on the left of the fuser with the u-shaped groove.
4
Gently lower the fuser into place. Push it down until it is firmly seated.
5
Turn the thumbscrews clockwise to tighten them.
Warning:
Make sure the thumbscrews are tightened fully before closing the upper door.
6
Close the upper door.
7
Turn the printer on.
If the fuser is installed improperly or it is missing,
87 Fuser Missing
appears on the operator panel. If this message
appears, remove the fuser, and reinstall it correctly.