Lexmark C524 User's Guide - Page 32
cartridges in the same way., Place the toner cartridges in any box available. - supplies
 |
View all Lexmark C524 manuals
Add to My Manuals
Save this manual to your list of manuals |
Page 32 highlights
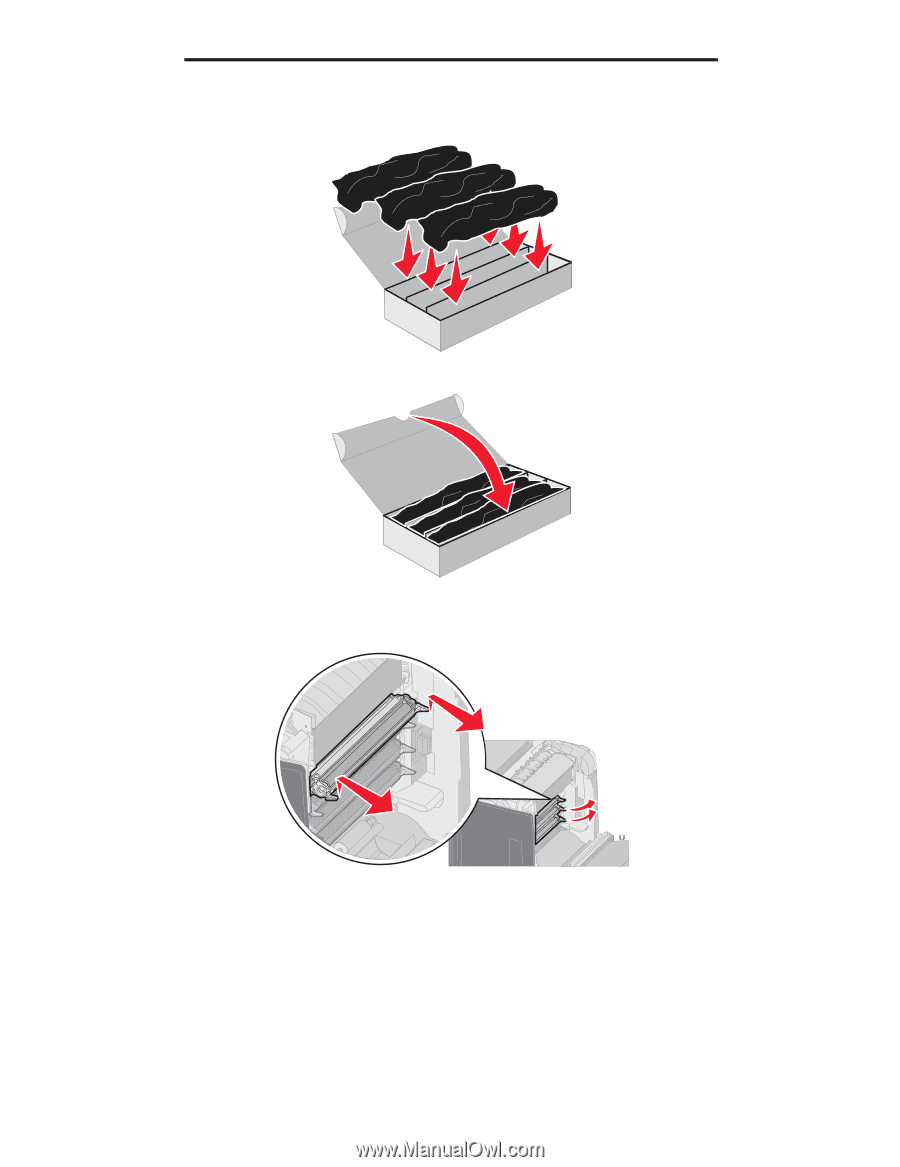
Printing 5 Place the photoconductor units in the box that comes with replacement units. If the box is not available, use an empty paper supplies box. 6 Close the box to protect the photoconductor units from light exposure. 7 Grasp the small handles on the yellow toner cartridge as the illustration blowup shows in detail. Lift it up slightly, and then pull it straight out. As the main part of the illustration shows, remove the magenta and cyan toner cartridges in the same way. 8 Place the toner cartridges in any box available. Printing only black text and graphics 32
-
 1
1 -
2
-
3
-
4
-
5
-
6
-
7
-
8
-
9
-
10
-
11
-
12
-
13
-
14
-
15
-
16
-
17
-
18
-
19
-
20
-
21
-
22
-
23
-
24
-
25
-
26
-
 27
27 -
 28
28 -
 29
29 -
 30
30 -
 31
31 -
 32
32 -
 33
33 -
 34
34 -
 35
35 -
 36
36 -
 37
37 -
38
-
39
-
40
-
41
-
42
-
43
-
44
-
45
-
46
-
47
-
48
-
49
-
50
-
51
-
52
-
53
-
54
-
55
-
56
-
57
-
58
-
59
-
60
-
61
-
62
-
63
-
64
-
65
-
66
-
67
-
68
-
69
-
70
-
71
-
72
-
73
-
74
-
75
-
76
-
77
-
78
-
79
-
80
-
81
-
82
-
83
-
84
-
85
-
86
-
87
-
88
-
89
-
90
-
91
-
92
-
93
-
94
-
95
-
96
-
97
-
98
-
99
-
100
-
101
-
102
-
103
-
104
-
105
-
106
-
107
-
108
-
109
-
110
-
111
-
112
-
113
-
114
-
115
-
116
-
117
-
118
-
119
-
120
-
121
-
122
-
123
-
124
-
125
-
126
-
127
-
128
-
129
-
130
-
131
-
132
-
133
-
134
-
135
-
136
-
137
-
138
-
139
-
140
-
141
-
142
-
143
-
144
-
145
-
146
 |
 |
Printing only black text and graphics
32
Printing
5
Place the photoconductor units in the box that comes with replacement units. If the box is not available, use an
empty paper supplies box.
6
Close the box to protect the photoconductor units from light exposure.
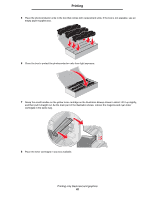
7
Grasp the small handles on the yellow toner cartridge as the illustration blowup shows in detail. Lift it up slightly,
and then pull it straight out. As the main part of the illustration shows, remove the magenta and cyan toner
cartridges in the same way.
8
Place the toner cartridges in any box available.