Pentax 19231 T30 Operating Manual - Page 111
Deleting Unwanted Parts of an Image (Cropping
 |
UPC - 027075126640
View all Pentax 19231 manuals
Add to My Manuals
Save this manual to your list of manuals |
Page 111 highlights
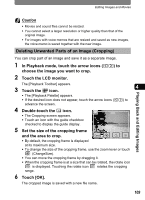
Editing Images and Movies Playing Back and Editing Images Caution • Movies and sound files cannot be resized. • You cannot select a larger resolution or higher quality than that of the original image. • For images with voice memos that are resized and saved as new images, the voice memo is saved together with the new image. Deleting Unwanted Parts of an Image (Cropping) You can crop part of an image and save it as a separate image. 1 In Playback mode, touch the arrow icons (qr) to choose the image you want to crop. 2 Touch the LCD monitor. The [Playback Toolbar] appears. 3 Touch the n icon. 4 • The [Playback Palette] appears. • If the desired icon does not appear, touch the arrow icons (qr) to advance the screen. 4 Double-touch the o icon. • The Cropping screen appears. • Touch an icon with the guide checkbox checked to display the guide display. 5 Set the size of the cropping frame and the area to crop. Cancel OK • By default, the cropping frame is displayed at its maximum size. • To change the size of the cropping frame, use the zoom lever or touch (ChangeSize). • You can move the cropping frame by dragging it. • When the cropping frame is at a size that can be rotated, the rotate icon is displayed. Touching the rotate icon rotates the cropping range. 6 Touch [OK]. The cropped image is saved with a new file name. 109
-
 1
1 -
2
-
3
-
4
-
5
-
6
-
7
-
8
-
9
-
10
-
11
-
12
-
13
-
14
-
15
-
16
-
17
-
18
-
19
-
20
-
21
-
22
-
23
-
24
-
25
-
26
-
27
-
28
-
29
-
30
-
31
-
32
-
33
-
34
-
35
-
36
-
37
-
38
-
39
-
40
-
41
-
42
-
43
-
44
-
45
-
46
-
47
-
48
-
49
-
50
-
51
-
52
-
53
-
54
-
55
-
56
-
57
-
58
-
59
-
60
-
61
-
62
-
63
-
64
-
65
-
66
-
67
-
68
-
69
-
70
-
71
-
72
-
73
-
74
-
75
-
76
-
77
-
78
-
79
-
80
-
81
-
82
-
83
-
84
-
85
-
86
-
87
-
88
-
89
-
90
-
91
-
92
-
93
-
94
-
95
-
96
-
97
-
98
-
99
-
100
-
101
-
102
-
103
-
104
-
105
-
 106
106 -
 107
107 -
 108
108 -
 109
109 -
 110
110 -
 111
111 -
 112
112 -
 113
113 -
 114
114 -
 115
115 -
 116
116 -
117
-
118
-
119
-
120
-
121
-
122
-
123
-
124
-
125
-
126
-
127
-
128
-
129
-
130
-
131
-
132
-
133
-
134
-
135
-
136
-
137
-
138
-
139
-
140
-
141
-
142
-
143
-
144
-
145
-
146
-
147
-
148
-
149
-
150
-
151
-
152
-
153
-
154
-
155
-
156
-
157
-
158
-
159
-
160
-
161
-
162
-
163
-
164
-
165
-
166
-
167
-
168
-
169
-
170
-
171
-
172
-
173
-
174
-
175
-
176
-
177
-
178
-
179
-
180
-
181
-
182
-
183
-
184
-
185
-
186
-
187
-
188
-
189
-
190
-
191
-
192
 |
 |
