Pentax 19231 T30 Operating Manual - Page 35
Connect the Camera to a Printer, Print the Images, Inserting the Date on Prints
 |
UPC - 027075126640
View all Pentax 19231 manuals
Add to My Manuals
Save this manual to your list of manuals |
Page 35 highlights
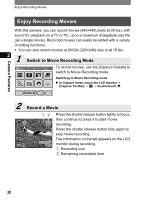
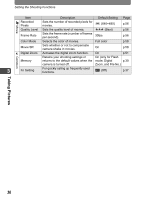
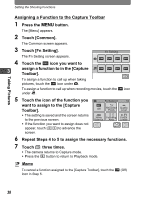
Camera Features Enjoy Printing Images 3 Connect the Camera to a Printer Select printing mode Connect the camera to a printer that supports PictBridge using the provided USB cable. The settings for the number of copies and whether Print Print DPOF to superimpose the date can also be made on All One Setting the camera when printing even if no DPOF print settings are made (p.140). 2 4 Print the Images Print with DPOF setting Total 10 Date Copies 1 Cancel Print If the DPOF settings have already been made, simply touch [DPOF Setting] and then [Print] to print the pictures (p.143). You can also print individual images (p.141) or print all the images on an SD Memory Card or those stored in the built-in memory (p.143). When printing is completed, turn off the camera, and disconnect the USB cable from the camera and printer. Inserting the Date on Prints By inserting the date on your prints, you can easily determine when the picture was taken. The setting for inserting the date can be made when making the DPOF settings or when printing (p.137, p.141, p.143). • Not all printers are capable of date imprinting. 2007.01.26 2007.01.26 33
-
 1
1 -
2
-
3
-
4
-
5
-
6
-
7
-
8
-
9
-
10
-
11
-
12
-
13
-
14
-
15
-
16
-
17
-
18
-
19
-
20
-
21
-
22
-
23
-
24
-
25
-
26
-
27
-
28
-
29
-
 30
30 -
 31
31 -
 32
32 -
 33
33 -
 34
34 -
 35
35 -
 36
36 -
 37
37 -
 38
38 -
 39
39 -
 40
40 -
41
-
42
-
43
-
44
-
45
-
46
-
47
-
48
-
49
-
50
-
51
-
52
-
53
-
54
-
55
-
56
-
57
-
58
-
59
-
60
-
61
-
62
-
63
-
64
-
65
-
66
-
67
-
68
-
69
-
70
-
71
-
72
-
73
-
74
-
75
-
76
-
77
-
78
-
79
-
80
-
81
-
82
-
83
-
84
-
85
-
86
-
87
-
88
-
89
-
90
-
91
-
92
-
93
-
94
-
95
-
96
-
97
-
98
-
99
-
100
-
101
-
102
-
103
-
104
-
105
-
106
-
107
-
108
-
109
-
110
-
111
-
112
-
113
-
114
-
115
-
116
-
117
-
118
-
119
-
120
-
121
-
122
-
123
-
124
-
125
-
126
-
127
-
128
-
129
-
130
-
131
-
132
-
133
-
134
-
135
-
136
-
137
-
138
-
139
-
140
-
141
-
142
-
143
-
144
-
145
-
146
-
147
-
148
-
149
-
150
-
151
-
152
-
153
-
154
-
155
-
156
-
157
-
158
-
159
-
160
-
161
-
162
-
163
-
164
-
165
-
166
-
167
-
168
-
169
-
170
-
171
-
172
-
173
-
174
-
175
-
176
-
177
-
178
-
179
-
180
-
181
-
182
-
183
-
184
-
185
-
186
-
187
-
188
-
189
-
190
-
191
-
192
 |
 |
