Pentax 19231 T30 Operating Manual - Page 144
Touch [Print]., Touch [Paper Size]., Touch the desired paper size.
 |
UPC - 027075126640
View all Pentax 19231 manuals
Add to My Manuals
Save this manual to your list of manuals |
Page 144 highlights
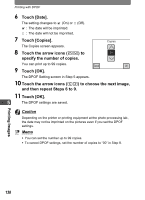
Direct Printing with PictBridge Changing the Print Settings 5 Touch [Print]. A confirmation dialog appears. 6 Touch [Paper Size]. The Paper Size screen appears. Print with this setting? Paper Size Paper Type Quality Border Status Print Paper Size Postcard A4 Card 4"x6" Letter L 2L 11"x17" 100x150 8"x10" A3 Printing Images 7 Touch the desired paper size. You can only choose a size that is supported by your printer. 5 8 Repeat Steps 6 to 7 for [Paper Type], [Quality] and [Border Status]. • If you select _, images are printed according to the settings on the printer. • When you touch [Paper Type], the more E the higher the quality of paper you can use. • When you touch [Quality], the more E the higher the print quality will be. 9 Touch [Print]. • The image is printed according to the settings. • Touch [Printing Cancel] during printing to cancel printing. Memo • The power indicator lights while the camera is communicating with the printer, and blinks while the card is being accessed and during printing. Do not disconnect the USB cable while the power indicator is blinking. • The [Paper Size], [Paper Type], [Quality] and [Border Status] settings are reset to their defaults when the camera is turned off. 142
-
 1
1 -
2
-
3
-
4
-
5
-
6
-
7
-
8
-
9
-
10
-
11
-
12
-
13
-
14
-
15
-
16
-
17
-
18
-
19
-
20
-
21
-
22
-
23
-
24
-
25
-
26
-
27
-
28
-
29
-
30
-
31
-
32
-
33
-
34
-
35
-
36
-
37
-
38
-
39
-
40
-
41
-
42
-
43
-
44
-
45
-
46
-
47
-
48
-
49
-
50
-
51
-
52
-
53
-
54
-
55
-
56
-
57
-
58
-
59
-
60
-
61
-
62
-
63
-
64
-
65
-
66
-
67
-
68
-
69
-
70
-
71
-
72
-
73
-
74
-
75
-
76
-
77
-
78
-
79
-
80
-
81
-
82
-
83
-
84
-
85
-
86
-
87
-
88
-
89
-
90
-
91
-
92
-
93
-
94
-
95
-
96
-
97
-
98
-
99
-
100
-
101
-
102
-
103
-
104
-
105
-
106
-
107
-
108
-
109
-
110
-
111
-
112
-
113
-
114
-
115
-
116
-
117
-
118
-
119
-
120
-
121
-
122
-
123
-
124
-
125
-
126
-
127
-
128
-
129
-
130
-
131
-
132
-
133
-
134
-
135
-
136
-
137
-
138
-
 139
139 -
 140
140 -
 141
141 -
 142
142 -
 143
143 -
 144
144 -
 145
145 -
 146
146 -
 147
147 -
 148
148 -
 149
149 -
150
-
151
-
152
-
153
-
154
-
155
-
156
-
157
-
158
-
159
-
160
-
161
-
162
-
163
-
164
-
165
-
166
-
167
-
168
-
169
-
170
-
171
-
172
-
173
-
174
-
175
-
176
-
177
-
178
-
179
-
180
-
181
-
182
-
183
-
184
-
185
-
186
-
187
-
188
-
189
-
190
-
191
-
192
 |
 |
