Pentax 19231 T30 Operating Manual - Page 71
Other Settings, Sharpness, Saturation and Contrast are selected
 |
UPC - 027075126640
View all Pentax 19231 manuals
Add to My Manuals
Save this manual to your list of manuals |
Page 71 highlights
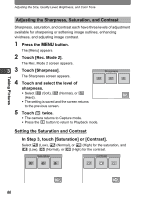
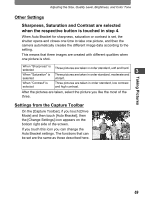
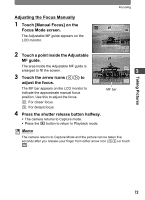
Adjusting the Size, Quality Level, Brightness, and Color Tone Other Settings Sharpness, Saturation and Contrast are selected when the respective button is touched in step 4. When Auto Bracket for sharpness, saturation or contrast is set, the shutter opens and closes one time to take one picture, and then the camera automatically creates the different image data according to the setting. This means that three images are created with different qualities when one picture is shot. When "Sharpness" is selected Three pictures are taken in order standard, soft and hard. 3 When "Saturation" is Three pictures are taken in order standard, moderate and selected vibrant. When "Contrast" is selected Three pictures are taken in order standard, low contrast and high contrast. After the pictures are taken, select the picture you like the most of the three. Settings from the Capture Toolbar On the [Capture Toolbar], if you touch [Drive Mode] and then touch [Auto Bracket], then 38 the [Change Settings] icon appears on the bottom right side of the screen. If you touch this icon you can change the Auto Bracket settings. The functions that can be set are the same as those described here. Taking Pictures 69
-
 1
1 -
2
-
3
-
4
-
5
-
6
-
7
-
8
-
9
-
10
-
11
-
12
-
13
-
14
-
15
-
16
-
17
-
18
-
19
-
20
-
21
-
22
-
23
-
24
-
25
-
26
-
27
-
28
-
29
-
30
-
31
-
32
-
33
-
34
-
35
-
36
-
37
-
38
-
39
-
40
-
41
-
42
-
43
-
44
-
45
-
46
-
47
-
48
-
49
-
50
-
51
-
52
-
53
-
54
-
55
-
56
-
57
-
58
-
59
-
60
-
61
-
62
-
63
-
64
-
65
-
 66
66 -
 67
67 -
 68
68 -
 69
69 -
 70
70 -
 71
71 -
 72
72 -
 73
73 -
 74
74 -
 75
75 -
 76
76 -
77
-
78
-
79
-
80
-
81
-
82
-
83
-
84
-
85
-
86
-
87
-
88
-
89
-
90
-
91
-
92
-
93
-
94
-
95
-
96
-
97
-
98
-
99
-
100
-
101
-
102
-
103
-
104
-
105
-
106
-
107
-
108
-
109
-
110
-
111
-
112
-
113
-
114
-
115
-
116
-
117
-
118
-
119
-
120
-
121
-
122
-
123
-
124
-
125
-
126
-
127
-
128
-
129
-
130
-
131
-
132
-
133
-
134
-
135
-
136
-
137
-
138
-
139
-
140
-
141
-
142
-
143
-
144
-
145
-
146
-
147
-
148
-
149
-
150
-
151
-
152
-
153
-
154
-
155
-
156
-
157
-
158
-
159
-
160
-
161
-
162
-
163
-
164
-
165
-
166
-
167
-
168
-
169
-
170
-
171
-
172
-
173
-
174
-
175
-
176
-
177
-
178
-
179
-
180
-
181
-
182
-
183
-
184
-
185
-
186
-
187
-
188
-
189
-
190
-
191
-
192
 |
 |
