Pentax 19231 T30 Operating Manual - Page 2

Accessing the Camera Settings, Monitor Indications, Using the touch display - digital camera

Page 2 highlights

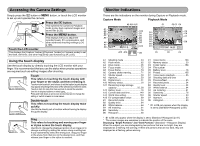
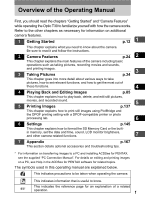
Accessing the Camera Settings Simply press the Q button or 3 button, or touch the LCD monitor to set up and operate the camera. Press the Q button. This switches the camera to Playback mode to play back captured images and sound files (p.25). Press the 3 button. This displays menus to adjust the recorded pixels, EV compensation, and other advanced shooting settings (p.34, p.145). Touch the LCD monitor. This displays the [Capture Toolbar] ([Playback Toolbar] in Playback mode) to set the flash, self-timer, and other frequently used functions (p.34, p.85). Using the touch display Use the touch display by directly touching the LCD monitor with your finger. It is recommended that you use the stylus when precise operations are required such as editing images after shooting. Touch This refers to touching the touch display with your finger or the stylus and then releasing it. Touch an icon to select it, and release to set that option (a guide display may appear describing the function of the selected icon before it is set). Touch an item for more than two seconds to cancel the selection. Use this to display toolbars or select icons. Press and hold down an arrow icon (suqr) to change the setting or switch screens in some menus. Double-touch This refers to touching the touch display twice quickly. Use this to directly set a function without having to display the guide display. Drag This refers to touching and moving your finger or stylus across the touch display. Use this to change the displayed portion of an image or to change a setting by sliding the cursor along a setting bar. If you inadvertently select the wrong icon, drag your finger or the stylus from that icon to the desired icon, and then release your finger or the stylus to reselect. Monitor Indications These are the indications on the monitor during Capture or Playback mode. Capture Mode Playback Mode A1 AUTO PICT A2 A3 A4 A5 A6 A7 1/250 A8 F2.7 A9 A10 A11 38 A12 7M B1 B2 B3 B4 ISO400 B5 01/26/2007 +1.0 14:25 A13 C1 C2 C3 C4 30 D1 7M D2 D3 100-0038 C5 C6 C7 D4 D5 ISO400 D8 D6 1/250 F2.7 D7 01/26/2007 14:25 A15 A14 B6 C9 C8 C9 A1 Shooting mode 43 A2 Flash mode 62 A3 Drive mode 35 A4 Focus mode 72 A5 Focus frame 74 A6 Camera shake warning 71 A7 Shutter speed 53 A8 Aperture 53 A9 Digital zoom 51 A10 Memory status 20 A11 Remaining image storage capacity 55, 58 A12 Battery level 16 A13 Current date and time 149 A14 World time setting 153 A15 EV compensation value 59 B1 Recorded pixels 54 B2 Quality level 54 B3 White balance 64 B4 AE metering 61 B5 Sensitivity 76 B6 Histogram 60 C1 Voice memo 130 C2 Memory status 20 C3 Folder name 158 C4 File number C5 Battery level 16 C6 Protect 105 C7 Voice memo playback 95 C8 Shooting date and time C9 Previous/Next 25 D1 Recorded pixels 54 D2 Quality level 54 D3 White balance 64 D4 AE metering 61 D5 Sensitivity 76 D6 Shutter speed 53 D7 Aperture 53 D8 Histogram 60 * D1 to D8 only appear when the display is set to [Standard+Histogram] (p.88). * B1 to B6 only appear when the display is set to [Standard+Histogram] (p.41). * The screen images are examples to indicate the position of the icons. Displaying "Bright Portions" and "Dark Portions" (Standard + Histogram Display) When the subject you are photographing has portions that are too bright, they are displayed as a flashing red warning. If there are portions that are too dark, they are displayed as a flashing yellow warning.

  • 1
  • 2
  • 3
  • 4
  • 5
  • 6
  • 7
  • 8
  • 9
  • 10
  • 11
  • 12
  • 13
  • 14
  • 15
  • 16
  • 17
  • 18
  • 19
  • 20
  • 21
  • 22
  • 23
  • 24
  • 25
  • 26
  • 27
  • 28
  • 29
  • 30
  • 31
  • 32
  • 33
  • 34
  • 35
  • 36
  • 37
  • 38
  • 39
  • 40
  • 41
  • 42
  • 43
  • 44
  • 45
  • 46
  • 47
  • 48
  • 49
  • 50
  • 51
  • 52
  • 53
  • 54
  • 55
  • 56
  • 57
  • 58
  • 59
  • 60
  • 61
  • 62
  • 63
  • 64
  • 65
  • 66
  • 67
  • 68
  • 69
  • 70
  • 71
  • 72
  • 73
  • 74
  • 75
  • 76
  • 77
  • 78
  • 79
  • 80
  • 81
  • 82
  • 83
  • 84
  • 85
  • 86
  • 87
  • 88
  • 89
  • 90
  • 91
  • 92
  • 93
  • 94
  • 95
  • 96
  • 97
  • 98
  • 99
  • 100
  • 101
  • 102
  • 103
  • 104
  • 105
  • 106
  • 107
  • 108
  • 109
  • 110
  • 111
  • 112
  • 113
  • 114
  • 115
  • 116
  • 117
  • 118
  • 119
  • 120
  • 121
  • 122
  • 123
  • 124
  • 125
  • 126
  • 127
  • 128
  • 129
  • 130
  • 131
  • 132
  • 133
  • 134
  • 135
  • 136
  • 137
  • 138
  • 139
  • 140
  • 141
  • 142
  • 143
  • 144
  • 145
  • 146
  • 147
  • 148
  • 149
  • 150
  • 151
  • 152
  • 153
  • 154
  • 155
  • 156
  • 157
  • 158
  • 159
  • 160
  • 161
  • 162
  • 163
  • 164
  • 165
  • 166
  • 167
  • 168
  • 169
  • 170
  • 171
  • 172
  • 173
  • 174
  • 175
  • 176
  • 177
  • 178
  • 179
  • 180
  • 181
  • 182
  • 183
  • 184
  • 185
  • 186
  • 187
  • 188
  • 189
  • 190
  • 191
  • 192

Simply press the
Q
button or
3
button, or touch the LCD monitor
to set up and operate the camera.
Use the touch display by directly touching the LCD monitor with your
finger. It is recommended that you use the stylus when precise operations
are required such as editing images after shooting.
Touch
This refers to touching the touch display with
your finger or the stylus and then releasing it.
Touch an icon to select it, and release to set that option (a guide display
may appear describing the function of the selected icon before it is set).
Touch an item for more than two seconds to cancel the selection.
Use this to display toolbars or select icons.
Press and hold down an arrow icon (
suqr
) to change the
setting or switch screens in some menus.
Double-touch
This refers to touching the touch display twice
quickly.
Use this to directly set a function without having to display
the guide display.
Drag
This refers to touching and moving your finger
or stylus across the touch display.
Use this to change the displayed portion of an image or to
change a setting by sliding the cursor along a setting bar.
If you inadvertently select the wrong icon, drag your finger
or the stylus from that icon to the desired icon, and then
release your finger or the stylus to reselect.
Accessing the Camera Settings
Press the
Q
button.
This switches the camera to Playback
mode to play back captured images and
sound files (p.25).
Press the
3
button.
This displays menus to adjust the
recorded pixels, EV compensation, and
other advanced shooting settings (p.34,
p.145).
Touch the LCD monitor.
This displays the [Capture Toolbar] ([Playback Toolbar] in Playback mode) to set
the flash, self-timer, and other frequently used functions (p.34, p.85).
Using the touch display
These are the indications on the monitor during Capture or Playback mode.
Capture Mode
A1
Shooting mode
...........................
43
A2
Flash mode
..................................
62
A3
Drive mode
..................................
35
A4
Focus mode
.................................
72
A5
Focus frame
.................................
74
A6
Camera shake warning
................
71
A7
Shutter speed
..............................
53
A8
Aperture
.......................................
53
A9
Digital zoom
.................................
51
A10
Memory status
.............................
20
A11
Remaining image storage
capacity
.................................
55, 58
A12 Battery level
.................................
16
A13 Current date and time
................
149
A14 World time setting
......................
153
A15 EV compensation value
...............
59
B1
Recorded pixels
...........................
54
B2
Quality level
.................................
54
B3
White balance
..............................
64
B4
AE metering
.................................
61
B5
Sensitivity
....................................
76
B6
Histogram
....................................
60
Playback Mode
C1
Voice memo
...............................
130
C2
Memory status
.............................
20
C3
Folder name
...............................
158
C4
File number
C5
Battery level
.................................
16
C6
Protect
.......................................
105
C7
Voice memo playback
..................
95
C8
Shooting date and time
C9
Previous/Next
..............................
25
D1
Recorded pixels
...........................
54
D2
Quality level
.................................
54
D3
White balance
..............................
64
D4
AE metering
.................................
61
D5
Sensitivity
.....................................
76
D6
Shutter speed
..............................
53
D7
Aperture
.......................................
53
D8
Histogram
....................................
60
*
D1 to D8 only appear when the display
is set to [Standard+Histogram] (p.88).
*
B1 to B6 only appear when the display is set to [Standard+Histogram] (p.41).
*
The screen images are examples to indicate the position of the icons.
Displaying “Bright Portions” and “Dark Portions”
(Standard + Histogram Display)
When the subject you are photographing has portions that are too bright, they are
displayed as a flashing red warning. If there are portions that are too dark, they are
displayed as a flashing yellow warning.
Monitor Indications
ISO400
ISO400
F2.7
F2.7
1/250
1/250
01/26/2007
01/26/2007
14:25
14:25
+1.0
+1.0
38
38
F2.7
1/250
14:25
+1.0
38
7
M
AUTO
PICT
01/26/2007
ISO400
A13
A14
A15
A1
A2
A3
A12
B1
B2
B4
B5
A11
A10
A9
A4
A5
A6
A7
A8
B6
B3
14:25
14:25
100-0038
100-0038
30
30
1/250
1/250
F2.7
F2.7
ISO400
ISO400
ISO400
14:25
100-0038
30
7
M
1/250
F2.7
01/26/2007
01/26/2007
01/26/2007
D1
C5
C7
D8
D2
D3
D4
D6
D5
D7
C6
C1
C2
C3
C4
C9
C8
C9