Pentax 19231 T30 Operating Manual - Page 65
Cont. Shooting, the Auto Bracket, Flash On + Red-eye.
 |
UPC - 027075126640
View all Pentax 19231 manuals
Add to My Manuals
Save this manual to your list of manuals |
Page 65 highlights
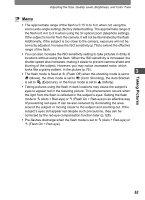
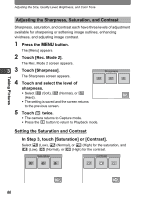
Adjusting the Size, Quality Level, Brightness, and Color Tone Memo • The approximate range of the flash is 0.15 m to 6 m when not using the zoom (wide-angle setting) (factory default setting. The approximate range of the flash is 0.4 m to 3 m when using the 3× optical zoom (telephoto setting)). If the subject is too far from the camera, it will not be illuminated by the flash. Additionally, if the subject is too close to the camera, exposure will not be correctly adjusted. Increase the ISO sensitivity (p.76) to extend the effective range of the flash. • You can also increase the ISO sensitivity setting to take pictures in dimly lit locations without using the flash. When the ISO sensitivity is increased, the shutter speed also increases, making it easier to prevent camera shake and blurring of the subject. However, you may notice increased noise, which looks like a grainy pattern, in the picture (p.76). • The flash mode is fixed at a (Flash Off) when the shooting mode is set to 3 C (Movie), the drive mode is set to 1 (Cont. Shooting), the Auto Bracket is set to l (Exposure), or the focus mode is set to s (Infinity). • Taking pictures using the flash in dark locations may cause the subject's eyes to appear red in the resulting picture. This phenomenon occurs when the light from the flash is reflected in the subject's eyes. Setting the flash mode to c (Auto + Red-eye) or d (Flash On + Red-eye) is an effective way of preventing red eyes. It can be also reduced by illuminating the area around the subject or moving closer to the subject and zooming out. If the subject's eyes still appear red despite such precautions, they can be corrected by the red-eye compensation function later (p.128). • Pre-flashes discharge when the flash mode is set to c (Auto + Red-eye) or d (Flash On + Red-eye). Taking Pictures 63
-
 1
1 -
2
-
3
-
4
-
5
-
6
-
7
-
8
-
9
-
10
-
11
-
12
-
13
-
14
-
15
-
16
-
17
-
18
-
19
-
20
-
21
-
22
-
23
-
24
-
25
-
26
-
27
-
28
-
29
-
30
-
31
-
32
-
33
-
34
-
35
-
36
-
37
-
38
-
39
-
40
-
41
-
42
-
43
-
44
-
45
-
46
-
47
-
48
-
49
-
50
-
51
-
52
-
53
-
54
-
55
-
56
-
57
-
58
-
59
-
 60
60 -
 61
61 -
 62
62 -
 63
63 -
 64
64 -
 65
65 -
 66
66 -
 67
67 -
 68
68 -
 69
69 -
 70
70 -
71
-
72
-
73
-
74
-
75
-
76
-
77
-
78
-
79
-
80
-
81
-
82
-
83
-
84
-
85
-
86
-
87
-
88
-
89
-
90
-
91
-
92
-
93
-
94
-
95
-
96
-
97
-
98
-
99
-
100
-
101
-
102
-
103
-
104
-
105
-
106
-
107
-
108
-
109
-
110
-
111
-
112
-
113
-
114
-
115
-
116
-
117
-
118
-
119
-
120
-
121
-
122
-
123
-
124
-
125
-
126
-
127
-
128
-
129
-
130
-
131
-
132
-
133
-
134
-
135
-
136
-
137
-
138
-
139
-
140
-
141
-
142
-
143
-
144
-
145
-
146
-
147
-
148
-
149
-
150
-
151
-
152
-
153
-
154
-
155
-
156
-
157
-
158
-
159
-
160
-
161
-
162
-
163
-
164
-
165
-
166
-
167
-
168
-
169
-
170
-
171
-
172
-
173
-
174
-
175
-
176
-
177
-
178
-
179
-
180
-
181
-
182
-
183
-
184
-
185
-
186
-
187
-
188
-
189
-
190
-
191
-
192
 |
 |
