Sony PMW200 User Manual (PMW-100 Memory Camcorder Operation Manual for Firmwar - Page 109
Nonlinear Editing, Recording External Input Signals, Set SDI/HDMI/i.LINK I/O Select
 |
View all Sony PMW200 manuals
Add to My Manuals
Save this manual to your list of manuals |
Page 109 highlights
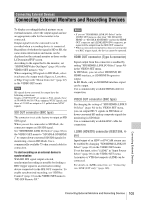
Nonlinear Editing When the camcorder is displaying thumbnails or in playback mode, you can transfer an HDV stream to a nonlinear editing system connected via the i.LINK (HDV/DV) connector. Notes • The i.LINK (HDV/DV) connector of this camcorder is a 4-pin connector. Check the number of pins of the i.LINK connector on your computer and use an appropriate i.LINK cable. • In searching pictures of this camcorder on the computer, it may take some time until the display is reflected on the computer. • If the playback clip is short or the playback starting point is near the end of the clip, the i.LINK signal may be interrupted between the clip and the next clip. When you try to capture such a signal using the nonlinear editing system, a malfunction may occur, depending on the nonlinear editing software in use. • If you specify a search speed other than 4, 15, or 24 times normal with the nonlinear editing system, no i.LINK signal is fed out. In such a case, the picture on the LCD monitor may stay frozen. • High-speed playback picture may not be displayed on the computer screen, depending on the nonlinear editing software in use. Setting on this camcorder Set "SDI/HDMI/i.LINK I/O Select" (page 90) in the VIDEO SET menu to "HDV" or "DVCAM." Recording External Input Signals The HDV stream input from a device connected via the i.LINK connector can be recorded on an SxS memory card in this camcorder. The timecodes superimposed on the i.LINK input are recorded regardless of the settings of the camcorder. Note DVCAM streams cannot be recorded. 1 Set the external signal to a format that can be recorded on the camcorder. Signals of 1440 × 1080/59.94i can be recorded when "Format" (page 99) is set to SP 1440/ 59.94i or SP 1440/23.98P, and signals of 1440 × 1080/50i can be recorded when set to SP 1440/ 50i. Recording is not allowed with other combinations of "Video Format" and input signals. 2 Set "SDI/HDMI/i.LINK I/O Select" (page 90) in the VIDEO SET menu to "HDV." 3 Set "Input Source Select" (page 90) in the VIDEO SET menu to "i.LINK." The input image is displayed on the LCD monitor/EVF screen and the monitor connected via the VIDEO OUT connector. The audio signal is output from the built-in speaker, headphones connected to the headphone connector, and the speaker of the monitor connected to the AUDIO OUT connector. 4 Press the REC START/STOP button (page 15) or the REC START button (page 17). Recording begins. Notes • An error is generated in the following cases. In such a case, cancel Recording mode by pressing the REC START/STOP button. -The video format of input signal does not match that specified on the camcorder. -A copy-protected stream is being fed in. • If the input to the camcorder becomes no signal during recording, the tally lamps and the i.LINK zREC status indication on the LCD monitor/EVF screen flash, indicating that no signal is being recorded on the SxS memory card. When an input signal is resumed, recording is restarted, incrementing the clip number on the memory card. Connecting External Devices Connecting via i.LINK (FAT only) 109
-
 1
1 -
2
-
3
-
4
-
5
-
6
-
7
-
8
-
9
-
10
-
11
-
12
-
13
-
14
-
15
-
16
-
17
-
18
-
19
-
20
-
21
-
22
-
23
-
24
-
25
-
26
-
27
-
28
-
29
-
30
-
31
-
32
-
33
-
34
-
35
-
36
-
37
-
38
-
39
-
40
-
41
-
42
-
43
-
44
-
45
-
46
-
47
-
48
-
49
-
50
-
51
-
52
-
53
-
54
-
55
-
56
-
57
-
58
-
59
-
60
-
61
-
62
-
63
-
64
-
65
-
66
-
67
-
68
-
69
-
70
-
71
-
72
-
73
-
74
-
75
-
76
-
77
-
78
-
79
-
80
-
81
-
82
-
83
-
84
-
85
-
86
-
87
-
88
-
89
-
90
-
91
-
92
-
93
-
94
-
95
-
96
-
97
-
98
-
99
-
100
-
101
-
102
-
103
-
 104
104 -
 105
105 -
 106
106 -
 107
107 -
 108
108 -
 109
109 -
 110
110 -
 111
111 -
 112
112 -
 113
113 -
 114
114 -
115
-
116
-
117
-
118
-
119
-
120
-
121
-
122
-
123
-
124
-
125
-
126
-
127
-
128
-
129
-
130
-
131
-
132
-
133
-
134
-
135
-
136
-
137
-
138
-
139
-
140
-
141
-
142
 |
 |
